Strider Posted July 18, 2017 Posted July 18, 2017 Guys, thanks for all the super nice comments I always ship my armor pre-trimmed since it's easy for me and it saves the guys some time because they don't have to check endless references as I had to do with my first armors. Only thing which I usually leave untrimmed is one piece of the knee armor for those guys who want both knees trimmed excactly the same down to the millimeter. Mickey, I'll try to get the remaining pieces done to send them together with Shaun's stuff. By way of announcement, I'm currently in talks with a maker from UK to do my biker scout armor. He's a great guy, very reliable and has a track record of 10+ years in the prop industry. What's more he has a professional vac forming machine and can hopefully bring out the edge in my molds (particularly thinking of the belt here). Just can't find the time to keep up with demand and it will be great to have a reliable source with short lead times. Hopefully looking to get the ball rolling in the next 2 months.... Cheers 9 Quote
Boba Leo Posted July 18, 2017 Posted July 18, 2017 Very Nice Build Michey and Great Armor Stirder!!!! Cheers!!! 1 Quote
ShaunPug Posted July 19, 2017 Posted July 19, 2017 I should be free that weekend! Sent from my LG-H830 using Tapatalk I'll be there from the 9th to the 16th I think. Sent from my SM-G935V using Tapatalk 1 Quote
BikerScout007 Posted July 19, 2017 Author Posted July 19, 2017 I'll be there from the 9th to the 16th I think. Sent from my SM-G935V using Tapatalk Sounds good, my dude! 1 Quote
ShaunPug Posted July 31, 2017 Posted July 31, 2017 I still haven't figured out what way I wanna trim my knees....I've seen it done two different ways. The scout reaching for his blaster on the speeder which I like and then the costuming book pics. I think I spent the most time on my knees. I mostly used the Bluray screengrabs and MotM exhibit photos as reference. Here's a link to my BluRay screencap gallery: http://imgur.com/a/s0NiX 6 Quote
Eyeslave Posted August 1, 2017 Posted August 1, 2017 I think I spent the most time on my knees. I mostly used the Bluray screengrabs and MotM exhibit photos as reference. Here's a link to my BluRay screencap gallery: http://imgur.com/a/s0NiX Thanks Shaun, I don't have a Blu-ray so these are fantastic. Quote
ShaunPug Posted August 1, 2017 Posted August 1, 2017 Thanks Shaun, I don't have a Blu-ray so these are fantastic. I'm glad they're helpful! Sent from my SM-G935V using Tapatalk Quote
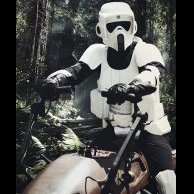
BikerScout007 Posted September 5, 2017 Author Posted September 5, 2017 Still waiting on my arm armor, but I really think the RS+Strider combo is the most screen accurate I've gotten so far 2 Quote
762s Posted September 5, 2017 Posted September 5, 2017 Still waiting on my arm armor, but I really think the RS+Strider combo is the most screen accurate I've gotten so far looks very good man .. awesome patiently waiting on the word from strider myself to have that the same settup 1 Quote
BikerScout007 Posted November 15, 2017 Author Posted November 15, 2017 Okay, I got the rest of my kit. It looks great: And here is a comparison with my old SC pieces. SC is on top, Strider on the bottom. Sorry I couldn't rotate it after uploading And my favorite improvement from SC, bigger knees! Strider on left, SC on right 4 Quote
BikerScout007 Posted November 15, 2017 Author Posted November 15, 2017 Oh and the shoulder bell comparison. Strider on top versus my heavily modified SC bell on bottom 1 Quote
BikerScout007 Posted November 15, 2017 Author Posted November 15, 2017 First thing up was the shoulder bells. I put thin elastic straps in the middle of the bell, mounted on zip tie anchors. The straps are supposed to stabilize the bell, not secure it to your arm. What holds the bell in place are the ziptie "t-straps". So I add this to the top of the bell, with about 1.5 inches of the zipties protruding past the bell Then on top of the connector, I put industrial velcro loop Then on the underside of the chest armor straps, I add the industrial velcro hook Once I connect the bell to the shoulder velcro, it holds very well! 1 Quote
BikerScout007 Posted November 15, 2017 Author Posted November 15, 2017 Strapping the armor was pretty easy. Strider cuts the slits for the elastic very thin so the slit itself holds the strap very well. All I did was add some hot glue on the inside to hold it down. Which is great because I didn't want to mess with velcro. And of course, I riveted the extra strap to the knee I made that top strap 11 inches, but your mileage may vary Here are all the pieces strapped up: 2 Quote
Strider Posted November 15, 2017 Posted November 15, 2017 Nice build, buddy - glad you like the other parts as well. Looking forward to seeing you fully geared up 2 Quote
BikerScout007 Posted November 15, 2017 Author Posted November 15, 2017 I'll be tackling that holster next! Then after that the TD 1 Quote
Griffin-X Posted November 16, 2017 Posted November 16, 2017 Looking good Mickey, love it. That Strider armor is the bomb diggity! Quote
BikerScout007 Posted November 16, 2017 Author Posted November 16, 2017 Looking good Mickey, love it. That Strider armor is the bomb diggity! It's by far the most screen accurate out there! Can't say enough good things about it. And I guess I'll have a SC kit for sale soon Quote
Shaolinscout Posted November 16, 2017 Posted November 16, 2017 Looks sik dude! Such a clean build, and the armor is the best I’ve seen fo sho😎ðŸ‘🻠1 Quote
BikerScout007 Posted December 7, 2017 Author Posted December 7, 2017 Here's me (on the left) all kitted up in my Strider gear, other than the holster which is still SC. This is a pretty good comparison photo too. The Scout on the right is wearing an MLC bucket and SC armor, so you can see the differences between my RS Props bucket and Strider armor Also, we are both 6 ft tall, and this pic serves as a good example that 7x6 pouches are too big. Mine are 6x5x2 5 Quote
Kosejonas Posted December 15, 2017 Posted December 15, 2017 Here's me (on the left) all kitted up in my Strider gear, other than the holster which is still SC. This is a pretty good comparison photo too. The Scout on the right is wearing an MLC bucket and SC armor, so you can see the differences between my RS Props bucket and Strider armor Also, we are both 6 ft tall, and this pic serves as a good example that 7x6 pouches are too big. Mine are 6x5x2 Are the dropboxes from the Strider kit smaller? They look great The entire thing looks great 1 Quote
BikerScout007 Posted December 15, 2017 Author Posted December 15, 2017 Are the dropboxes from the Strider kit smaller? They look great The entire thing looks great Yes they are. He really did a fantastic job Sent from my LG-H872 using Tapatalk 1 Quote
BikerScout007 Posted November 13, 2019 Author Posted November 13, 2019 Well it only took me about 2 and a half years, but I'm finally getting my Strider holster onto my new boots from @Chrisx909x First I had to make a connector piece from scrap ABS to join the holster frame to the backing piece. Used a heat gun to curve it. And gloves! Don't forget the gloves: I glued the piece to the holster frame with E6000: Then once dried, glued it to the holster backing piece: Before mounting to my boot, I took another scrap of ABS to make a reinforcing piece for the top of the holster to go inside my boot. Again with the heat gun to curve it: Then I riveted it onto my boot with 1/8 rivets and washers: From the inside of the boot, you can see the reinforcement bracket I made: 3 Quote
BikerScout007 Posted November 13, 2019 Author Posted November 13, 2019 Folks always ask what rivets I use, well here they are: 1 1 Quote
kacrut Posted November 14, 2019 Posted November 14, 2019 13 hours ago, BikerScout007 said: Folks always ask what rivets I use, well here they are: so, that's for Holster.. is the same size for the knee armor and back armor(tank)?.. Ooh and what size of the rivet washer?.. sorry for asking alot, i need to gathered the info and buy the correct size first time. Thank you. 1 Quote
Stroker Posted November 14, 2019 Posted November 14, 2019 9 hours ago, kacrut said: so, that's for Holster.. is the same size for the knee armor and back armor(tank)?.. Ooh and what size of the rivet washer?.. sorry for asking alot, i need to gathered the info and buy the correct size first time. Thank you. Yes it's the same. You'll need a 1/8 rivet washer. 1 Quote

Recommended Posts
Join the conversation
You can post now and register later. If you have an account, sign in now to post with your account.