jen0farc Posted June 12, 2017 Share Posted June 12, 2017 LOOK at this beautiful pile of materials!! I spent my vacation researching and devouring the boards and the moment I returned I headed out with my shopping list and think I bought everything I needed for the soft parts! I've sewed many costumes and am excited I'll be able to use my skills on so much of the biker outfit. I love going for the most accurate version of any costume component but right off the bat I've decided not to make the flight suit to Lancer standards. This was not an easy decision and I thought about it a LOT and the plain truth is: I'm a woman who drinks a ton of water and needs bathroom breaks. And if there is a way to build a costume that doesn't force me to take every single piece of armor off every time I need a rest stop? Then for practical purposes I need to build it that way. Hence, a 2-piece suit. C'est la vie. But I figure I'll Lancerize (nearly) every other component, so then down the line all I'll need to do is whip up a second suit for that approval if I decide I want it. And keep the 2-piece for longer troops, etc. So: here we go! I want to control and customize the fit of the suit so building it from scratch just made more sense and will frankly take way less time for me than trying to modify a man's coverall. I also liked getting to choose a slightly less heavy cotton blend bottomweight twill with a little bit of stretch for comfort. The pants are a simple 2-piece pants pattern with an elastic waist. I tapered the leg to keep the pants tight against my calf so it will stay in the boots. I drafted a riding patch pattern in muslin and pinned it to the pants. It wasn't easy to find a reference photo for the back of the patches so I'm not sure if I have it correct back there, or if it even matters since the riding flap will cover much of it. Any feedback on the patch before I cut the suede and sew it? 3 Quote Link to comment Share on other sites More sharing options...
Retrofire Posted June 12, 2017 Share Posted June 12, 2017 Looks like you are off to a great start Jen! Don't worry about about Lancer for The time being you need to build a suit that's comfortable to you. You can always work the rest of your armor to Lancer standards and save the flight suit for later. The front looks ok but the back looks a little high to me. The back will basically wrap around the thigh and not rise to the belt line. Your mupflap will cover this area so using additional suede here isn't necessary. Here's a link to one of more recent patterns that might help: http://forum.bikerscout.net/index.php?/topic/15973-New-Riding-Patch-Templates. Here's what my riding patches and flap look like on my suit. Hope this helps. 2 Quote Link to comment Share on other sites More sharing options...
jen0farc Posted June 12, 2017 Author Share Posted June 12, 2017 Thanks Peter! Haha actually I made an earlier draft and thought "mmm those patches don't come up high enough." So maybe my original was better? 2 Quote Link to comment Share on other sites More sharing options...
kayelbe Posted June 12, 2017 Share Posted June 12, 2017 I'm taking a guess that the larger crease is where the "cheek" ends, and that's where I would end the patch. It shouldn't really go up on your butt...thats what the butt flap is for, I reckon. 1 Quote Link to comment Share on other sites More sharing options...
BikerScout007 Posted June 12, 2017 Share Posted June 12, 2017 Yeah it seems to go up high in the front but not as high in the back 1 Quote Link to comment Share on other sites More sharing options...
jen0farc Posted June 13, 2017 Author Share Posted June 13, 2017 I'm taking a guess that the larger crease is where the "cheek" ends, and that's where I would end the patch. It shouldn't really go up on your butt...thats what the butt flap is for, I reckon. Kevin this is very helpful! I used this guide when I drafted my next rear patch, I also finished my flight suit top, I made it with some princess seams to give it a lady-friendly fit --- I figure you'll never see them underneath the armor anyway. Quote Link to comment Share on other sites More sharing options...
M.J Posted June 13, 2017 Share Posted June 13, 2017 Looking good Jen, love that your doing the two different under suits. I used Cotton based top and bottom, so they give a overall's look. Also very cool in Summer. Just be careful of your neck, it looks ribbed? 1 Quote Link to comment Share on other sites More sharing options...
Retrofire Posted June 14, 2017 Share Posted June 14, 2017 That looks much better. I'd lock that pattern in and go for it. Don't forget the 2" elastic around your thighs. It's best to get an idea of length while you are wearing it so it doesn't come out too loose. That gets sewn in under the suede so you want to make sure that's right before you commit to the seam. Keep up the great work! 1 Quote Link to comment Share on other sites More sharing options...
jen0farc Posted June 16, 2017 Author Share Posted June 16, 2017 Pattern locked in, I'm pretty happy with the result!: Thanks everyone for your kind comments. The neck of my flight suit top is the same fabric as the rest of it so maybe the appearance of ribbing is just a lighting trick? Next I made the cod and the mudflap. I'm pretty happy with how the cod turned out --- but on my 1st try it's looking to me like my mudflap is too big: both too wide and too long. It should be trimmed some, yes? Quote Link to comment Share on other sites More sharing options...
Griffin-X Posted June 16, 2017 Share Posted June 16, 2017 You're making some great progress, keep it up! 1 Quote Link to comment Share on other sites More sharing options...
M.J Posted June 18, 2017 Share Posted June 18, 2017 Jen dont you just love Camera's and the lighting. Looking good. And yes the flap is a tad big. At least you were smart to test it, I had made 3 sets of pants and released all flaps were too big so unpicked the lot! With the flap it stops short before going under the bum, when the elastic is pulled up to the cummberbun. 1 Quote Link to comment Share on other sites More sharing options...
jen0farc Posted June 19, 2017 Author Share Posted June 19, 2017 Thanks Jim! And yes Kelly, it's definitely tricky indoors to get great lighting, I should try more for some daylight photos. It's hard when I do most of my work at night! I agree about trimming the flap, but since I just checked my tracking number and saw that my armor arrives TOMORROW (yay!!!!) I figured I'd put the pants aside for a moment to knock out my vest so I'd have that ready to go so I can have everything I need to start fitting the armor. I followed the T-shirt tutorial and I think it turned out pretty well. It fits over my flight suit top but I took a photo over a blue shirt to make it more visible. The sleeves are just basted in place so if I have to shorten them to fit the armor I can. And in fact looking at these photos the sleeves are clearly bunching in the back and need to come in underneath the arms a bit for a better fit. How about the length, do they look about long enough? 1 Quote Link to comment Share on other sites More sharing options...
jen0farc Posted June 19, 2017 Author Share Posted June 19, 2017 OK question about the boot cuts. Every thread I've read mentions "cutting" them with an exacto knife. This is not working for me at all, and I've already driven the blade into my thumb once -- an experience I'd rather not repeat. I can't get the angle to make a shallow cut without risking further injury. These are the Texas Steers which everyone says has a soft sole. Can you Dremel them out? What is the safe and precise way to do this? 1 Quote Link to comment Share on other sites More sharing options...
Griffin-X Posted June 19, 2017 Share Posted June 19, 2017 I think the part that was missing was "which" blade type to use. The chisel blade works best when digging into that rubber sole material. A Dremel may work for you but will most likely heat up the rubber and make a mess. http://www.techni-to...CFQItaQodAkYC0Q 1 Quote Link to comment Share on other sites More sharing options...
jen0farc Posted June 19, 2017 Author Share Posted June 19, 2017 I think the part that was missing was "which" blade type to use. The chisel blade works best when digging into that rubber sole material. A Dremel may work for you but will most likely heat up the rubber and make a mess. http://www.techni-to...CFQItaQodAkYC0Q Ahhhh, got it. Yes this blade seems like just the thing! Thanks, Jim! 1 Quote Link to comment Share on other sites More sharing options...
Griffin-X Posted June 19, 2017 Share Posted June 19, 2017 Ahhhh, got it. Yes this blade seems like just the thing! Thanks, Jim! Yep, you can even heat it up a bit with a lighter and it'll slice right through the material. Just go slow and watch your fingers! 1 Quote Link to comment Share on other sites More sharing options...
BikerScout007 Posted June 19, 2017 Share Posted June 19, 2017 I got a hot knife at Michael's for 20 bucks. Cut through my sole like butter. But do it outside unless you dig burning rubber fumes! Sent from my LG-H830 using Tapatalk 2 Quote Link to comment Share on other sites More sharing options...
jen0farc Posted June 21, 2017 Author Share Posted June 21, 2017 So my armor came yesterday! Yay! My goal was really to finish up all the soft parts before starting any armor work but actually it arrived at a good time because it allowed me to get a good idea of how tall the cummerbund should be. I taped the chest and back armor together, made sure it was placed correctly up around my neck and marked the bottom, then measured the space between the bottom and my belly button and got a whopping seven inches. Yep, I'm a little short for a scout trooper. (Sorry I didn't take photos of this process since my hands were a little full holding armor and chalk) So I made my bund nine inches, and incorporated an idea I read about on another thread of integrating a hidden separating zipper to help line up the velcro every time --- necessary for someone like me who sometimes has a changing room all to myself and may not always have someone to help me get dressed. Working on finishing the pouches next and hope once it cools off a little tonight I'll get it all on and post a photo of all the soft parts together. Quote Link to comment Share on other sites More sharing options...
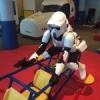
jen0farc Posted June 21, 2017 Author Share Posted June 21, 2017 Pouches done, happy with how they turned out, they need a pressing to make the corners a little sharper and of course some filler but I'm happy with them: And here everything is together. So I definitely see I have droopy cod for sure, it needs to come up about an inch and a half. I'd pinned it correctly on the pants but didn't correctly sew it in place. Will restitch tomorrow. The back looks just ok to me, I think it's how it's supposed to look? I'm just not a great fan of the appearance of velcro closures. I also trimmed the mudflap slightly, I think it's 1/4" off each side and 1/2" off the bottom. May be still too big? But I want to make sure I trim slowly. Armor is next! So definitely this is all a bit large on me, the belt and chest back armor aren't really curving close enough to my body. Am thinking of curving them slightly with a heat gun? Is that recommended for smaller people? I've read the only real trimming to do is on the shoulder bells, the rest of the kit shape-wise is what it is. This is my first armor so I'm nervous about proceeding with any modifications. It's not like fabric where if I mess up I can just cut another piece! Quote Link to comment Share on other sites More sharing options...
Bubonos Posted June 22, 2017 Share Posted June 22, 2017 The cummerbund looks a little too big on you. I have a small frame as well and commissioned a friend in my garrison to help make mine. She had to make adjustments to fit me away from the pattern we found in bns. Great start and the pouches do look great! Coming along nicely. Sent from my SAMSUNG-SM-J120A using Tapatalk 1 Quote Link to comment Share on other sites More sharing options...
jen0farc Posted June 22, 2017 Author Share Posted June 22, 2017 The cummerbund looks a little too big on you. I have a small frame as well and commissioned a friend in my garrison to help make mine. She had to make adjustments to fit me away from the pattern we found in bns. Great start and the pouches do look great! Coming along nicely. Sent from my SAMSUNG-SM-J120A using Tapatalk Thanks Jeremy, do you think the bund looks too big as in too tall? Or too loose? It's funny because I thought I made it corset-tight to help with lower back support but looking at the photos it definitely doesn't look as tight as it feels. But I'd rather things be big and I can take them in! Much harder to go the other way Quote Link to comment Share on other sites More sharing options...
Bubonos Posted June 22, 2017 Share Posted June 22, 2017 Too tall by a tad and the cod looks too wide. You maybe able to fix the sagging off the top with suspenders. I have bad sagging issues and suspenders fixed that. Sent from my SAMSUNG-SM-J120A using Tapatalk 1 Quote Link to comment Share on other sites More sharing options...
Griffin-X Posted June 22, 2017 Share Posted June 22, 2017 Pouches done, happy with how they turned out, they need a pressing to make the corners a little sharper and of course some filler but I'm happy with them: And here everything is together. So I definitely see I have droopy cod for sure, it needs to come up about an inch and a half. I'd pinned it correctly on the pants but didn't correctly sew it in place. Will restitch tomorrow. The back looks just ok to me, I think it's how it's supposed to look? I'm just not a great fan of the appearance of velcro closures. I also trimmed the mudflap slightly, I think it's 1/4" off each side and 1/2" off the bottom. May be still too big? But I want to make sure I trim slowly. Armor is next! So definitely this is all a bit large on me, the belt and chest back armor aren't really curving close enough to my body. Am thinking of curving them slightly with a heat gun? Is that recommended for smaller people? I've read the only real trimming to do is on the shoulder bells, the rest of the kit shape-wise is what it is. This is my first armor so I'm nervous about proceeding with any modifications. It's not like fabric where if I mess up I can just cut another piece! Great progress for sure! And, you have a kitty helper. That's awesome. 1 Quote Link to comment Share on other sites More sharing options...
Eyeslave Posted June 22, 2017 Share Posted June 22, 2017 The cod looks good in your first pic, so as you said in your recent fit, it needs to come up a bit & it will look better. Some members sew in a stiff material into the cod to keep the shape. Bund will sag if you use pouches ( for keys / phone etc. ) So suspenders / braces of velcro attached to undersuit will fix that. Armor does look a little big. Gently heating the shoulder bridges and curving the angle so it sits a bit higher will look better ( you'll need to cut off excess ). I hope that makes sense Remember to wear your vest for fittings as well. Soft parts are really the hardest part & your doing great. 2 Quote Link to comment Share on other sites More sharing options...
jen0farc Posted June 22, 2017 Author Share Posted June 22, 2017 The cod looks good in your first pic, so as you said in your recent fit, it needs to come up a bit & it will look better. Some members sew in a stiff material into the cod to keep the shape. Bund will sag if you use pouches ( for keys / phone etc. ) So suspenders / braces of velcro attached to undersuit will fix that. Armor does look a little big. Gently heating the shoulder bridges and curving the angle so it sits a bit higher will look better ( you'll need to cut off excess ). I hope that makes sense Remember to wear your vest for fittings as well. Soft parts are really the hardest part & your doing great. Thanks, great tips. Yes it seems like bringing up the shoulders and curving in the sides will make it look less like I'm a kid wearing my dad's armor. Any advice on heat molding the armor? I got my father-in-law's heat gun but it seems like it's industrial-strength and I'm a bit nervous about causing damage to my shiny new armor. I've read cautionary tales on whitearmor about using a heat gun and this is my first armor so I'm just cautious. I tried using my hairdryer to mold the forearm armor which was wayyyy too gigantic for my arms, but I didn't really seem to be getting anywhere with that. Quote Link to comment Share on other sites More sharing options...

Recommended Posts
Join the conversation
You can post now and register later. If you have an account, sign in now to post with your account.