Retrofire Posted July 6, 2017 Posted July 6, 2017 Great job. Boot height looks good to me. If you shorten the zip tie length on the shoulder bells that should fix that problem. I would suggest pushing down your chest & back armor a little. It looks like it's sitting high and the shoulder join looks like it's not sitting on you properly. That will help with the bells as well. Alan has a good point about the chest armor. Sometimes what happens is that the bund keeps the chest from dropping down on your shoulders. It looks like your bund is a bit bunched up in the back in the pic and that might be why your chest armor isn't sitting fully down on your shoulders. The way I don my chest armor is to put my vest on then my bund over it and then put my chest armor assembly over that. I leave one end unstrapped so I can get it over my vest and bund but I usually look to a fellow trooper to help make sure it's sitting right. You're starting to come down to fitment and it's looking good. Keep up the great work! 1 Quote
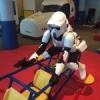
jen0farc Posted July 11, 2017 Author Posted July 11, 2017 Thanks everyone, great tips on getting dressed, I've actually printed out these tips to keep with my kit! A bunch of recent travel has slowed my build lately, but in a way was good because while at a convention I got to see some others' approved scout armors up close and I feel like I'm on the right track. So until I get more time next week to finish up the armor and build the helmet, here are some photos of my knee assembly. Nothing ground-breaking here, was just my 1st time using a rivet gun and was pretty pleased with the results! I used the Pandatrooper method, using scraps from my trimmed shoulder bells as shims and also using a backing washer. (I don't know about everyone else, but I couldn't find backing washers anywhere in any local store, I had to order them from Amazon.) I also used a leather punch to make a neat 3/16" hole in the elastic and dabbed the hole with some Fray Check before riveting it in place to help prevent the hole from unraveling/tearing down the line. Like I mentioned earlier this was the last of my 1/2" elastic but I've been able to buy more since then and will be finishing up the shoulder bell elastic next. 1 Quote
Griffin-X Posted July 11, 2017 Posted July 11, 2017 Great work Jen, you're doing a fantastic job! Keep it up. 1 Quote
jen0farc Posted July 19, 2017 Author Posted July 19, 2017 Okay, after a big run of travel, this is it: I am vowing to finish everything by the end of the week! First up, correcting the shoulder bells. Got all the materials I needed (the goo gone is to remove the adhesive from the zip tie mounts when I inevitably made a placing mistake. Happened): I cut some 1/2" elastic, sewed velcro on the ends, and adhered velcro to the bells. The zip tie mounts got clamped to ensure the adhesive took. I had one fly off so if the clamping doesn't work, out comes the E6000. My other issue aside from the lack of elastic, was that I couldn't get my zip ties to lay flat. When I had the zip ties make a big loop, I just wasn't liking the look of these weird pieces of plastic sticking up out of my shoulders. I read a lot of other people's methods and think I used a combination of ideas. Instead of looping the zip tie and have two lengths of plastic on my shoulder, I would just have the tie go straight so there was just one flat line on my shoulder. First I decided to sew some velcro on to the underside of my elastic loops. Then I cut my zip ties short and placed a silver of industrial-strength velcro on the smooth side. So all I need to do to wear the bells is slip the flat zip tie underneath the elastic loop to grip it in place. Much better! Absolutely everything is done now except the helmet. Time to get started on it. I also never posted about finishing my boots but I'll make sure I get to that too. 1 Quote
Griffin-X Posted July 19, 2017 Posted July 19, 2017 Okay, after a big run of travel, this is it: I am vowing to finish everything by the end of the week! First up, correcting the shoulder bells. Got all the materials I needed (the goo gone is to remove the adhesive from the zip tie mounts when I inevitably made a placing mistake. Happened): I cut some 1/2" elastic, sewed velcro on the ends, and adhered velcro to the bells. The zip tie mounts got clamped to ensure the adhesive took. I had one fly off so if the clamping doesn't work, out comes the E6000. My other issue aside from the lack of elastic, was that I couldn't get my zip ties to lay flat. I just wasn't liking the look of these weird pieces of plastic sticking up out of my shoulders. I read a lot of other people's methods and think I used a combination of ideas. I decided to sew some velcro on to the underside of my elastic loops. Then I cut my zip ties short and placed a silver of industrial-strength velcro on the smooth side. So all I need to do to wear the bells is slip the flat zip tie underneath the elastic loop to grip it in place. Much better! Absolutely everything is done now except the helmet. Time to get started on it. I also never posted about finishing my boots but I'll make sure I get to that too. Most impressive Jen! You are in the home stretch now. 1 Quote
Chopper Posted July 19, 2017 Posted July 19, 2017 That's pretty much what I did to attach my shoulder zip ties as well, except I used Devcon instead of E6000. Nice work. 1 Quote
jen0farc Posted July 20, 2017 Author Posted July 20, 2017 Helmet! Let's do this. So at first I had the idea to not mess with paint, and instead use a permanent sign marker to color the snout. I figured it would draw a clean line and there would be zero dry time. However the enormous down side is that there is also ZERO margin of error. Your hand slips or the cat jumps on you while you're drawing and any little mistake is uncorrectable. The idea was just too risky so I went with the tried and true tape-and-Testors paint way. Which turned out to be a good thing because I had layered pin striping tape, and then painters tape on top just for added protection, and I realized about a half hour after I painted that the paint bled underneath small gaps in the pin striping tape! So I quickly pulled off the tape and the paint was no longer wet but still gummy, so I was able to use my thumbnail to redraw the line and gently scrape away the bled paint. Thank God for high humidity! Obviously I also cut the eye hole and have the visor clips glued and clamped. Earholes are also cut, I have some gaffe tape inside but will put more in once it's all done and I can see where it's necessary. Dome and back are just taped in place for now. Elevator bolts are scuffed and painted and waiting to dry. This wasn't so bad! Maybe because I had read and read and read so I knew what to do. Time to just do it. But here's my question, where the heck does the chin cup go? Maybe because of photobucketgeddon I can't see examples when I search but I'm a bit stumped as to what to do with this thing. Does it really just hang from elastic attached to the elevator bolts? And how does the elastic attach to the chin cup? Velcro? Glue? The Force? Quote
Eyeslave Posted July 20, 2017 Posted July 20, 2017 Good job on the bells Chin cup is attached to the sides of the lid. Elastic is feed through bottom, up along sides and inside. I will try and post a pic later to illustrate. 1 Quote
jen0farc Posted July 20, 2017 Author Posted July 20, 2017 Good job on the bells Chin cup is attached to the sides of the lid. Elastic is feed through bottom, up along sides and inside. I will try and post a pic later to illustrate. Ahh, I think I got it. So you're saying you make cuts in the chin cup and thread the elastic through? Sort of like how this hard hat chin cup looks? Mine didn't have slots so I was sort of confused. This makes more sense, thank you! Honestly I'm a little torn on this part. This will be my first bucket and I feel like there's already a lot going on in the face and neck area (tab collar, balaclava, probably eventually a microphone, etc) so to have one more piece on my face ... especially in the current heat of summer ... I'm just not so sure about it. Since it's optional I may hold off for now, see how I do after a couple of troops. I can always screw it in later. Quote
Chopper Posted July 20, 2017 Posted July 20, 2017 You can put a loop on the end of the elastic and thread it onto the hard hat liner (if you're using one). Alternatively, you could poke a small hole in the elastic ends and attach it onto the visor bolt assembly. 1 Quote
Eyeslave Posted July 20, 2017 Posted July 20, 2017 Yes, elastic through chin cup similar to your pic. It should be quite easy to make the slots with a dremmel & then it's just a case of feeding through the elastic. I just folded over the elastic at the ends and sewed . I'm not sure it's required for basic Clearance but it's a nice feature . 1 Quote
Griffin-X Posted July 20, 2017 Posted July 20, 2017 The chin cup is optional for basic or Lancer. I personally don't use one as it rattles the helmet inside when I talk. 2 Quote
Bubonos Posted July 20, 2017 Posted July 20, 2017 I went w/o the cup and just have a thick piece of black elastic. I stitched on some Velcro to the elastic and stuck in Velcro to the bucket. Fits more comfortably than the cup. Sent from my SAMSUNG-SM-J120A using Tapatalk 2 Quote
Griffin-X Posted July 21, 2017 Posted July 21, 2017 Honestly, the hard hat liner works perfect for me. No wiggle or wobble. 2 Quote
Bubonos Posted July 21, 2017 Posted July 21, 2017 I used the pads SC included in the kit. No wobble, just slides forward on my head. Chin strap stopped that. Sent from my SAMSUNG-SM-J120A using Tapatalk 1 Quote
jen0farc Posted July 21, 2017 Author Posted July 21, 2017 I used the pads SC included in the kit. No wobble, just slides forward on my head. Chin strap stopped that. Sent from my SAMSUNG-SM-J120A using Tapatalk I emailed Jeff and apparently his pad source dried up so he no longer includes pads with the kit. I think I'll try the hard hat liner/elastic route once everything's together. Thanks all for the tips, I hadn't thought it through to realize the chin cup is actually necessary to keep the bucket stable, I figured it was just maybe a decorative thing. Thanks again for all the great ideas. The one thing I'm learning sewing costumes has over building armor is that with sewing, you don't have these days where you're at a standstill because you're waiting for glue and paint to dry. So I used my "drying evening" to make a bag for my bucket. These are some Tie Fighter twin sheets I found on sale at Target months ago for like $8. What's that, less than $1 a yard for a SW print? Tons of fabric to play with! And this is the bag I made tonight. I sort of rushed it near the end because I was getting sleepy so it's not perfect and I think the sheets make a better lining fabric than an exterior but it'll do the job. Maybe all the purple is pretty girly but I figure my case will be unique in the changing rooms. I made the straps extra long so I could sling it over my shoulder in case I needed my hands free. They may be too long, I'll have to see how it works out. The quilted lining helps give it some shape and I included a pocket for trading cards, microphone, etc. Can't wait to finish everything tomorrow! 1 Quote
Griffin-X Posted July 21, 2017 Posted July 21, 2017 That's a really cool bag! Can you make me one?! 1 Quote
jen0farc Posted July 21, 2017 Author Posted July 21, 2017 That's a really cool bag! Can you make me one?! Haha! I'm glad you like it! I think the photo hides some shortcomings of the patterning and workmanship --- it's not terrible for the first bag I've ever made but not something I'd be exactly proud to send to the detachment XO. I'm sure you've seen the bags Walter on the 501st.com boards sells, which I think are pretty astonishing for the price. Jealous of some of his details, I wish my machine did embroidery for my TKID! That said, if you were to somehow track down a set of those discontinued Return of the Jedi Pottery Barn sheets (Bikers on them!) I might be willing to discuss a trade ... 1 Quote
jen0farc Posted July 22, 2017 Author Posted July 22, 2017 Okay, this is it: Black paint on the snout dried so I got the snout greebie gluing I decided to hot glue some black fabric on the edges of the lens clips to prevent them from scratching up the lens. Gaffe-taped my helmet liner in for now, will velcro it in place once I'm satisfied with the placement. The drilling and matching of the side holes was a nerve-wracking and minor-error-filled process that I didn't document in photographs but it all worked out in the end and after screwing the bolts in, all of a sudden I have a completed bucket: Then a few decals and a steady hand --- --- and look, I'm a biker! I have to touch up the paint on one of the elevator bolts which got a bit too scuffed up as I was screwing it in, but other than that I think I'm ready to put it all on and take some photos? Unless I'm missing something? 2 Quote
Griffin-X Posted July 22, 2017 Posted July 22, 2017 Wow, you are a natural scout! Awesome work all around Jen, well done. 1 Quote
Eyeslave Posted July 22, 2017 Posted July 22, 2017 Awesome job. To nitpick a little, I would suggest to tidy up the lines on the eyes and ear holes with some sandpaper. But amazing job all round. That full suit pic is perfect. 2 Quote
jen0farc Posted July 22, 2017 Author Posted July 22, 2017 Awesome job. To nitpick a little, I would suggest to tidy up the lines on the eyes and ear holes with some sandpaper. But amazing job all round. That full suit pic is perfect. Oooh Alan you are right, that photo really made me realize how much smoother my lines could be, thanks! And thanks, Jim! Excited to be at the finish line! 1 Quote
jen0farc Posted July 28, 2017 Author Posted July 28, 2017 Oh hey, look who's officially an approved Biker Scout! This build wouldn't have happened without all the help from everyone who chimed in on this build thread. I've built a few costumes but this is really the first complete build thread I've ever done and the help and support I received was just amazing and really kept me going. Thank you SO MUCH to: Peter with his great tips and reference on how my riding patches should be shaped, for tips on heat-molding my armor and for his perfect advice on in what order everything should go on; Kevin for helping me figure out the back; Mia for her kind words; Mickey for helping with both the patch placement and for great tips on my sole cuts; Jeremy for his tips on the cod and cummerbund, shoulder bell trimming, attaching the chin cup, padding the helmet, and for reminding me about the gray square on the chest armor (almost missed that!); Alan for his helpful tips on shaping the armor, zip-tie length; chin cup, reminding me to smooth out my helmet ear and eyeholes, and how to put it all on in the right order so it looks right; Kelly for her fantastic game-changing tip on using boiling water to heat-mold armor; Joe for his tips on trimming the shoulder bells; Corey for his tip on gluing the zip ties to the shoulder bells; and most of all Jim for weighing in on everything from the right tools for the boot cuts (still need to perfect those) to correcting how the cummerbund should close to providing invaluable reference images for painting the snout greeblie, to his tip on the hard hat liner, to his constant encouragement and being a wonderful cheerleader as my build progressed. Thank you all, I'm super proud to be a Pathfinder, this is a great detachment! And I finally opened up the envelope with the decal I ordered --- I said I wasn't going to open it until I was official, now I can put it on my armor case! (The cat stays at home) 5 Quote

Recommended Posts
Join the conversation
You can post now and register later. If you have an account, sign in now to post with your account.