Eyeslave Posted June 22, 2017 Posted June 22, 2017 I used a heat gun on my TK, but obviously take it slow and start off from a distant until you get it right. Use gun on the inside of the armor so you don't damage the finish on the outside. It shouldn't damage the inside either once you get the distance & heat right. Use gloves of course, and when bending try not to touch the outside of the armor if possible ( prints , marks etc. ) . Maybe mark on the inside where you want the curve to start so you get an even look. Hope that helps You can also ask local Garrison members who may have done this before and are willing to help. 3 Quote
Retrofire Posted June 22, 2017 Posted June 22, 2017 If you have any scrap that would be a good way to test your technique. Don't hold it too close and make a few passes at a time and test if it has softened enough. For your biceps I would recommend making a few passes then gently squeezing the ends together where the strapping will go. Go a little at a time heat squeeze a bit then let it cool check for fit and repeat if necessary. You can do this! Sent from my VS985 4G using Tapatalk 2 Quote
M.J Posted June 23, 2017 Posted June 23, 2017 Jen if your concerned about over heating it, use hot water. I boiled up a large pot and stuck the parts in. I have seen quite a few melt their plastic. Cummberbun looks good. With the Cod piece I use buckrim giving it a less camel toe, I agree, you may need to bring it up to see the arch better. Make sure the Bun is nice fit so no wrinkles, my youngest got picked on that one.. I've placed straps over the shoulders so mine doesn't flop down. I can't see, the pocket flap is it larger than the pouch? I hope that makes sense. 2 Quote
Chopper Posted June 23, 2017 Posted June 23, 2017 I used volara foam inside my cod. Works pretty well. 1 Quote
jen0farc Posted June 28, 2017 Author Posted June 28, 2017 Thanks everyone for the tips! Yes definitely going to try the boiling water technique to start. Slowly Dremeling the holes for the TD I saw how quickly the ABS can soften and melt so I think I'll begin trying to shape the armor with a gentler method. But first I fixed the cod and bund, think it looks better: (ignore my right pouch, I pulled the closure too far down which makes it incorrectly look like the flap is too long.) I realized as I was finishing up a delicious graham cracker snack that the box was exactly the width I'd need to fill out the boxes, and exactly twice as deep. So I cut it in half and trimmed the length to fit, so far it works great. I started building the belt and want to see if my dropbox placement is about right before I stitch and glue everything in place. Does it look about right? I tried to go by the distance from the belt and box in the Star Wars Costumes book: Quote
Griffin-X Posted June 28, 2017 Posted June 28, 2017 Looking pretty good Jen! For the bund, the closure in the back is "right-over-left" not "left-over-right". I hope that makes sense. The drop box placement and belt look just about right for you. I think the height of the boxes will be one of the last little tweaks you'll make towards the end. 1 Quote
jen0farc Posted June 28, 2017 Author Posted June 28, 2017 Looking pretty good Jen! For the bund, the closure in the back is "right-over-left" not "left-over-right". I hope that makes sense. The drop box placement and belt look just about right for you. I think the height of the boxes will be one of the last little tweaks you'll make towards the end. GAAAAH!!! I can't believe I never learn! Being left handed I've made this initial mistake on so many costumes. Pants closures, holster closures, basically almost anything that goes around my waist, my brain just flips the image and my hands want to craft it the other way. Luckily, for this garment it's an easy fix. Thanks for catching, Jim! 1 Quote
jen0farc Posted June 29, 2017 Author Posted June 29, 2017 Today I tackled the second-most daunting part of the armor build, the front and back. The boiling water method definitely was the method for me. I used a tall stockpot and just dipped the parts I wanted to shape for a few seconds, pulled them out, gave them a gentle bend while wearing an oven mitt, then when happy, I hit it with the cold water sprayer. Couldn't have been easier. Shoulders before: Shoulders after: I also shaped the sides slightly and suddenly the armor looks like it could fit me! On to the single most daunting part of the armor build: Trimming the shoulder bells. Luckily the boiling water was a great start to first getting them to seem like they would fit my arms. The before and after is more dramatic here: And now here's everything together. I'm not sure if I'm wearing the bicep armor correctly --- in fact definitely I didn't put them up high enough, I'm sure. Any advice on how much I should trim would definitely be appreciated! Trimming makes me nervous! Quote
Chunk Posted June 29, 2017 Posted June 29, 2017 You need to take off min 1 inch off the bottom of the shoulder bells. I had to remove 1" off my wife's bells. What you can do is buy 1/2" masking tape. Put the tape even with the bottom of the bell. Draw a line with a pencil. Leave the tape and now draw a line 1/4" above that & finalky another line 1/4" above the "middle" line. Pull the tape off & cut at the bottom line. This will be 1/2" off try on, if still too long cut at the next line, Repeat if necessary. My wife is 5'7 & i took an inch off hers. 4 Quote
Bubonos Posted June 29, 2017 Posted June 29, 2017 The cod looks much better and great idea on the pouches, I lined mine with cardboard from a couple six inch black series scouts. Figured it was only fitting. I would take a half inch to an inch off the bells, they are a tad big on you. But really, all and all, it's looking great. Keep up the good work and updates and approval will be a breeze. Sent from my SAMSUNG-SM-J120A using Tapatalk 1 Quote
miamuerta Posted June 29, 2017 Posted June 29, 2017 Looks so awesome, Jen! I'm thinking of doing a two-piece flight suit myself. What kind of pattern did you use for the top? 1 Quote
Griffin-X Posted June 29, 2017 Posted June 29, 2017 Great work Jen! As mentioned above, just need to trim and round the shoulder bell parts. If you don't already have them, pick up a pair of Lexan scissors. You can use a 'quarter' as a template to round the lower corners, too. https://www.amazon.com/Integy-Hobby-C23053-Curved-Scissors/dp/B00QYZOS7G 1 Quote
Eyeslave Posted June 29, 2017 Posted June 29, 2017 Nice job with the boiling water. Fit looks good. As others have said, trimming the bottom of the shoulder bells will look better. The SC ones are a bit long anyway. 2 Quote
Bubonos Posted June 29, 2017 Posted June 29, 2017 As far as trimming, to fit your size you may need some more outside the shoulders here and there, but Jeff does a great job that all I really needed to do with my SC kit was sand the edges smooth and round. I am lanky as well as scrawny so my bells were actually perfect for my ape arms, but I have seen that with shorter people, they look huge. A female scout I troop with had this problem as well. Half inch is what she and her husband too off and they were perfect. Sent from my SAMSUNG-SM-J120A using Tapatalk 2 Quote
jen0farc Posted June 30, 2017 Author Posted June 30, 2017 You need to take off min 1 inch off the bottom of the shoulder bells. I would take a half inch to an inch off the bells, they are a tad big on you. Looks so awesome, Jen! I'm thinking of doing a two-piece flight suit myself. What kind of pattern did you use for the top? If you don't already have them, pick up a pair of Lexan scissors. You can use a 'quarter' as a template to round the lower corners, too. As others have said, trimming the bottom of the shoulder bells will look better. The SC ones are a bit long anyway. A female scout I troop with had this problem as well. Half inch is what she and her husband too off and they were perfect. Thanks everyone! I ordered the scissors well before my armor came and am going to start with a half-inch cut first and see how it looks. Will post my results Mia I just used basic sportswear slopers that I've adjusted over the years to fit me the way I like. If you want to use a commercial pattern I would imagine you could modify a simple yoga pants pattern to get an elastic waist pant, and then for the top you could use probably any blouse pattern, modify the collar and put in a lapped zipper instead of buttons. (here's a pretty good lapped zipper tutorial: ) My favorite thing about the 2-piece is that the top just becomes this casual jacket when I unzip it. I'm thinking of putting a patch on the chest (making sure its hidden by the armor of course) so it can be an off-duty garment as well! EDIT: Actually Mia I was browsing around patterns and view C in this one is sort of close-ish to mine, except in the line art I don't see any bust darts which obviously would compromise the fit considerably. https://butterick.mccall.com/b3345 2 Quote
jen0farc Posted June 30, 2017 Author Posted June 30, 2017 Got the tools I needed --- Marked 1/2" but I think my cut along with sanding the edge brought me to 5/8." here's one trimmed and one untrimmed: Wearing both, trimmed is on my left Not sure if I need to come up any more? I also finished my TD, I read on other threads how the SC tubing is too light so I covered mine in gray primer before I assembled it. I also think the snout greebie needs to be painted gray? Here it is next to my Dremel. To me, that is 100% black. If I don't paint it gray, it won't stand out against the black snout correct? 1 Quote
miamuerta Posted June 30, 2017 Posted June 30, 2017 Mia I just used basic sportswear slopers that I've adjusted over the years to fit me the way I like. If you want to use a commercial pattern I would imagine you could modify a simple yoga pants pattern to get an elastic waist pant, and then for the top you could use probably any blouse pattern, modify the collar and put in a lapped zipper instead of buttons. (here's a pretty good lapped zipper tutorial: ) My favorite thing about the 2-piece is that the top just becomes this casual jacket when I unzip it. I'm thinking of putting a patch on the chest (making sure its hidden by the armor of course) so it can be an off-duty garment as well! EDIT: Actually Mia I was browsing around patterns and view C in this one is sort of close-ish to mine, except in the line art I don't see any bust darts which obviously would compromise the fit considerably. https://butterick.mccall.com/b3345 Wow, Jen! Thanks so much for the tips and those great links. I really appreciate it! Looking forward to seeing your finished gear! 1 Quote
Griffin-X Posted June 30, 2017 Posted June 30, 2017 Got the tools I needed --- Marked 1/2" but I think my cut along with sanding the edge brought me to 5/8." here's one trimmed and one untrimmed: Wearing both, trimmed is on my left Not sure if I need to come up any more? I also finished my TD, I read on other threads how the SC tubing is too light so I covered mine in gray primer before I assembled it. I also think the snout greebie needs to be painted gray? Here it is next to my Dremel. To me, that is 100% black. If I don't paint it gray, it won't stand out against the black snout correct? Yep, I'd take off another .75" from the shoulder bells. But the rounding looks marvelous! The snout plate and "engine" part should be gray and the faucet aerator should be black. 1 Quote
jen0farc Posted June 30, 2017 Author Posted June 30, 2017 Yep, I'd take off another .75" from the shoulder bells. But the rounding looks marvelous! The snout plate and "engine" part should be gray and the faucet aerator should be black. Thanks! Another .75: sounds terrifying but I'll give it a go. And that clarification re: snout colors and photo is very helpful! My question is, what about the round-y part that holds the aerator? Can't 100% tell from the reference shots and just want to 2x check. Is that black or gray? Quote
Griffin-X Posted June 30, 2017 Posted June 30, 2017 Thanks! Another .75: sounds terrifying but I'll give it a go. And that clarification re: snout colors and photo is very helpful! My question is, what about the round-y part that holds the aerator? Can't 100% tell from the reference shots and just want to 2x check. Is that black or gray? For the bells, you could do .5" first and see how it looks. IMO, I think .75" or 3/4" will look better for your size. The faucet aerator is ALL black. 1 Quote
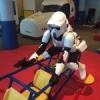
jen0farc Posted July 4, 2017 Author Posted July 4, 2017 Ok here is everything all together --- shoulders trimmed and cummerbund closure flipped. I had a bit of a tough time dressing myself the first time (I imagine it gets easier with practice?) so I see in these photos I have some "wearing it wrong" issues: My right shoulder bell has flown away and my left bicep armor is sliding down, and I didn't tuck in my cummerbund correctly under my back armor. But other than adjustments in how I'm wearing it, anything structural anyone sees to fix? Maybe my boot tops need to be hemmed 3/4"? I hadn't hemmed them yet, ... wanted to see how they looked with the knee armor first. Quote
Eyeslave Posted July 4, 2017 Posted July 4, 2017 Great job. Boot height looks good to me. If you shorten the zip tie length on the shoulder bells that should fix that problem. I would suggest pushing down your chest & back armor a little. It looks like it's sitting high and the shoulder join looks like it's not sitting on you properly. That will help with the bells as well. 1 Quote
Griffin-X Posted July 4, 2017 Posted July 4, 2017 Great work Jen, and awesome advice from Alan too. Usually at events there are "handlers". They could be troops out of costume and/or friends and family who have signed up to help. Handlers assist troopers in getting suited up for an event and help keeps all the parts and pieces in-tact. Kids like to grab blasters and TDs, etc. 1 Quote
jen0farc Posted July 4, 2017 Author Posted July 4, 2017 Thanks Jim and Alan, great tips as usual. I'm near to the end and your help along the way has been so great, thank you so much. I think also putting things on in the correct order will probably help too. If I put my chest/back on sooner, it will be placed correctly and everything else will follow naturally. I put it on after the belt and pouches and I think it would be better if I reverse that. I also realized in both the SC instructions and most of the build threads I've read, I totally missed how to do bicep armor elastic --- so mine doesn't have any! Yikes, that was kind of an obvious miss! Elastic will definitely help loads keeping the bells in place. The SC kit doesn't come with 1/2" black elastic though it's in the CRL for Lancer. I used the last of my black 1/2" in my stash on the knees and can't get to the store until next week so for now I think I'll use gaffe tape and some 1/4" I can cannibalize from some airline-issued sleep masks to help figure out where it should go. How do people normally attach shoulder bell elastic? Glue? Velcro? Quote
Bubonos Posted July 5, 2017 Posted July 5, 2017 Looking good trooper. Other than what was mentioned, maybe twist the arm pads in line with the bicep pads. Looks like the rectangle on the lower chest needs the decal or grey paint. And like mentioned handlers/wranglers are usually around to help straighten out odds and ends. Keep up the good work!!! Sent from my SAMSUNG-SM-J120A using Tapatalk 1 Quote

Recommended Posts
Join the conversation
You can post now and register later. If you have an account, sign in now to post with your account.