ShaunPug Posted February 23, 2017 Share Posted February 23, 2017 After my first Scout was completed I knew I couldn't leave it be. I trooped many times in it, but in my heart I knew so many things weren't accurate and my accuracy OCD reached dangerous levels of instability! lol. So after a year and a TK build I've returned to my first Star Wars love. I wasn't about to skimp out on this build however. The initial push came when I actually received an update about my incoming RS helmet, which got the juices flowing. The ultimate purpose for this build is to be used in a short film that I am writing and producing starring this armor. More details to follow on that... I've already made significant progress on this build so I'll be posting mostly showoff pictures. There aren't going to be too many "How-to's" for this build either so it's mostly just to track progress. I may do a weathering video tutorial if enough people think they'd like it, but other than that it's your basic build! A big thanks to Constantin for an early set of his armor, and a great many tips, as well as Gino for his feedback. And last but not least, a huge shoutout to Mickey for being constantly available and a damn big help. Onward! http://vid20.photobu...%20Unboxing.mp4 3 Quote Link to comment Share on other sites More sharing options...
haribon72 Posted February 24, 2017 Share Posted February 24, 2017 And subscribed! 1 Quote Link to comment Share on other sites More sharing options...
ShaunPug Posted February 24, 2017 Author Share Posted February 24, 2017 Here is the armor untrimmed. The pieces are so good. The belt, in my opinion, is the main attraction. The "V" detail is spot on, and the belt is made the same way as the originals. A very complicated pull from what I hear. 3 Quote Link to comment Share on other sites More sharing options...
ShaunPug Posted February 24, 2017 Author Share Posted February 24, 2017 Some pics of untrimmed areas... The armor was very easy to trim with Lexan scissors. I made sure to cross-reference every tiny cut I made. There are a lot of curves and soft edges on this costume, and it can be tricky if you're not studied up. I don't have many pics of the actual assembly of a lot of the pieces, but I do have finished pictures. Here is how I attached the tank....I've posted this already a few times on other threads. Quote Link to comment Share on other sites More sharing options...
ShaunPug Posted February 24, 2017 Author Share Posted February 24, 2017 Here are some pics of my zip tie connection: The zip tie is removable on both sides this way. Sent from my SM-G935V using Tapatalk 2 Quote Link to comment Share on other sites More sharing options...
ShaunPug Posted February 24, 2017 Author Share Posted February 24, 2017 I won't show any of the research on this thread for the TD, but I went through 6 or so different tunes and several cables before I landed on the right thing. With that figured out it was just a matter of finding a good paint color. I ended up using Tamiya's "Buff", mixed with White and a touch of light grey. The color looks weird in these photos, but I'll post better photos of what it look like in a later post. You'll also notice my TD clips (which need to be repainted btw.)...I took Tape measure clips, which are spring steel I believe, and cut them with my dremel to match the recent photos we have of them. They measure the same as the screen used photo we have and they hold well on the belt. A really great placeholder until something better is found. The clips are riveted to the TD tube with a washer on the inside. Sent from my SM-G935V using Tapatalk 1 Quote Link to comment Share on other sites More sharing options...
ShaunPug Posted February 24, 2017 Author Share Posted February 24, 2017 I purchased this from Amazon for the tank striping: It was incredibly simple to install. I drew on the armor with a dry-erase marker for the placement first. I ended up having to trim the thin vinyl a bit more because it was a tad too thick based on reference photos. I went with 4 wide stripes rather than the six that can also be done. Sent from my SM-G935V using Tapatalk 1 Quote Link to comment Share on other sites More sharing options...
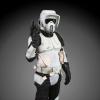
ShaunPug Posted February 24, 2017 Author Share Posted February 24, 2017 Now that the armor was all built, it was time to weather it all! I was pretty nervous to do it, but was confident that I could replicate the weathering style of the films. You can tell from reference photos that they used a combination of airbrush and rattlecan sprays. The rattle can stuff is just for bigger droplets. I have an Iwata HP-CS airbrush that I use for scale modeling, and it worked like a dream for this. The paint I used is actually a scale model primer by Badger: https://www.amazon.c...words=stynylrez It's a very forgiving primer and goes on incredibly smoothly with an airbrush. I used the Blu-ray images and the costumes book (the same set of armor based on the weathering patterns....I assume the costumes book photos were taken long ago, and the blu-ray photos were more recent.) for reference. My process was simple... 1) Spray from 4 or so feet away barely letting any paint out. I tried to get the "shapes" of the weathering at this stage, and gradually built up paint where it needed to be darker. 2) Smudge....I simply smudged with either a baby-wipe (I had plenty on hand with a 1yr old!) or my thumb. This creates a very cool texture, and fills in any blemishes in your armor with faint black pigment. 3) scratch! I used my fingernails for this! I was deliberate but random. I wanted it to look natural 4) Sprayed more primer from 6 or so feet away for a blanket covering 5) Rattle can effects. Both black and grey. See the last few posts for the completed costume/weathering 1 Quote Link to comment Share on other sites More sharing options...
cheesewhoopy Posted February 24, 2017 Share Posted February 24, 2017 Wow man that weathering is beautiful. If I can make mine look half as good as that I'll be happy Sent from my iPhone using Tapatalk Quote Link to comment Share on other sites More sharing options...
ShaunPug Posted February 24, 2017 Author Share Posted February 24, 2017 Wow man that weathering is beautiful. If I can make mine look half as good as that I'll be happy Sent from my iPhone using Tapatalk You can! I'm a firm believer in being able to accomplish pretty much anything if you research enough. Give it a shot! Sent from my SM-G935V using Tapatalk Quote Link to comment Share on other sites More sharing options...
Strider Posted February 24, 2017 Share Posted February 24, 2017 Looks great, buddy - can't wait to see you all suited up! 1 Quote Link to comment Share on other sites More sharing options...
ShaunPug Posted February 24, 2017 Author Share Posted February 24, 2017 I'm waiting on a new cod and pouches currently, but I wanted to share with you all the difficulty of taking selfies while wearing armor. Sent from my SM-G935V using Tapatalk 2 Quote Link to comment Share on other sites More sharing options...
K@nne Posted February 24, 2017 Share Posted February 24, 2017 Awesome mate, I like the weathering. Can´t wait to have finish my armor. Should be ready in March to take the first pictures 1 Quote Link to comment Share on other sites More sharing options...
BeastlyKirby Posted February 24, 2017 Share Posted February 24, 2017 That's awesome. Good job Sent from my SM-N910V using Tapatalk Quote Link to comment Share on other sites More sharing options...
Bobik96 Posted February 24, 2017 Share Posted February 24, 2017 That looks amazing. How did you do the weathering? Quote Link to comment Share on other sites More sharing options...
ShaunPug Posted February 24, 2017 Author Share Posted February 24, 2017 That looks amazing. How did you do the weathering? Before all of the images started there's a little description of what I did. 👠Sent from my SM-G935V using Tapatalk Quote Link to comment Share on other sites More sharing options...
Bobik96 Posted February 24, 2017 Share Posted February 24, 2017 Thx. I must have scrolled past that post. Sent from my iPhone using Tapatalk 1 Quote Link to comment Share on other sites More sharing options...
riddeth Posted February 25, 2017 Share Posted February 25, 2017 nice build Shaun, love the weathering 1 Quote Link to comment Share on other sites More sharing options...
ShaunPug Posted February 25, 2017 Author Share Posted February 25, 2017 I'll be taking a break on this over the weekend. I'm getting my new cod and pouches early next week, so I'll have a full armor fit then (sans helmet haha). Sent from my SM-G935V using Tapatalk Quote Link to comment Share on other sites More sharing options...
fettfw3 Posted February 25, 2017 Share Posted February 25, 2017 what are those peace's that the zip ties connect to on the inside shoulder bells ? Quote Link to comment Share on other sites More sharing options...
ShaunPug Posted February 25, 2017 Author Share Posted February 25, 2017 what are those peace's that the zip ties connect to on the inside shoulder bells ? They're the heads from releaseable zip ties. Sent from my SM-G935V using Tapatalk Quote Link to comment Share on other sites More sharing options...
ShaunPug Posted March 5, 2017 Author Share Posted March 5, 2017 Finished up the soft parts minus the pouches. I'll be working with a friend to make some new ones that are more accurate than we've currently seen. With the 2 photos we have that show closeup detail, it's clear that the pouches that we see often aren't exactly accurate. If my experiments pan out well I'll post the new templates. I've also got Strider's newest TD mold coming so I'll be finishing that up soon as well. After that, it's on to the boots. Thanks to a generous fellow BSN member, I have these to play with... The tricky part is finding a way to add the horizontal lines without permanently affecting the soles as they are. As we know, these boots are the closing living relative to the original boots. I'm also going the leather route and I'm currently researching and experimenting with different types. Sent from my SM-G935V using Tapatalk 5 Quote Link to comment Share on other sites More sharing options...
ShaunPug Posted March 23, 2017 Author Share Posted March 23, 2017 Look what came in the mail today... Sent from my SM-G935V using Tapatalk 1 Quote Link to comment Share on other sites More sharing options...
K@nne Posted March 24, 2017 Share Posted March 24, 2017 Look what came in the mail today... Sent from my SM-G935V using Tapatalk I guess you mean the cap?! Really nice one. I like the colour. But the gloves are ......where did you find them Quote Link to comment Share on other sites More sharing options...
Strider Posted March 24, 2017 Share Posted March 24, 2017 I guess you mean the cap?! Really nice one. I like the colour. But the gloves are ......where did you find them Really? I thought he meant the T-Shirt í ½í¸œ But seriously, nice catch bro. Those are really interesting because they deviate in a lot of smaller details from the screen-used ones. I wonder if they were a re-run of the originals. But hey, very cool nevertheless! 1 Quote Link to comment Share on other sites More sharing options...

Recommended Posts
Join the conversation
You can post now and register later. If you have an account, sign in now to post with your account.