Aliaz Posted November 8, 2017 Author Posted November 8, 2017 How should the buckles be aligned on the drop box straps? Just noticed I have them in different ways in the front so good thing I’m asking before I sew them to the back of the belt. Quote
Chef Posted November 8, 2017 Posted November 8, 2017 My advice is to put a bit of velcro on the ends and on the belt. You can then move them about if needs be. As I recall the buckles are 'bar down'. 2 Quote
Aliaz Posted November 9, 2017 Author Posted November 9, 2017 My advice is to put a bit of velcro on the ends and on the belt. You can then move them about if needs be. As I recall the buckles are 'bar down'. That’s a good point. The wisdom keeps flowing from you chef, Thanks! Quote
Aliaz Posted November 10, 2017 Author Posted November 10, 2017 Boots arrived today from chrisx909x, Very happy with them 2 Quote
Aliaz Posted November 15, 2017 Author Posted November 15, 2017 Still have to finish the tank (put the topper on and rivet it in place) and the holster but other than that I feel pretty happy with the armor pieces. Just have to crack on with the bund, cod, pouches and riding patches/flap now. And some velcro on that Damn bicep armor. â€Honey, there are ewoks in the house!†2 Quote
Aliaz Posted November 28, 2017 Author Posted November 28, 2017 Some progress atleast. Happy with the pouches (maybe a bit wide) and bund (Although I forgot to add enough fabric for the overlap so my wife will have to put up with doing it again...) Going to be down to the wire to finish everything before the TLJ premiere. 1 Quote
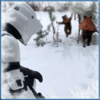
Aliaz Posted December 1, 2017 Author Posted December 1, 2017 Got a little friday feeling so decided to throw everything on now that the cumberbund is redone. Quote
Retrofire Posted December 5, 2017 Posted December 5, 2017 Looking great! The only nits I have are to pull the corner of that left pouch up a bit to square it with the other one and to pull your flight suit legs tight after you get your knees on and before you put your boots on. They look a little bunched around the knee/thigh area. Other than that looks like you’re ready to post in the pre-submission thread. Great work! Quote
Aliaz Posted December 5, 2017 Author Posted December 5, 2017 Looking great! The only nits I have are to pull the corner of that left pouch up a bit to square it with the other one and to pull your flight suit legs tight after you get your knees on and before you put your boots on. They look a little bunched around the knee/thigh area. Other than that looks like you’re ready to post in the pre-submission thread. Great work! Thanks for the tips. The pouches there are just being held up by being wedged under the chest armor, haven’t attached them properly yet but I will keep it in mind. Good point on the flight suit, I plan on putting some elastic straps on the bottom to prevent it from bunching up. Still have to add the riding patches/flap and attach the tank to the back armor and the holster to the boots before posting a pre-submission thread though. Was shooting for the TLJ premiere but I’ve kinda given up on that, I want to do it right and not just rush. Quote
Aliaz Posted December 8, 2017 Author Posted December 8, 2017 Finally got around to getting the tank attached to the back armor. 2 Quote
Retrofire Posted December 11, 2017 Posted December 11, 2017 Looking good. The addition of the elastic on the tank top is a great touch. 1 Quote
The Wayner Posted December 16, 2017 Posted December 16, 2017 Where did you get the zip tie anchors? I’ve been thinking going with zip tie for shoulder bells Quote
Aliaz Posted December 17, 2017 Author Posted December 17, 2017 Where did you get the zip tie anchors? I’ve been thinking going with zip tie for shoulder bellsThey were included in the kit. Quote
Aliaz Posted December 19, 2017 Author Posted December 19, 2017 Approved and will be trooping for the first time today TB 87101 is ready to go! 1 Quote
Griffin-X Posted December 19, 2017 Posted December 19, 2017 Approved and will be trooping for the first time today TB 87101 is ready to go! Congrats, I have granted you Pathfinder access on the forum! Quote
Aliaz Posted December 20, 2017 Author Posted December 20, 2017 Congrats, I have granted you Pathfinder access on the forum! Thanks! Did my first troop yesterday, it was awesome! 😊 And a huge Thank you to Chef for the great kit and the advice/help given during my build! Quote
TK-41015 Posted October 9, 2018 Posted October 9, 2018 This is a top of the line WIP and really good to follow. I read in another post that you split the riding patch in two or more pieces. Do you still have images of that and could you tell what you did exactly? Thanks a lot! Quote
Aliaz Posted October 10, 2018 Author Posted October 10, 2018 12 hours ago, TK-41015 said: This is a top of the line WIP and really good to follow. I read in another post that you split the riding patch in two or more pieces. Do you still have images of that and could you tell what you did exactly? Thanks a lot! Thanks! I split them in 4 pieces. So one piece for the front part of the right leg, one for the left. And one piece for the back of the right leg, one for the left. Both me and my wife who did the sewing found this much easier to attach and it looks much better. I'll dig around for some photos. 1 Quote
TK-41015 Posted October 11, 2018 Posted October 11, 2018 On 10/10/2018 at 8:34 AM, Aliaz said: Thanks! I split them in 4 pieces. So one piece for the front part of the right leg, one for the left. And one piece for the back of the right leg, one for the left. Both me and my wife who did the sewing found this much easier to attach and it looks much better. I'll dig around for some photos. Thanks a lot! Looking forward to the images! Quote
Aliaz Posted October 12, 2018 Author Posted October 12, 2018 Thanks a lot! Looking forward to the images!Can’t find any of my own pictures but check out this thread by our DL, he is the one that gave me the tip about that method.http:// http://forum.501stpathfinders.com/index.php?/topic/19259-undersuit-mods/&_fromLogin=1Skickat från min iPhone med Tapatalk 1 Quote
TK-41015 Posted October 16, 2018 Posted October 16, 2018 Ok, that does the job, thanks for pointing out the thread! 1 Quote

Recommended Posts
Join the conversation
You can post now and register later. If you have an account, sign in now to post with your account.