Strider Posted September 4, 2016 Posted September 4, 2016 I decided to build some new Bikerscout armor parts to achieve a higher accuracy. The first parts I wanted to tackle was the belt, the drop boxes and the helmet. First step was to get got reference pictures which I found in the extras section of the SW blu rays. As with the original armor I decided to model the belt using good old wood: Belt mold ready for casting: Second step were the drop boxes. I build it with cardboard first to get a feel for the overall dimensions and angles: I found the most tricky part the angles of the sides actually. The appear really different on each reference picture. For example if I compare the front of mine with the costume in the SW costumes book it appears the angle could be more flat. However, comparing it from the side to picture from the MoM exhibition it seems pretty close to me (see comparison pics below) After some trial and error versions this is the version I ended up casting: Next stop: the helmet 6 Quote
stasz Posted September 4, 2016 Posted September 4, 2016 Damn. This looks fantastic, Constantin! Hooray for another one piece belt! Quote
BikerScout007 Posted September 4, 2016 Posted September 4, 2016 That's so beautiful I'm going to cry 4 Quote
Smiling Fox Posted September 4, 2016 Posted September 4, 2016 Very nice. Where do we send money? Quote
gmrhodes13 Posted September 4, 2016 Posted September 4, 2016 Nice work, looking forward to the progress Quote
Strider Posted September 5, 2016 Author Posted September 5, 2016 Thanks for all your feedback! My motivation for posting this is more to inspire screen accuracy rather than working towards a sales thread. I haven't really thought about selling anything. Also e.g. making the belt is a tricky process because the first 3 boxes are so close to each other that they don't get sucked in when you vac form it so you have to help a bit with a card and push it down (that was actually the same way they casted the original belts). What can happen is that when you bend the belt it might get small cracks left and right of the buckle. No biggie and easy to fix but still I wouldn't like to sell something that is not perfect. For my current costume I won't make all parts myself (but with the option to do so at a later point in time). Some will be modded parts from other makers to show how far you can take them (eg, the LW helmet), other parts I have developed in collaboration with other armor makers (eg, chest/back and shoulders) and a few will be just off the shelf. Stay tuned 5 Quote
Strider Posted September 8, 2016 Author Posted September 8, 2016 EDIT: Updated link to respective thread: http://forum.bikerscout.net/index.php?showtopic=15980&view=findpost&p=148345 1 Quote
Griffin-X Posted September 8, 2016 Posted September 8, 2016 My squad recently aquired a bunch of LW helmet and I decided to do various mods with mine. Many are quite subtle but a few are a bit more distinctive (such as the exchange of the vents). That is a super nice looking helmet Constantin! Also, love the work you're doing on the armor. Quote
Dart Posted September 9, 2016 Posted September 9, 2016 Great work on the belt. I never gave much thought to those hip boxes being so angled like that, but the photos speak for themselves! Looking forward to seeing more! Quote
Strider Posted October 10, 2016 Author Posted October 10, 2016 After seeing this picture I decided to go back to change the design of the drop boxes slightly: The general dimensions are the same but I increased the angles of the sides a bit (unweathered drop box is the new one): Also I got a new pair of knee guards made with a little bit of help from my friends ;-) - Thanks John/LW! A fellow prop maker from the UK pointed me towards a new supplier who had pinseal ABS which is the stuff they used for the original bikerscout armor (or the helmet at least for all we know). I really like working with it a lot, it's a great, high quality material. Tried it out for a couple of my molds and it works just great 4 Quote
BikerScout007 Posted October 10, 2016 Posted October 10, 2016 That's a great pic for the bund dimensions too! Quote
Griffin-X Posted October 12, 2016 Posted October 12, 2016 That's a great pic for the bund dimensions too! Agreed, and you can see that the pouches are attached to the bund. Awesome pic and work on the new boxes! 1 Quote
Strider Posted October 19, 2016 Author Posted October 19, 2016 Okay, the bikerscout armor is finished. I'll probably do more mods in the future but for the time being I'm pretty happy with the current level. A lot of people have contributed to it so I would like to name a few; first I'd like to thank Gino for the inspiration and tipps along the way, my buddy Alex (TB-86079) for the collaboration on the helmet and a lot of fruitful discussions, John (Lonewolf) for allowing me to use his helmet as a base for my own design and of course the armory team of the BSN for their valuable input and support. My goal was first and foremost to increase the accuracy of the custom but also emphasize the coolness and meanness of the imperial scout trooper. I have to say it was a great experience; by trying to rebuild the original parts as close as possible I really learned to appreciate the subtleties and elegance of this great costume. There are no sharp edges or corners, every line is in flow and connects to the adjacent parts like a classic Italian automobile. So without further ado here it is: Here is a comparison shot to my "inspirations" for this armor and build: Hope you like it! Cheers 8 Quote
stasz Posted October 19, 2016 Posted October 19, 2016 Bravo! Way to raise the bar! And thanks for the inside shoulder bell detail shot. I've desperately needed that! Sent from my SM-G900P using Tapatalk 1 Quote
Stroker Posted October 19, 2016 Posted October 19, 2016 Leave to Constantine! Now I gotta upgrade my knees! Yes he set the bar high! However no matter what Disney pulls out the hat you'll never have another set of armour as cool and aggressive as the OG biker! 2 Quote
Nexous Posted October 19, 2016 Posted October 19, 2016 Truly amazing job! You can tell a lot of work and research went into this as well as love. Seriously. Insane work. 2 Quote
Strider Posted October 19, 2016 Author Posted October 19, 2016 Thanks for your kind words, gentlemen Yes, quite a lot trial&error involved in the process but it was fun getting a bit closer with each iteration. I think there's still quite a bit of potential but I wanted to tackle the things first that bothered me the most; the helmet, the chest, the soft parts and the proportions in general. Everything in this costume interacts with each other (re the overall look) and if one part is incorrect it will affect the look of the remaining parts. E.g. I had a cod piece that looked good with my old belt but when I changed the belt the piece looked completely wrong so I had to redo it. 2 Quote
TB-8719 Posted November 1, 2016 Posted November 1, 2016 This.... is.... AMAZING STUFF! Iam amazed by your research and dedication! Top notch work Constantin! 1 Quote
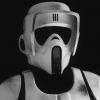
Strider Posted December 1, 2016 Author Posted December 1, 2016 The helmet is often the most prominent part of the costume. After going through numerous iterations I can finally say I'm pretty happy how it came out. The helmet is made out of 2mm pinseal ABS just like the original helmets. When taking comparison shots with a camera angle, distance, lighting can make a huge difference. The pictures that are out there of screen used helmets are often from a very near distance so I used some shots from the EFX Legend helmet (coming from the original molds) as a comparison. Inside comparison against a screen used helmet: 2 Quote
Dart Posted December 2, 2016 Posted December 2, 2016 Great work! So... any chance you're planning on giving BS.N Armourers a sweet deal on some new armour? *wink, wink* 1 Quote
Strider Posted December 3, 2016 Author Posted December 3, 2016 Thanks, Dart. Would love to do that but I don't make the armor just a few parts. To clarify on the helmet; this is just a personal project to achieve higher accuracy (no offerings) as I used John's Lonewolf helmet as a base with his consent. Cheers 1 Quote

Recommended Posts
Join the conversation
You can post now and register later. If you have an account, sign in now to post with your account.