Griffin-X Posted July 4, 2016 Posted July 4, 2016 For the belt, only use 1 rivet on each side in the back to hold the 2" back webbing. If you have a 3-piece SC belt, you should glue the pieces together to make a 1-piece belt. Don't use rivets to put these pieces together, please. It looks horrible when it's done that way! 2 Quote
BikerScout007 Posted July 4, 2016 Posted July 4, 2016 Hope this helps give you some ideas about the bund and pouches: Quote
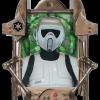
TB 11954 Posted July 14, 2016 Author Posted July 14, 2016 GUESS WHAT i MANAGED TO GET MY HANDS ON! Quote
MotorCityFool Posted July 15, 2016 Posted July 15, 2016 This picture brings me to an interesting question. I'm not sure about the red tip for approval, but most cons you'l likely be at WILL require the cap (for safety and disclosure reasons). Can some vets chime in about complying with 501 code yet obeying con rules via scout pistols? Sent from my iPhone using Tapatalk Quote
TB 11954 Posted July 15, 2016 Author Posted July 15, 2016 Well I was going to repaint it. This is the Kenner toys Scout Blaster from the mid 1980's. Quote
Griffin-X Posted July 15, 2016 Posted July 15, 2016 This picture brings me to an interesting question. I'm not sure about the red tip for approval, but most cons you'l likely be at WILL require the cap (for safety and disclosure reasons). Can some vets chime in about complying with 501 code yet obeying con rules via scout pistols? Sent from my iPhone using Tapatalk I would not go that far and have never been asked to have an orange tip on this blaster. It all depends on your area or region. In North Texas, our blasters are tagged with a "safety band" at CONS. This just confirms it's a fake weapon. Quote
MotorCityFool Posted July 15, 2016 Posted July 15, 2016 I would not go that far and have never been asked to have an orange tip on this blaster. It all depends on your area or region. In North Texas, our blasters are tagged with a "safety band" at CONS. This just confirms it's a fake weapon. Yeah, different rules for different cons. I am from Detroit Sent from my iPhone using Tapatalk Quote
BikerScout007 Posted July 15, 2016 Posted July 15, 2016 At the cons in SoCal they usually ziptie our weapons with some neon green ziptie monstrosity. But never been asked to put an orange tip on the end. Honestly, the scout is just not a blaster-intensive costume and most of the time I leave it in the bin. Quote
TB 11954 Posted July 28, 2016 Author Posted July 28, 2016 I know I haven't made an update in a while, but I have been working on my kit. I also just got my riveter today. But I came across a small roadblock I can't find an answer to, so I figured asking would be my best bet. How do I connect my T-bits to my bicep? Quote
BikerScout007 Posted July 28, 2016 Posted July 28, 2016 I know I haven't made an update in a while, but I have been working on my kit. I also just got my riveter today. But I came across a small roadblock I can't find an answer to, so I figured asking would be my best bet. How do I connect my T-bits to my bicep? Glue. E6000 Quote
TB 11954 Posted August 4, 2016 Author Posted August 4, 2016 I love the E6000 glue! It worked like a charm, thanks. I got my drill too so I was also was able to complete the belt, minus the thermal detonator which I'm working on currently. I should have pics soon of everything I have been working on. I'd say I'm coming close. But a couple questions. 1) How am I suppose to attach the thermal detonator to the belt? Like some sort of clip, or any specific type of clip? 2) How do I attach the tank to the back plate? Now first let me say that with the kit I bought my back plate already came with a tank on it, and a separate one as well. So could I just glue the tank onto the already attached tank? 1 Quote
BikerScout007 Posted August 4, 2016 Posted August 4, 2016 1) Here are the clips you need: http://www.theclip.com/store/Metal-belt-clip-661-Tempered-Belt-Clip.html You can see here where they go on the tubes: 2) I glued my tank to my back plate with E6000, and used one rivet at the top and bottom of the tank to hold it in place. But if yours already has a tank on it..... not sure what you're describing. Got pics? Quote
TB 11954 Posted August 4, 2016 Author Posted August 4, 2016 Thank you. And yeah, I just took a couple of pics. Here you can see the Tank on top of the other one. That's as far as it will go down, so I hope that is alright. Quote
TB 11954 Posted August 8, 2016 Author Posted August 8, 2016 Ok like promised I took pictures of everything I've been working on. I put it all on and man I'm liking this. I think I'm coming close though. Lets make a checklist... - Make the boots (including holster attachment) - add the suede details on coveralls. - get gloves - put the grey detail on the chest - Paint the blaster - put together the helmet - add all the decals - Make a sniper rifle (optional) And I think that's it. 1 Quote
TB 11954 Posted August 13, 2016 Author Posted August 13, 2016 So I've been doing some research and apparently the cod "should" be separate from cummerbund. I think I'll fix this, as that will then fix my "camel toe" problem. Actually Mickey it was a post you were commenting on; and you said, "The codpiece on the original scouts actually attached to the vest, under the bund. Mine is velcroed to my undersuit." And I think I would like to velcro it to the undersuit, as I think it would be the simplest, and would probably work the best. I don't think it would be possible to attach it to the vest without remaking a bunch of stuff. So is it alright to attach it via velcro to the undersuit, and then just put the cummerbund on top of it? I don't know if rules have changed since then or not. Quote

Recommended Posts
Join the conversation
You can post now and register later. If you have an account, sign in now to post with your account.