yoshix Posted November 28, 2015 Posted November 28, 2015 Let's see if I can post photos here or if photobucket will fail BROWN BOX DAY! Quote
yoshix Posted November 29, 2015 Author Posted November 29, 2015 Ok, so my plan is to use this as a build thread, I hope that's cool as I don't really see a spot for build threads here. I like to be able to ask questions and descus what I'm doing and need to do. I've found a lot of great thread here but I have notice many of them are a little old. Many of the threads I've looked to for info were made almost 10 years ago. So wish me luck More to follow Quote
ferra Posted November 29, 2015 Posted November 29, 2015 I´m still working on mine as well as RG, so anything we can help just ask away! Quote
Grumpy Posted December 1, 2015 Posted December 1, 2015 Everybody usually posts their build threads on the main page... http://forum.bikersc...hp?showforum=25 But, it really doesn't matter. Now that we know where yours is, we can follow it. And, we are here to help as best we can. It's a big puzzle, but it can be done. (Especially if you do the White Kashyyk... ) Quote
yoshix Posted December 5, 2015 Author Posted December 5, 2015 Thank you Grumpy. I guess I'll continue to post here as I've already started this one. I've got the back pretty well figured out I decided to go ahead and bondo the hell out of the inside were the two connect, hoping for extra support against cracking. Its just a little bit crooked but I don't think anyone will notice (fingers crossed ) A quick question about bondo, I noticed two different kinds at Home Depot. One more for car body repairs and the other all purpose. I didn't know the advantages or disadvantages of eather so I went with the all purpose one. Anyone have any experience with both? Quote
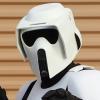
yoshix Posted December 6, 2015 Author Posted December 6, 2015 I've got everything trimmed and the legs are put together I made a lot of progress on my bucket I cut the face off because I want that flip up function that the biker scouts have. I also sanded up the corners of the eyes. First layer of bondo A little sanding After a few more layers and some shaping I got excited and just had to paint. I still need to so some more shaping but I'm very happy with what I have Quote
yoshix Posted December 8, 2015 Author Posted December 8, 2015 So after hours of gluing and clamping and cutting and sanding, I've got a good start on my pouches. I also got by blaster in the mail yesterday, I'm getting so pumped! Quote
Rwg86 Posted December 11, 2015 Posted December 11, 2015 Looks good so far! I don't think anyone has done a white version. It's fun to order stuff like blasters since it keeps things in perspective. My bucket cooling fans are on their way and I will be ordering a DC-15a long rifle from Heavy on CT.net soon. Quote
ferra Posted December 11, 2015 Posted December 11, 2015 RG: Heavy = Heidi? Grumpy did the white trooper and is helping with the CRL for it I think, he may be the best source for information, plus he has pics on facebook(can´t recall if he posted them here..) Quote
Rwg86 Posted December 12, 2015 Posted December 12, 2015 RG: Heavy = Heidi? Grumpy did the white trooper and is helping with the CRL for it I think, he may be the best source for information, plus he has pics on facebook(can´t recall if he posted them here..) Yup that's Heidi! In regards to your question about bondo- I use the Bondo automotive spot putty to fill in minor dips and holes. No amount of reinforcing will prevent straight bondo from cracking if you use it to fill an open gap. I used JB Weld and Quick-Cure epoxy to fill in the gaps. Quote
ferra Posted December 12, 2015 Posted December 12, 2015 I glass fibered my tank after glueing it with Nural. Quote
yoshix Posted December 17, 2015 Author Posted December 17, 2015 I knew I wouldn't be ready for episode 7, but I'm cool with it. I'll just have to take my TK. I have made a lot of progress through. I hope everyone is enjoying the premier today or tomorrow or this weekend or when ever you see it. Quick question, how do you attached the rubber parts like the straps to the armor? Every adhesive I've tried just falls apart. So far I've seen some people use snaps but I'm not crazy about that idea. I can't see using snaps on the lower arms. I've also seen people using velcro to attach the belt and I'm having a hard time imaging that as well. Also, what's the best paint to use on rubber? My primer just cracks and falls off 1 Quote
Grumpy Posted December 20, 2015 Posted December 20, 2015 Looks great! I'm going to eventually go back and add to my lens area. I made it too "open." For the strap piece on the left bicep, I used a piece of grey craft foam sheet. (8' x 10" piece.) And cut it to the shape of the greeblie strap piece. Otherwise it would be E-6000 and clamps... The rubber belt is another story. Ii sewed it to the bottom area of the 2" black nylon strap. (Had to sew that part by hand.) Was your rubber belt already white? (For my original belt, I used a white Plasti-dip spray can.) I have since got a white rubber belt from Bikerchick. I then added a 1" strip of Velcro to the top of that same black nylon strap. I added the opposite part of the Velcro to the back of the cummerbund. Definitely do the best you can on the back and tank. Any cracks will show on white. Quote
Grumpy Posted December 20, 2015 Posted December 20, 2015 RG: Heavy = Heidi? Grumpy did the white trooper and is helping with the CRL for it I think, he may be the best source for information, plus he has pics on facebook(can´t recall if he posted them here..) I have removed all of my pics from Facebook. I have had many, many problems on there, with Mark Zuckerberg's evil creation. Got hacked. Wasn't too happy. I did send all of the proper parts pictures to the LMO for the White Kashyyyk CRL. Hopefully they will be on there sometime soon. 1 Quote
Grumpy Posted December 20, 2015 Posted December 20, 2015 If anyone does want any of my CRL pictures, and all of the reference pictures that I used, please feel free to send a request on Facebook. Yes, even though I hate Facebook, it happens to be the easiest way to send pictures. I just don't get on Facebook that much anymore. Sorry. Just not feeling like making Kashyyyk parts anymore. Quote
yoshix Posted December 20, 2015 Author Posted December 20, 2015 Was your rubber belt already white? (For my original belt, I used a white Plasti-dip spray can.) I have since got a white rubber belt from Bikerchick. I then added a 1" strip of Velcro to the top of that same black nylon strap. I added the opposite part of the Velcro to the back of the cummerbund. Definitely do the best you can on the back and tank. Any cracks will show on white. My belt is not white, it came grey. I just ordered some Plasti-dip spray, depending on the results of that I may end up contacting Bikerchick to try to get a white one. Thank you Grumpy for the tips, I'll try hand sewing the velcro onto the back of the belt. My gloves should be here Wednesday, unfortunately they're just regular leather gloves and not kashyyyk gloves so I'll have to mod them my self. Quote
yoshix Posted December 27, 2015 Author Posted December 27, 2015 So, I've got some small tweaking to do but visually I'm good to go. I'm ready to submit my photos for approval. Quote
Grumpy Posted December 28, 2015 Posted December 28, 2015 Dang! That was quick! Makes mine look like crap... heh! Well done! ...looks like the next Kashyyyk Biker to me. (Did you get a white Kashyyyk "fishhook" sticker for the helmet?) Quote
yoshix Posted December 28, 2015 Author Posted December 28, 2015 Dang! That was quick! Makes mine look like crap... heh! Well done! ...looks like the next Kashyyyk Biker to me. (Did you get a white Kashyyyk "fishhook" sticker for the helmet?) Thank you! It took just over a month working as fast as I could. It's so hard to see the white on white. Is this acceptable? Question, because I'm already 501st, I only need to send photos to my GML for approval to start trooping in this right? Is it possible that he'll have a problem with it because it's listed in the CRL as "CRL status undefined"? Quote
Grumpy Posted December 28, 2015 Posted December 28, 2015 Yes, it looks acceptable to me. It is hard to see the white on white. But, we know it's there. Correct. Since you are already 501st, it only needs to go to your GML. Not sure about the last question, though. Each GML is different. The written CRL is complete. The visuals were sent to the LMO. He has to edit out backgrounds for the visual CRL. (I did shoot them on a plain black background, though. But, I understand. I'm no photoshop expert...) If the GML has any questions, they can contact me, or show them what has already been cleared. (I guess...) Quote
yoshix Posted December 30, 2015 Author Posted December 30, 2015 I submitted the photos to my GML and received this as response "Very nice work, extremely cool costume. I will post this to my review team, also this costume will be posted to the legion for review. Since this needs to go to the LMO and legion review it may take a while. PLease give it a couple of weeks before you hear anything. I am hoping sooner but takes time." I've got my fingers crossed! Quote
yoshix Posted January 11, 2016 Author Posted January 11, 2016 Approved! ! ! I got the email this morning. I'll post some pics later on this week or weekend of a change they asked for. 5 Quote

Recommended Posts
Join the conversation
You can post now and register later. If you have an account, sign in now to post with your account.