Murderink Posted July 12, 2015 Posted July 12, 2015 I have already built one scout helmet from pepakura with a ton of mods and am making another and documenting it this time as I will make bucks from this one for casting. I am not going to be getting into great about pepping the original pep file itself this more about modding the file so it is accurate to a certain degree, as I have seen a few different ones and they are all off and don't have the correct look to them. If anyone needs the file I am working off just PM me with your email address and I will send the file. Please note that this file has had modifications made to a degree and is already scaled against a SC bucket This will be a pic heavy thread Sent from my iPhone using Tapatalk 1 Quote
kiel814 Posted July 13, 2015 Posted July 13, 2015 Totally gonna follow this. I'm also building mine from pepakura. Really interested in any pics, tips or whatever you have to share. Quote
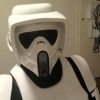
Murderink Posted July 13, 2015 Author Posted July 13, 2015 I have already made the faceplate and visor, the helmet really needs to be made in three separate sections, This will be my 4th biker scout helmet build of which two failed. I have modded the pep file quite a lot in pepakura designer and also made extra parts that were excluded from the original file. I have scanned my templates as you will see in the images above. if printed print off as A4 as that is the size i scanned them. You can also see my third attempt in a few of the images i spent about 6 months building it, the visor is the only part that is ABS the faceplate and main dome are all pepakura, the reason I am doing another build is, One: to document the whole process from start to finish. Two: so I can create bucks to make casts from. This will be quite a lengthy process but not half as long as it took for the first 3 as i have ironed out most of the bugs and know what parts nee major modifications, this time i will make the visor from scratch which needs to be resized already. if you need the file i used shoot me a message and i will email it to you. Thanks for looking. Troop on! Quote
Griffin-X Posted July 13, 2015 Posted July 13, 2015 Keep in mind, if you upload images to the site - you need to grant permissions to your library/gallery. If you do not, only yourself and the staff will see them. It is a far better option to upload on PhotoBucket (or some other hosting site) and then link them here. IMHO... Quote
Murderink Posted July 13, 2015 Author Posted July 13, 2015 here are the templates I have made so far for some of the main adjustments that need to be made to the faceplate. Quote
Murderink Posted July 14, 2015 Author Posted July 14, 2015 The following pictures show the attachment of what i would like to call the faceplate ear pieces or main visor attachment pieces. Quote
Murderink Posted July 14, 2015 Author Posted July 14, 2015 the ear pieces/visor connectors may look a little big at the moment but these will get smaller once they are fibre glassed and sanding commences, its always better to be a little bigger. Quote
Murderink Posted July 14, 2015 Author Posted July 14, 2015 I have doubled up on these images as it also shows the changes made to the forehead prior to further modifications, I have cut extra lines so i can angle the forehead slope to approx 30 degrees Quote
Murderink Posted July 14, 2015 Author Posted July 14, 2015 next item to mod on the pep is the snout as it is 1cm shorter than the original, to extend the snout i made two and cut off the amount needed being the 1cm and attached it Quote
Murderink Posted July 14, 2015 Author Posted July 14, 2015 Added a few extra parts today Sent from my iPhone using Tapatalk Quote
Murderink Posted July 14, 2015 Author Posted July 14, 2015 Still a lot of mods to go Sent from my iPhone using Tapatalk Quote

Recommended Posts
Join the conversation
You can post now and register later. If you have an account, sign in now to post with your account.