kiel814 Posted May 11, 2015 Posted May 11, 2015 Ok, I'm creating my helmet almost from scratch so I got a pepakura model and I was able to finish it over the weekend. It is not screen accurate (not by a long shot), but I'm going to use it anyway as a pattern for an EVA foam helmet. The main issue that I have to correct is the fact that it does not open. The faceplate and the main body are a single piece, and the blinder is a separate piece. It is also a little too tight. I actually have to squeeze my head in. For the paper version this is ok, but the final version will be pretty rigid so I'll have to open it to put it on. For you guys with real scout helmets out there, can you put it on and take it off without opening it? Quote
Chef Posted May 11, 2015 Posted May 11, 2015 Not really... I have to crack mine open about 10mm to get it on comfortably. But it literally is just a crack. Quote
Darth Voorhees Posted May 11, 2015 Posted May 11, 2015 i can sqeeze mine on without openeing it, but it rubbs on my nose when i do that, so i usually open it a crack, like Chef said, to get it on. Quote
kiel814 Posted May 11, 2015 Author Posted May 11, 2015 Great! This means the design itself is quite tight to put on. I've been reading old posts and found some measures. I'll compare them to the pepa when I get home. In the mean time, I know this is a scout forum but I wanted to share with you my girlfriend's almost finished stormtrooper helmet. I think only the lenses are missing. Quote
kiel814 Posted May 12, 2015 Author Posted May 12, 2015 Got home and took some measures of the opening. 13.3 cm at its widest point and about 28 cm long. So it is indeed narrow. Luckily, I've got a small head Started working with the EVA foam. All I have for now is the snout. I'll have to get creative to make the forehead piece and join it with the snout to make the faceplate. As I don't like the way it's done in the pepa. Quote
Quinxx44 Posted May 12, 2015 Posted May 12, 2015 As a fellow EVA armorer, consider this followed. Quote
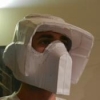
kiel814 Posted May 13, 2015 Author Posted May 13, 2015 As a fellow EVA armorer, consider this followed. Nice to meet you, Quinn. If you have an album of your work, I would like to see it. Here's some pics of my helmet so far. Faceplate is quite finished. It will probably need some more adjustments to fit with other pieces, but it's mostly done. (Finally learned how to use thumbnails) Quote
Quinxx44 Posted May 13, 2015 Posted May 13, 2015 Haven't done anything Star Wars with EVA, but have some ODST and Spartan armor from Halo that I've created. I'll try to get some pics and send me to you if youre interested. As for the helmet so far, looks like a good start. I think it will need some sizing tweaks. Maybe not though. Are you looking to make this for s****-and-giggles or a scratch build for 501st application? Quote
kiel814 Posted May 13, 2015 Author Posted May 13, 2015 Yeah, mostly for the fun of it. I have no experience whatsoever so I don't expect it to be good for 501st. Actually I'm not even sure that EVA armor is acceptable for approval... In any case, I'll just do my best and see how far I can get. Would love to see that Spartan armor. Quote
kiel814 Posted May 18, 2015 Author Posted May 18, 2015 During the week I found a much more accurate pepakura model, so I threw the previous one overboard and started again. EVA is almost done. And although there is A LOT to correct in the next phase, I think it's looking good already: Quote
kiel814 Posted May 21, 2015 Author Posted May 21, 2015 Ok, a new round of pictures. EVA is 100% done now. It does have some major flaws that I'm going to try to fix with spackle. Expect more pictures as soon as there is something to show... Quote
Quinxx44 Posted May 21, 2015 Posted May 21, 2015 Don't really know about spackle, but if it's like bondo it will crack off as the foam flexes even a bit. Make it rigid with some fiberglass strips and Rondo on the inside. Then you can bondo the outside to your hearts content Quote
kiel814 Posted May 21, 2015 Author Posted May 21, 2015 See below, for what I think spackle means. The stormtrooper helmet in a previous post has a lot of detailing with spackle, and we have been manipulating it a lot for quite some time now. In any case, although an important layer, it is only an intermediate one. After that it will need a school glue layer, and then the paint. I have never worked with fiberglass before. I tried investigating it a bit, but I still don't feel confident to try it. If I want to make EVA more rigid, I've been told to use "cartapesta" with toilet paper (couldn't find a translation, but it's a similar technique to papier-mache). BTW, I have no idea what Rondo is. According to Google: A player of the Celtics. And I'm not entirely sure about Bondo. I understand it's a body-filler for cars, but since I live in Argentina, similar products here may be different. * I'm not sure "spackle" is the correct word. "Enduido" (in Spanish) is a paste that is used to prepare the walls before painting them. The correct translation may be "wall filling" or "patching plaster" or "spackling paste" or maybe something else... Quote
Quinxx44 Posted May 21, 2015 Posted May 21, 2015 Rondo is a made up word created by prop makers. Google "rondo bondo" for a better result definition. It's basically a paste made of resin and bondo (hence the rondo) I've used fiberglass to reinforce my Eva armor on the inside and it works quite well Quote
kiel814 Posted June 7, 2015 Author Posted June 7, 2015 EVA was a no-go for me. I tried several times and with different strategies, I never liked the form I was getting. So I decided to follow the steps that used the guy who sent me the second pepakura model: Fiberglass. He's German so it took me a while to understand all steps. He's done a number of helmets, so apparently he knows what he's doing. Yesterday I finally finished the paper helmet using heavy paper (180g/m2). It's actually pretty tough. Today it's going to be my first experience with polyester resin. Quote
NegativeEleven Posted June 10, 2015 Posted June 10, 2015 Polyester resin and fiberglass is tricky, but it does make a surprisingly lightweight and strong product when you finally figure it out. That is a good looking pepakura model. All the ones I found on RPF and some facebook pepakura groups were too big. I did end up using my first scout helmet build for something a few weeks ago. It was made from the larger pieces of the pepakura model, traced onto sintra, heated to curve and bondo filled in the smaller spaces. I gotta take a better picture of this thing before RustBucket takes it home. Most of the parts on there are either wood, sintra, styrene or parts that RustBucket has left over as he upgrades his KS armor bit-by-bit to SC. 1 Quote
paradoxdj Posted June 13, 2015 Posted June 13, 2015 I've done a bunch of pepakura builds for other costumes in the past. Looks like you've got a good clean start to this one. I can't wait to see the final product! Quote
kiel814 Posted June 14, 2015 Author Posted June 14, 2015 Last weekend was my first attempt with the resin. It didn't go very well. Apparently I used too much catalyst so the resin turned into jelly after only a couple of strokes with the brush. I could not finish a single layer. But at least I didn't screw up the model. So today was my second attempt. It went much better, I used about half the dose I had used last time. I was worried because I was told that too little catalyst would never dry well and it will stay gooey, but apparently I got the ratio right this time. It's been about 6 hours now, and it's looking good. Some parts are pretty dry already, others are a little sticky but I'm confident they will completely dry overnight. I could not finish the layer completely but only because I don't have a confortable and vented place to work, so there were some unreachable areas (the neck) with the helmet resting on a low table on the balcony. If I have time tomorrow I will finish the outside layer. Picture time!!! Quote
kiel814 Posted July 8, 2015 Author Posted July 8, 2015 Time for an update: Over the last weekends I applied several layers of resin on the outside and the inside. I was already happy with the result I was getting and I decided to apply a layer of fiberglass. I must say I'm impressed with the result. It's super hard and resistent. It is also very light. Now that it is quite rigid, I removed the bottom part that prevented me from wearing it. Unfortunately it feels a little too big for my taste, but it may be just me being picky. Next steps: - Finish the fiberglass layer - Remove visor placeholder - Sanding - Polyester putty - A lot more stuff that I don't want to think about so I don't get discouraged... Pic: Quote

Recommended Posts
Join the conversation
You can post now and register later. If you have an account, sign in now to post with your account.