Spycee Posted December 2, 2014 Posted December 2, 2014 So I got a KS helmet for my wife, for her birthday Maybe I've been spoiled by my Authentic Props TK kit, but this helmet quality is ... meh. "B grade" AP helmets are better than that. There's a small brown scratch on the side that doesn't go, and plastic is a bit unevent at some places. But it seems all of the same color, so I got that going for me, which is nice. Well, I have to look at it more closely with a good lighting source to be sure, it's a bit dark in the house. The shipping was relatively fast, less than a month, so I'm happy I ordered a better snout piece from Darth Voorhees, and the replacement hardware from kwdesigns. I need to order the new stickers. I'll go search for a good tutorial on how to build it, I'm not sure about how to use the replacement hardware. I'll post some pictures of the build soon. Oh, and I will surely have a lot of questions for the experts ! Quote
Spycee Posted December 2, 2014 Author Posted December 2, 2014 Hmmm I think I'm in the wrong section ... Can a moderator move this thread in the Biker Scout HQ section ? I think it's the right one. Quote
Chex Posted December 2, 2014 Posted December 2, 2014 No problem. And yes, KS helmets leave a little, or a lot to be desired sometimes. I got lucky with mine back in the day, now a days..meh. Quote
Spycee Posted December 2, 2014 Author Posted December 2, 2014 Thanks for the move ! The quality may be meh, but my wife was still very very happy And since my son wants one too it will be a good experience, while waiting for walt to finish his children scout armor. 2 Quote
BikerScout007 Posted December 3, 2014 Posted December 3, 2014 Their pulls are very rough. But they clean up pretty nice. Quote
Spycee Posted December 8, 2014 Author Posted December 8, 2014 I started trimming the pieces : I don't see how I can assemble the back piece with the top piece without a big seam (is it the right word ?) ... I mean it is VERY easy to see the line of separation. The part over the face doesn't align right on the 2 sides : one seems not bad but th other doesn't feel "right", I must work on it. Are there good pictures of one during the building ? I'm very curious to see how it would compare to mine. I found some picture of the finished helmet and a couple during the building, but not on the angles I want to see. Thanks ! Quote
Spycee Posted December 8, 2014 Author Posted December 8, 2014 Here are some pictures : I'm not exactly sure how to stop trimming, I'm going little by little : Also here I'm not sure about the trimming. I'll finish it once the face piece will be in place. This side seems ok, needs some more trimming : This side doesn't seem to fit correctly. The curve in the middle of the main helmet piece is more acute (right word ?) than on the other piece : Quote
spookymufu Posted December 9, 2014 Posted December 9, 2014 those "seams" where the flip visor and the helmet come together (remember these helmets are made to flip up) are not symmetrical, there is one side with a smoother angle then the other, so dont try and trim them both smooth or you'll "ruin" the look. Look at screen grabs and study them very carefully so you get a feeling of where the "wonkyness" is supposed to be, just like your TK lid, it has specific imperfections that make it "right" and yes, you have been spoiled by that RS Propmasters helmet, as far as I know there are no scout lids that come as close to the original as that RSPM lid does to that TK lid..... Good luck! Quote
bikerscout73 Posted December 9, 2014 Posted December 9, 2014 I have a KS bucket now don't really like it they did a bad job putting it together for me. I have a CB bucket on the way and his buckets look bad ass Quote
Spycee Posted December 18, 2014 Author Posted December 18, 2014 Some progress... Far from finished, held together with Velcro and tape : The 2 sides are not of the same length, so I'll have to cut and I'm a bit scared to do a mistake. From what I see I have to cut a part of the right side of the mask to align it correctly with the part over the mask. I'll take a picture of that to show. 1 Quote
Spycee Posted December 18, 2014 Author Posted December 18, 2014 Thanks :-) Here are some more pictures : This side (left side) aligns properly : The right side doesn't align : I have to cut the mask piece to align it correctly. If I try to align the 2 sides, the top part doesn't align and lean (I think it's the right word ?) on one side. What it look on the inside, is it too close from the border ? : Quote
cucblack Posted December 20, 2014 Posted December 20, 2014 Maybe could make the lenses hole bigger. Quote
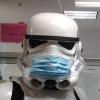
Spycee Posted December 30, 2014 Author Posted December 30, 2014 Some progress made. I tried to enlarge the lenses a bit, don't know if it's visible. I may need to enlarge it again. I used snaps to keep the face at the right place : And I painted in black the back of the ears : I used a screw to keep the snout in place, so I can remove it if I need to : Here's the result of the front. I need to repaint arount the snout, when I screwed it the snout moved and scratched the paint :-( Here's the left side : And the right side. I need to shorten the strap. Now I need to get the "good" stickers from TrooperBay, and find a comfortable padding. After that it will be done :-) Quote

Recommended Posts
Join the conversation
You can post now and register later. If you have an account, sign in now to post with your account.