Soundwave Posted April 28, 2014 Posted April 28, 2014 Also, If you're going to weather, Make sure you keep it where it makes sense. Don't weather the chest, and forget or neglect everything else. That's why less is more... because for each piece that you do, It adds more overall. One of the things I did was get some automotive primer, spray it at the grass and let gravity and the wind do the rest. If it gets too heavy, get a brillo pad and gently scrape it down. you can also do an extremely light mist of black. Just don't cake it on. it starts to look tacky, and uniform. You want the weathering to be character to your costume. It should tell a story. And that story should not be a Rorschach test. 2 Quote
Skinner3D Posted May 1, 2014 Author Posted May 1, 2014 LOL, so I know that test is, but not by name. Had to look it up. Thanks muchly for all the advice. I will be using these ideas. By primer you mean you just dropped the armor on it? I start to see how much is on my current set. I will probably scrub some of it off. Soundwave: pm sent, or will be sent, whatever. Quote
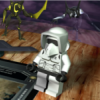
Soundwave Posted May 1, 2014 Posted May 1, 2014 I'm not sure what you mean by dropping the armor on the primer. I'm also not sure how it was read earlier, so I'll just explain again... Lay your armor on the ground, Stand about 2-3 feet away (do a distance spray test before application) and spray the primer/paint at the ground in front of your armor. The wind and gravity will assist in getting it in the areas where you are trying to get it. You do not need to spray directly onto the armor. It will apply too much. What you're doing is getting a natural feel to the armor. You're not looking to make it obvious from a distance. However, if it shows from a distance, you have have done too much. The weathering should be shading. if you look at my user picture, You'll see a few places on the chest. Those are sticker decals. I also used some of the black paint and grey auto primer for shading and weathering. In the picture, you can't see much, But I assure you, it is there. Anyone up close will see it. And from a distance, I just somewhat blend in. Which is good. You don't want to paint a target on yourself. granted, everyone's armor is different, but we are in "uniform". And I'd be willing to bet that no single trooper was placed alone into an area of the galaxy/universe. troopers were a team of specialized recon. So, Your weathering should also match up with what your team's is like. Most of the troopers in my area that are Scouts have a pretty clean look. I chose some weathering, as I wanted to be a sniper. Therefore, it allows me to fit in with my group, and I have my own story as well... Does that help? 1 Quote
Skinner3D Posted May 2, 2014 Author Posted May 2, 2014 lol I totally had that flipped. That makes way more sense. It most certainly helps. Now I just have to implement it. Quote
Soundwave Posted May 5, 2014 Posted May 5, 2014 Got some feedback yesterday on my gear. I had weathered down the knees and the chest, however, I didn't have much on my boots. I thought I had weathered enough, but they turned out green, so I cleaned them up, and started over. Just make sure your weathering is consistent throughout. I'm now currently working on spraying the grey primer, using a grill brush on the boots, road grime from some tires, as well as burning some paper over the vinyl to add wear in different places. It's a lot of work to get it looking good. So, word to the wise, make sure you know what you're doing BEFORE you start weathering. It takes a lot of work and processing to get it looking right. Shoe polish and spray paint should not just be acceptable forms of weathering. Whatever you do... Make sure it stays and is permanent, But it also needs to look acceptable. Make sure you get good feedback on it before you try to go all out. And, last for now.... Just remember that I'm pretty sure that the 501st will approve your armor BEFORE you start weathering. What you do after you are approved is on you. And what you do may be subject to approval per your 501st peers. So, just be extremely careful when weathering. 2 Quote
Skinner3D Posted May 5, 2014 Author Posted May 5, 2014 Understood. I do plan on getting approval in white and then weathering later. It is going to be hard to put good effort into it when space and tools are of limited availability right now. Oooh wheel brake stuffs I will definitely add that to my list of 'nasty things to use on armor'. Quote
Soundwave Posted May 6, 2014 Posted May 6, 2014 Don't get me wrong here. I don't want to say that it's too much... But the fact that you can see clearly into every crease of the armor is too much for me. It looks too uniform. I think you're on the right path. Just don't go so heavy all over. Space it out. Quote
Griffin-X Posted May 6, 2014 Posted May 6, 2014 Good advice: approval first, weather second... 1 Quote
Skinner3D Posted May 8, 2014 Author Posted May 8, 2014 as per instructions. less is more. Build done.... sort of... sorry just had to post, will update this thread for real when its done. 1 Quote
Skinner3D Posted May 18, 2014 Author Posted May 18, 2014 ok everyone. Round 2. The approval armor is done. Can I shoot for an ID? Quote
Soundwave Posted May 19, 2014 Posted May 19, 2014 I don't see anything to complain about. lol Good job. Quote
spookymufu Posted May 19, 2014 Posted May 19, 2014 is that a "nose" decal or does the helmet have openings cut into it? Quote
Soundwave Posted May 19, 2014 Posted May 19, 2014 Looks like the KS nose greeble with decal to me. Quote
Skinner3D Posted May 19, 2014 Author Posted May 19, 2014 uhm if its the part I am thinking you are talking about its the decal that came with the sc kit. Quote
Soundwave Posted May 22, 2014 Posted May 22, 2014 Skinner, can you please add a picture up close of the nose vents? Thanks! Quote
Skinner3D Posted May 22, 2014 Author Posted May 22, 2014 My nose vents?!, gee that is a rather personal question. Will do as soon as I can Quote
spookymufu Posted May 23, 2014 Posted May 23, 2014 ah it IS a decal, cool.......mine came with actual vents that I had to cover up with a decal.... Quote
Soundwave Posted May 23, 2014 Posted May 23, 2014 Work on that cameltoe issue, buttflap may need to be a bit longer, I don't know who made it, and the closures on your chest/bund are a little long. But that's just me being nitpicky right now. Other than that, I think you're good to submit for basic 501st approval. Good job. Quote
Skinner3D Posted May 25, 2014 Author Posted May 25, 2014 the velcro on the cummerbund is the 2" lancer spec, but I will look into the closure. The buttflap actually touches surface that I am sitting on. Is that long enough? Quote
Soundwave Posted May 25, 2014 Posted May 25, 2014 On the bund, I meant the pouch closures. They seem to hang down lower than the pouches come down. They should be even. As for the flap, I can't offer much advice there. I just think in the pictures it looks a little short. But, like i said, I think you could go ahead and request basic 501 clearance. Quote
Skinner3D Posted May 25, 2014 Author Posted May 25, 2014 oooh those closures. I agree there. Will get them fixed. Quote

Recommended Posts
Join the conversation
You can post now and register later. If you have an account, sign in now to post with your account.