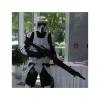
EnigmaEngine Posted December 30, 2013 Share Posted December 30, 2013 Alright. Still waiting on my soft armor to get through customs and my boots to ship, but my blaster was finished and should ship asap, already have my bucket, balaclava, and gloves: Well, I just yesterday recieved this: Woohoo! I'm not sure how much I'll get done immediately, as I work every day until I go out of town for a week, but I'm going to try. My local garrison is doing an appearance on Jan. 10th....I'm signed up as a handler, but it would be killer if I could actually participate in outfit. More pictures to come! Quote Link to comment Share on other sites More sharing options...
EnigmaEngine Posted December 30, 2013 Author Share Posted December 30, 2013 Okay, so question number one. The black stripes on the tank; I've found nothing in the instructions about them, but my best guess is....automotive vinyl wrap? But that's a best guess and nothing I've ever used. The heck is it? Quote Link to comment Share on other sites More sharing options...
Stroker Posted December 30, 2013 Share Posted December 30, 2013 Yup,that's all they are. You have SC armor I thought they came with the kit. My did. Quote Link to comment Share on other sites More sharing options...
EnigmaEngine Posted December 31, 2013 Author Share Posted December 31, 2013 Yeah, I've been through the box three times now; definitely no vinyl or stickers. Don't have the little gray bit for the chestpiece. I may contact SC, but given they don't look expensive or difficult to source, I'll probably just pick some up or grab it off Amazon. I've started trimming and sanding. Not much of the former, since I am not a small fellow (6'3" and 235), but rounded off the corners of the shoulder bells. Gluing has to wait until a warmer day, since E-6000 is not indoor friendly and it's been under 50 degrees by the time I get home from work. Hopefully when I get back from going out of town, I'll have better opportunities to start on that. Edit: Yup, I have the decals. They were in the very bottom of the envelope with the instructions, and I missed them. 1 Quote Link to comment Share on other sites More sharing options...
EnigmaEngine Posted January 9, 2014 Author Share Posted January 9, 2014 Okay. Got back from a week out of town. Hopefully now I can get started on working at this properly. But there are a couple updates! The mail we had on hold turned out to contain two packages for me. OH WHAT HAVE WE HERE Robbie sent me some boots! And Duff sent me some pew-pew! I'm now officially only missing my soft parts, which sounds filthy, but means my undersuit/cummerbund/vest. They should get here any day now, since they shipped from Cuc back at the very start of December. I did start a little bit of work before leaving. I removed the mesh from the ears of my helmet, sprayed the visible inside black (somewhat sloppily. Not used to working with Krylon), and cleaned up the results. Also applied my hump decals once I found them because I am stupid. Quote Link to comment Share on other sites More sharing options...
Griffin-X Posted January 9, 2014 Share Posted January 9, 2014 Great work on your build! Quote Link to comment Share on other sites More sharing options...
Stroker Posted January 12, 2014 Share Posted January 12, 2014 Looking good. Quote Link to comment Share on other sites More sharing options...
EnigmaEngine Posted January 14, 2014 Author Share Posted January 14, 2014 Hokay. Big update, kindof. So I'm still waiting on undersuit/vest/bund. It's a pity, but I just won't have an ETA on them unless I get a tracking number, which I won't get until they're through customs, and I'm not even sure how/if I'll get it, or if they'll just show up on my doorstep. No worries; they'll get here, but it does make sizing straps difficult. I'm going to be tapping my mother, an experienced sew-er, for help with that and attaching velcro to elastic. But I've been a busy little beaver on anything involving trimming, sanding, glue and rivets! General overview. Slots are cut, most corners rounded. Belt sections are riveted together. Thermal detonator is assembled. Arm sections greeblied. Hump attached to back plate (funny story there, I'll get to that), topper attached and white spot painted. Back of the detonator assembly. No troubles on that, though I'm really hoping those plastic (vinyl?) clips hold up. Bicep piece; rounded corners, greeblied. Holster on boot. It's got a magnet glued between the boot vinyl and holster plastic, helps the blaster stay in place when walking. Great fit all around! Props to Robbie for his boots! I was a bit of an idiot; On the bottom two rivets, I neglected to use a washer on the inside....and of course they pulled straight through the hole in the vinyl. Oops. So, I drilled out the rivets and re-did them with washers. Pain in the butt, but they're solid as a rock now! Okay, so, when I did the hump I glued the topper a little too far back from the edge where it meets the backplate. This meant when I drilled through and riveted, it wouldn't actually go through nor attach to the back of the armor! Oops. So I took an idea from PandaTrooper's build, with my own cheap twist. I got a piece of vinyl gutter that had a ninety-degree bend in it for a buck something, cut off what I needed, riveted it to the back, then the hump to the part sticking out. End result: A tiny bit crooked, but not eye-catchingly so. I think it works! I hope so, because I have no clue how I'd take it apart and start over. Now, before I leave you all to stare in bewilderment at the things I've done, I have a question. What's the "standard" method of attaching the 1 1/2" webbing straps for the drop boxes behind the "buckle" of the belt? This is the place I mean: I know PandaTrooper used extra plastic and some snaps, but these are things I do not have. Is it velcro? Rivets? Sewn together? The directions aren't clear enough for my thick brain. Quote Link to comment Share on other sites More sharing options...
Rainfly Posted January 14, 2014 Share Posted January 14, 2014 Looking good! I swapped out the belt material that SC provides with some white seatbelt material. It doesn't fray at all and its really sturdy. The plastic clamps on the back of the TD have not worked out well for me and I am looking to replace them with either money clips or maybe even a large strip of velcro. They slide off the belt really easily... particularly the belt webbing that comes with SC's kit. Quote Link to comment Share on other sites More sharing options...
EnigmaEngine Posted January 18, 2014 Author Share Posted January 18, 2014 Once again, I feel....not that bright. My mother pointed it out: I can just thread the webbing behind the buckle. It doesn't have to be riveted, velcroed, or anything. A'durr. I may need to get a different material for the back of the belt, though, as I'm a big dude and what came provided isn't really long enough to attach to the belt AND have overlap for the velcro. Quote Link to comment Share on other sites More sharing options...
cucblack Posted January 18, 2014 Share Posted January 18, 2014 A hard and good work Dylan, Hopping that you receive the soft parts soon. Quote Link to comment Share on other sites More sharing options...
M.J Posted January 19, 2014 Share Posted January 19, 2014 Dylan your mum is correct...just thread and sew on the clips in the front....for the back webbing the length will be measured on your size, the more the larger the less the smaller, I Riveted the seat belt webbing to the back ends of the plastic belt, then sewn the large clip.......my detonator attachment leaves much to be desired and I still have to find a more less floppy friendly idea.... Love the photos nice work. Quote Link to comment Share on other sites More sharing options...
EnigmaEngine Posted January 28, 2014 Author Share Posted January 28, 2014 Bad news! Forced to stay home sick from work due to spending all night horking up lunch instead of sleeping. Good news! This meant I was home when my suit, vest, cummerbund arrived! Props to Cuc; it all fits very well. The undersuit's a tiny bit short, pulling on my shoulders/crotch, but not uncomfortably so or enough to prevent me moving freely. I'm 6'3" and most of my height's in my torso rather than legs. I've been spending my time cutting elastic and velcro, figuring out assorted strap measurements, and should have more images up as things get done. I'm stealing my mother's talents with sewing for much of this, although I intend to watch over her shoulder and maybe learn a bit. Also going to Hobby Lobby to grab a bit more 2" white elastic. Again, big guy, not SC's fault. I just need longer straps in places. Quote Link to comment Share on other sites More sharing options...
EnigmaEngine Posted January 30, 2014 Author Share Posted January 30, 2014 Pictures! The pouches aren't actually attached, just held in place by pressure. Also note the torso armor is missing straps, it's mostly there for the look of the thing....it'll fit better with the elastic on. Bonus: my miniature ewok I mean dog. Quote Link to comment Share on other sites More sharing options...
cucblack Posted February 1, 2014 Share Posted February 1, 2014 You are a big guy. Could put more down the chest armor, like the back armor. Chest look too short in that position. Quote Link to comment Share on other sites More sharing options...
EnigmaEngine Posted February 1, 2014 Author Share Posted February 1, 2014 Oh, it will be. In these, the torso armor isn't actually attached; it's just dangling from velcro at the shoulders, so it kept sliding back. I've got the straps on all the other armor pieces now! All that's left is the straps for the torso armor itself, and the work needed on the belt. ....and after another test-fitting, I've discovered two things. I need to put a little foam on the inside bottom edge of the knee armor so it doesn't dig in. I also absolutely need a fan inside the bucket, to prevent lens fogging. Rain-X works for a while, but wouldn't be effective enough for a long troop. Quote Link to comment Share on other sites More sharing options...
Southscout Posted February 3, 2014 Share Posted February 3, 2014 Great work! One concern is that you might find the bund riding a bit high, or low, when you put the belt on since it looks a bit tall. It should end at belt level in the bottom and by the straps in the top. It's an easy fix however, just a stitch in the top, cut off the excess with half an inch of margin, fold it, and sew another stitch. But wait until you have the belt done before doing the measurement. Quote Link to comment Share on other sites More sharing options...
EnigmaEngine Posted February 6, 2014 Author Share Posted February 6, 2014 I haven't been keeping up on my picture-taking. Bad scout. Baaaaad scout. But as a verbal update: belt is done. Knee, shoulder, bicep, elbow armor done. T-straps for torso armor done. Pouch velcro attached, as well as a strip to connect the cummerbund's top edge to the vest. Still need to do the side elastic straps for the torso armor, and the little white bands to cover the join at the shoulders. Planning to get foam for the pouches, and for the inside of the knee armor; I found the bottom edge digs into my shin something fierce on my last test-fitting. Also want to install a tiny fan in the helmet to blow over the inside of the visor....really hoping that will knock out my fogging problem. Rain-X works for a certain amount of time, but when it wears off I go blind. Discovered that at the Havoc troop. Yeah, I can re-apply it, but that could be tricky mid-troop, depending on the setup and circumstances. I'd rather have the fan in there and be able to forget about it. All this should be done this weekend! Quote Link to comment Share on other sites More sharing options...
EnigmaEngine Posted February 7, 2014 Author Share Posted February 7, 2014 Hoooookay. So. ...Palpatine's wrinkly undercarriage, I have a long frickin' torso. Also pets. I have pets, and the dog gets really worried when I put this on. Maybe he thinks I'll mistake him for an ewok. Still need to do the little rings to cover the armor gap above the shoulders, obviously, and add foam to the pouches so they aren't flat pancakes. The rest is pretty much the quality of life improvements I mentioned in the last post. I did notice the chest armor has a tendency to rise up on me....not sure what exactly to do about that. Quote Link to comment Share on other sites More sharing options...
Guest JamesS Posted February 7, 2014 Share Posted February 7, 2014 Looks great! +50 points for the cat. Quote Link to comment Share on other sites More sharing options...
Southscout Posted February 7, 2014 Share Posted February 7, 2014 Looks good. But just to reiterate on the bund length. It should not show below your belt, and the belt is a tad too low IMHO. 1 Quote Link to comment Share on other sites More sharing options...
Griffin-X Posted February 7, 2014 Share Posted February 7, 2014 I agree with Patrik. Really nice work! But, that helmet sure looks good too! Quote Link to comment Share on other sites More sharing options...
ThatThingOnTheFloor Posted February 8, 2014 Share Posted February 8, 2014 Lookin' good, bro! 1 Quote Link to comment Share on other sites More sharing options...
EnigmaEngine Posted February 9, 2014 Author Share Posted February 9, 2014 I know the belt has to cover the bottom edge of the bund (thus why it is where it is), but the issue is...I just have a long torso. Seriously. I said it as a joke, but it's true; most of my 6'3" is between my hips and shoulders. On my next test fit I'm going to try getting the bund a bit higher on me so I can raise the belt, but it was hiked up pretty good there. The strap underneath was....squeezing things when I tugged on it. On the plus side, my GML sounded happy with how it's looking. I got the foam, filled out my pouches, and padded the inside/bottom edge of the knee armor. My lovely mother (who is directly responsible for my love of Star Wars) is doing up the canvas for the shoulder gap of the torso armor as I type. No luck on the fan yet, but that's something I can put off for the time being if I need to. Edit: Pics sent in for approval. I may have a fix to raise the cummerbund a bit, and make some other little tweaks for a better fit, but I'm confident everything's there for joining up! Quote Link to comment Share on other sites More sharing options...
EnigmaEngine Posted February 12, 2014 Author Share Posted February 12, 2014 Advice taken. Pics are a bit of a rough fit (and prominently display both my receding hairline and need for a trim), but I raised the velcro holding up the bund, allowing me to likewise raise where I wear the belt. Agreed; looks and feels better! Now I just need to find a small enough fan to install inside the helmet, to deal with the visor fogging. And an adapter for a 9v battery. And a switch. And figure out how to put it all together. That may warrant its own thread in the Helmet subforum, full of screams and electrical burns. 1 Quote Link to comment Share on other sites More sharing options...

Recommended Posts
Join the conversation
You can post now and register later. If you have an account, sign in now to post with your account.