DarthShlomo Posted April 6, 2013 Posted April 6, 2013 Hello all. I recently acquired a 1997 Don Post biker scout bucket and I will be using the tutorial created by Heathrowtrooper TB-8751 of the UK Garrison to bring it up to standards. I recently brought a Rubies TIE bucket from crap to beautiful so this is not my first mod. It was actually quite a bit a fun and I am looking forward to this mod. And with such an amazingly well done tut by Colin I am confident this one will turn out fine as well. I have been reading through the pages of posts and trying to absorb everything before I begin so I know what the frak I am doing! But I still have a few questions so please indulge me. I have the accurate head bolt kit as well as the Trooperbay green lense. But there are still some items I will need. #1. The Snout. I have a PM out to Darth Vorhees for his casting of the snout piece with backplate. Will this fit well on the DP after cutting the old one away? Has anyone put one of these on a DP? Is the 1997 DP that horrible? Maybe with a decent paint job? Fine, I'll change it. lol #2. Decals. The decals on Trooperbay say they will fit "most" buckets. Does this include a DP? Does anyone have any experience using these on a DP? Thank you in advance for any advice as I start this. Quote
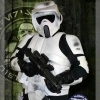
Junglie Scout Posted April 6, 2013 Posted April 6, 2013 I did one too quite a while back buddy and really enjoyed the challenge. I'll look forward to seeing this as you progress. Here's a couple of piccies of mine, I think it came out ok!! All the best mate, Andy. Quote
jyjellyfish77 Posted April 6, 2013 Posted April 6, 2013 Andy, those pictures you posted are of a DP? Looks great! Quote
Griffin-X Posted April 6, 2013 Posted April 6, 2013 On 4/6/2013 at 1:19 AM, winterg said: Hello all. I recently acquired a 1997 Don Post biker scout bucket and I will be using the tutorial created by Heathrowtrooper TB-8751 of the UK Garrison to bring it up to standards. I recently brought a Rubies TIE bucket from crap to beautiful so this is not my first mod. It was actually quite a bit a fun and I am looking forward to this mod. And with such an amazingly well done tut by Colin I am confident this one will turn out fine as well. I have been reading through the pages of posts and trying to absorb everything before I begin so I know what the frak I am doing! But I still have a few questions so please indulge me. I have the accurate head bolt kit as well as the Trooperbay green lense. But there are still some items I will need. #1. The Snout. I have a PM out to Darth Vorhees for his casting of the snout piece with backplate. Will this fit well on the DP after cutting the old one away? Has anyone put one of these on a DP? Is the 1997 DP that horrible? Maybe with a decent paint job? Fine, I'll change it. lol #2. Decals. The decals on Trooperbay say they will fit "most" buckets. Does this include a DP? Does anyone have any experience using these on a DP? Thank you in advance for any advice as I start this. Ah, you got the DP from Carlos?! Cool! Yes, the Trooperbay decals should work just fine for you and I believe DV is making his snouts to screen accurate scale so that should work as well. Best of luck and can't wait to see your progress! Quote
CRISTONAMO Posted April 7, 2013 Posted April 7, 2013 On 4/6/2013 at 10:22 AM, Junglie Scout said: I did one too quite a while back buddy and really enjoyed the challenge. I'll look forward to seeing this as you progress. Here's a couple of piccies of mine, I think it came out ok!! All the best mate, Andy. Got any before shots? Nice job! I gotta try this. Quote
DarthShlomo Posted April 7, 2013 Author Posted April 7, 2013 Thanks for the info everyone! Yes, I got the one from Carlos. I'm looking forward to this project. 1 Quote
Junglie Scout Posted April 7, 2013 Posted April 7, 2013 Hi guys, the build piccies for my helmet found at the link below. All the helmet shots are scattered about my other scout build phots. http://s1202.photobu...%20Build?page=1 I hope these help as I didn't take that many build shots. A. Quote
DarthShlomo Posted May 21, 2013 Author Posted May 21, 2013 Andy, your build pic are great. Thank you. And your DP mod came out beautiful. It gives me a lot of hope for mine. Quote
Junglie Scout Posted May 21, 2013 Posted May 21, 2013 So do I mate!!! Slow and steady wins the race. Any snags, give me a bell and I'll try to help as much as I can. 1 Quote
bjsavage7 Posted May 21, 2013 Posted May 21, 2013 Oh, and Andy, that bucket looks great! I would have thought is was a KS or something completely different. Quote
Chef Posted May 22, 2013 Posted May 22, 2013 I've always said, that with some time and effort, the sows ear that is the Don Post / Rubies can be turned into a silk purse of a lid. Quote
DarthShlomo Posted May 25, 2013 Author Posted May 25, 2013 I got the helmet deconstructed. I cleaned up the edges and got the main shell straightened. The snout cleanup took a little work but I think it is coming along very nicely. I have the angle looking good with wire reinforcement. And a new back plate put in. I didn't have any white plastic. But it will be primered and painted anyway so no biggie. And I have a DV snout to put in when it is done. I opened it up a little bit so it is easier to get on and off. Here is the view from inside. I still have to finish covering the wire. The snout has a much better form now. More to come! Quote
Katsu Posted June 4, 2013 Posted June 4, 2013 That looks really awesome! The work on the snout is coming along nicely. I have to ask, what wire is that, and how are you bonding it in? I've heard about the method, but never gotten any good definite information on it. Quote
DarthShlomo Posted June 4, 2013 Author Posted June 4, 2013 On 6/4/2013 at 1:27 AM, Katsu said: That looks really awesome! The work on the snout is coming along nicely. I have to ask, what wire is that, and how are you bonding it in? I've heard about the method, but never gotten any good definite information on it. If you a definite guide on how to convert one of these buckets, you need the guide made by Heathrowtrooper. http://website.lineone.net/~hollis_wood/trooper/avatar/TB-RubiesMod.pdf The wire is simply a sturdy coat hanger. And the two part epoxy putty is Quicksteel Plastic Repair that I picked up at my local Autozone. (This stuff is fraking amazing) http://www.autozone.com/autozone/accessories/CarGo-QuikSteel-plastic-tank-repair-kit/_/N-255s?itemIdentifier=344797 Hope this helps! Quote
Tribune Posted January 31, 2014 Posted January 31, 2014 How's it going. Read the guide mentioned in the link above. Understood mostly all. having said that I got a question or two. in the chin modification portion there are measurements and angles given. are there any measurements and angle references for the brow and visor modifications?. Quote
Tribune Posted February 3, 2014 Posted February 3, 2014 Ok I misread it. Im a idiot good tutorial Quote

Recommended Posts
Join the conversation
You can post now and register later. If you have an account, sign in now to post with your account.