ShaunPug Posted April 16, 2013 Author Posted April 16, 2013 I just realized I double posted. Sorry about that! I can't seem to find the way to delete a post. There is a an issue with the DJ greeblie and the MC TD. What I, and most people, have done is to add a small piece of plastic underneath it. I made mine slightly smaller and painted it black, so it looks like a the greeblie is thicker than it is. Either that or fill it out with bondo will work just fine. Southscout, can you point me to a thread that shows this process? Quote
Southscout Posted April 17, 2013 Posted April 17, 2013 Southscout, can you point me to a thread that shows this process? I couldn't find any post with pictures. Basically it's a square piece of around 1.5mm thick plastic, cut to fit into the groove and slightly narrower than the greeblie. Paint the edges black and smack it on with some E6000. The knob also seems to not fit so good, but maybe a good glob of glue will do the trick for that. Quote
ShaunPug Posted June 26, 2013 Author Posted June 26, 2013 Initial belt construction is done! I was too excited to take proper photos, so these will have to do for now. I'm starting work now on the TD....I'm thinking of following Pandatrooper's thread on it, as the earth magnet idea is seriously cool. I think I want to try that for my holster as well. Speaking of the holster, I didn't reinforce the rivets with scrap plastic, so now one of them has given out....I need to re-do all 4 of the rivets with scrap ABS reinforcement and was wondering how to safely remove the rivets? Quote
Southscout Posted June 27, 2013 Posted June 27, 2013 I need to re-do all 4 of the rivets with scrap ABS reinforcement and was wondering how to safely remove the rivets? Just drill them from the top (i.e. the side where you put them in from). It doesn't take much effort and it will just fall out. Use a smaller, or same size as the rivet, drill. It's dead easy, so don't worry. Nice looking belt Quote
ShaunPug Posted June 27, 2013 Author Posted June 27, 2013 Sweet. Doesn't sound too hard. On the subject of the TD and bicep armor greeblies, are they supposed to have a gloss finish? I've seen different finishes (the BluRay screens look like they have a flat finish). Is there a way that they are supposed to look, or is it a matter of taste? Quote
ShaunPug Posted June 18, 2014 Author Posted June 18, 2014 Awesome day today! I finally received my shiny new CB Helmet! I have to say the finish and workmanship on this thing is absolutely top notch. CB did an amazing job. He usually doesn't have the correct 3M bolts in his helmets but when I asked him if he could build mine using the correct bolts he obliged....He told me my helmet is the first with the correct 3M hardware. So that's pretty neat. The inside of the helmet and the chin strap are also very well done. The helmet is really actually quite comfortable, but it might rest a little too low on my head at the moment. 2 Quote
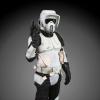
ShaunPug Posted June 18, 2014 Author Posted June 18, 2014 So after getting my new helmet, I no longer have any legitimate excuses not to finish my Scout. I think the intimidation of all of the components can block progress, but it's about time I pushed through and finished this thing! So here is a test fitting of my current soft parts as well as my belt (TD isn't finished yet, so it isn't attached) and boots. I also took another picture holding up the front chest piece to show where it will rest on my shoulders. For those in the know who are more familiar with how everything should fit, how does it look so far? I apologize for the low photo quality, but hopefully this will be enough to get started on some advice! 2 Quote
scout.trooper Posted June 18, 2014 Posted June 18, 2014 Hey, Shaun! Welcome! I wish I saw your thread earlier, I would've given you some help since I had similar issues with my MC kit! Check out my build thread for some problem/solution ideas and pics: http://forum.bikerscout.net/index.php?showtopic=11691&st=0 If your wingnut attachment on your tank is digging in to your back, try using an electrical screw... it's flat and it's got an oval head so it'll fit better. I also had a problem with the greeblies not fitting right (check out post #50 from my thread). I solved that issue by 3D printing myself some new greeblies with rounded bottoms designed from scratch. I ended up scaling them down, too, because my rectangular greeblie was right up against the zip tie. Anyway, I'd love to give you some feedback on your scout! (I'm working on mine, too, so please take the advice from 501st approved scouts before you take mine!) It seems like your scout is pretty good so far. You're going to need a balaclava to hide your neck (they're easy to find at any sporting goods store or sports store). I can't see where the elastic straps are on your thighs, but your suede patch looks a bit long...? It's hard to tell without your knee armor as a reference point. Happy building! Quote
ShaunPug Posted June 19, 2014 Author Posted June 19, 2014 Glad to see another MC owner on here! I just read through your build thread and you're making great progress! The biggest trouble that I am having is figuring out how to put together the chest and back armor. My tank is ready to go, but everything else with that is so confusing to me for some reason! Quote
scout.trooper Posted June 20, 2014 Posted June 20, 2014 Glad to see another MC owner on here! I just read through your build thread and you're making great progress! The biggest trouble that I am having is figuring out how to put together the chest and back armor. My tank is ready to go, but everything else with that is so confusing to me for some reason! Thanks! Yup, it's coming along (hope to have it done soon)! Maybe I can help you with your problem... are you having trouble attaching the top of the shoulders together? Or are you having trouble attaching the lower sides together (where the top of the bund would be)? Quote
ShaunPug Posted June 20, 2014 Author Posted June 20, 2014 Both as a matter of fact. I've been following Pandatroopers build, but I'm still a bit confused. I think im mostly confused when trying to understand how the armor is actually put on...do you undo the straps by the bund every time you want to put it on, or do you undo the shoulder straps? What is the Lancer way to "build" the chest and shoulder armor? The pictures included with the MC armor invoke the same confusion. I'll try to take some pics soon to better illustrate the confusion I have if my description is lacking. Quote
scout.trooper Posted June 20, 2014 Posted June 20, 2014 Okay, I think I get what you're saying. I'm not sure about the Lancer way, but this is what I did... Let's start with the bottom part: The way I wear it is I loosen up the elastic on the sides of the chest/back pieces just enough for me to slide the conjoined back/chest piece over my head (I do not undo the shoulder pieces). Because my MC kit's slots for the elastic were a bit snug, it does not allow me to detach the side elastic due to the velcro I attached to the inside. What I did was I shaved them open a bit first (sorry for the huge pics). If you're going for Lances, the standard for that section is 2" webbing/elastic (see pic below) You will probably need to shave your slots a lot more to make it wide enough to fit 2" webbing/elastic. My slots were much smaller. Here's a pic of some 2" elastic I bought compared to my slots: I don't know if the Lancer standard was changed for this or not. I just did a 1" or 1.5" elastic instead as I am not currently going for Lancer. Next, you need to decide how you want to attach your front and back pieces as there is more than one way to do this. 1) You can thread one piece of elastic/webbing through your slots, joining the front and the back, and close it off with one of your black plastic buckles that was provided in your kit (I think the MC directions do it this way). 2) You can cut two separate pieces of elastic/webbing (one for the left side, one for the right side) and sew velcro on each end (meaning you'll sew on velcro 4 times, 2 for the front and 2 for the back) and attach that to sticky velcro inside your armor (I think PandaTrooper does it this way). 3) The way I did it is that I sewed "knots" inside the back plate and then velcro the elastic inside the chest plate (that way, I can detatch the velcro from the front easliy, give myself enough slack to open the armor like a clam's shell, then shimmy out the bottom). Knot (back plate): Velcro (chest plate): Okay, now for the shoulder pieces... Per PandaTrooper build, I put sticky velcro inside the 2 halves of armor (had to cut them to fit). Then you make his "T" strips (a combo of velcro and elastic). This will hold the chest and back shoulders together while the bottom part of the "T" holds the shoulder bells in place. Here's a pic of mine with the duck cloth over the shoulder gap to show you what the finished product will look like: Anyway, that's just me. Other scouts may do it differently. Find a way that works best for you. Hope that helps! 1 Quote
EnigmaEngine Posted June 20, 2014 Posted June 20, 2014 I put my armor on simply by pulling it over my head and putting my arms through like a shirt. Mildly awkward, easier if I have a helper to make sure the bottom edge of the backplate gets over the top edge of my bund. 1 Quote
ShaunPug Posted June 23, 2014 Author Posted June 23, 2014 Thanks for the detailed info Scout Trooper! That actually makes much more sense! I'll have to see which one suits me better. I would love to find the Lancer specifications to look them over again, but I can't seem to find them anymore...have they moved? Quote
scout.trooper Posted June 25, 2014 Posted June 25, 2014 Yeah, man, no problem. Happy to help. It looks like the Lancer specs were just updated for 2014: http://forum.bikerscout.net/index.php?showtopic=12081&pid=104951&st=0entry104951 Quote
scout.trooper Posted June 29, 2014 Posted June 29, 2014 Hey, Shaun (I really wanna call you "Pug"!) Have you done the detonator box yet? I'm having a hell of a time trying to drill through those steel clips that attatch the det hose and box to the belt. I even bought some hardened steel drill bits and it's really slow going. Was wonering if you did it a different way...? Quote
ShaunPug Posted July 13, 2014 Author Posted July 13, 2014 Ill be sure to check out the updated Lancer specs! I have yet to assemble the TD, but what I did with the clips was actually buy the Makita clips on eBay recommended by Lonewolf. He used those clips as a starting point and did some mods to them. I think its a much softer metal than the clips that come with the MC detonator. Quote
CRISTONAMO Posted August 11, 2014 Posted August 11, 2014 Awesome build so far! how long did it take to get your MC armor? Quote
ShaunPug Posted September 26, 2014 Author Posted September 26, 2014 Cristonamo, technically it took me years as it took me forever to pay it off, but after that it didn't take long! They kept me updated all the way until it hit my doorstep. Great communication! Quote
Jancelot Posted September 26, 2014 Posted September 26, 2014 Looking great! And another GGG scout. I think 3 new builds on the area have popped up in the past 2 weeks. Keep it up. Hope to see you around a troop soon. Quote
ShaunPug Posted November 2, 2014 Author Posted November 2, 2014 Alright! A significant update! After communicating with Jancelot, he was able to help me by giving some much needed hands on help! He helped me solve a few of my biggest hurdles. I'm so grateful for this community. So much help that goes above and beyond! As a result, I was able to get everything wearable for Halloween! I was so stoked I didn't know how to contain myself. It was a perfect test run as I walked alot and was able to identify problem areas. Here is a pic that my wife took and threw on her Instagram: So the things that stood out to me immediately was 1) The dire need for velcro on the undersuit where the pieces of arm armor sit, as well as the knee armor. The majority of trooping issues for me would be solved with fixing that. 2) Lengthening the sleeves on my vest (not really visible in the above picture). Right now my shoulder bells end right at the end of the sleeve rather than letting the sleeve peek out a bit. I already trimmed the bells and I think they look great size-wise, but the sleeves need to be longer. 3) TD clips. Jancelot is helping me by making a set according to Pandatrooper's guide. Really excited for that. I'll post picks of the TD's construction in a future post. 4) Helmet mods....I need to add a bit more padding on the inside of the helmet to both fit snugger and sit higher on my head. It's looking a bit too big atm...unfortunately one of the 3M bolts cracked while trying to raise my visor...not sure how but I need to find a way to keep the visor to stay up when I need it to. Also velcro on the elastic chin strap where the visor meets the helmet to keep it shut when I bend over! 5) Tightening the fit of the belt to avoid the slippage seen in the above pic. 6) Painting my knee rivets white! 7) Voice amp! Nobody could hear anything I was saying haha! I'll post some better pictures later of the fit of everything, but overall it went very very well! And anything you guys notice would be appreciated! And here is a bonus pic of why we all go through all this work: Priceless! 2 Quote
Southscout Posted November 3, 2014 Posted November 3, 2014 You look absolutely great! Outstanding job! Just some comments on your points: 1) The dire need for velcro on the undersuit where the pieces of arm armor sit, as well as the knee armor. The majority of trooping issues for me would be solved with fixing that. Yup, you need those. Fuzzy on the undersuit and the other one on the plastic. remember to clean the surfaces. A nice smooth surface is what you need (i.e no sanding) 4) Helmet mods....I need to add a bit more padding on the inside of the helmet to both fit snugger and sit higher on my head. It's looking a bit too big atm...unfortunately one of the 3M bolts cracked while trying to raise my visor...not sure how but I need to find a way to keep the visor to stay up when I need it to. Also velcro on the elastic chin strap where the visor meets the helmet to keep it shut when I bend over! I keep my helmet closed, it just doesn't open up very well. It's not a requirement, so velcro it in place 6) Painting my knee rivets white! Noooooooo... There's no need, they should be 'rivety' in color 7) Voice amp! Nobody could hear anything I was saying haha! Amen to that, I was at a con this weekend, had my Aker turned up to maximum (!) and people still said "What??". I made button holes in the undersuit, the vest and one of the pouches to pull the wire through. If you get a tiny MP3 player you can also use the scout audio loop that's available here somewhere. Quote
ShaunPug Posted November 3, 2014 Author Posted November 3, 2014 Thanks Southscout! I'd love to see some pictures of peoples amp wiring/setup. Also, anyone do wireless setups for their voice amps? As far as the knee rivets go, I was following the Lancer specs which specify for them to be painted white... (just the knee ones though!), I'd love to reach Lancer at some point but still got a few things to do on that end! Quote
cucblack Posted November 4, 2014 Posted November 4, 2014 ...not sure how but I need to find a way to keep the visor to stay up when I need it to. Also velcro on the elastic chin strap where the visor meets the helmet to keep it shut when I bend over! Maybe the 3M speedglass headband Kit, with hold up/down system. Great Job in your Prop, looks great!!! Quote
01Hawk Posted November 4, 2014 Posted November 4, 2014 I would have swore it said silver rivet for the knees. But it does say white now so I am glad I didn't rivet the knees yet since I have white rivets too Quote

Recommended Posts
Join the conversation
You can post now and register later. If you have an account, sign in now to post with your account.