gr1fter Posted February 12, 2013 Posted February 12, 2013 I recieved my first items and I plan to document the whole journey from start to finish so, here is my build thread. Items already ordered: Armor Kit - SC Helmet - KS Blaster - KS Gloves - SA Cummerbund / Pouches - Marcel Undersuit - Red Kap Balaclava - UnderArmor Items still needed: Vest Boots (will make my own) Helmet Mods Day 1: I recieved my SA gloves. I have really small hands so I opted for the small and they were a perfect fit. That is all I have for today, but I am pretty excited to get this journey started. Stay tuned... Quote
4505Marcel Posted February 13, 2013 Posted February 13, 2013 No he has some seconds in small and extra large left, i spoke with him yesterday and ordered some small for the wife. Quote
Southscout Posted February 13, 2013 Posted February 13, 2013 Great! Every journey starts with a small step 1 Quote
gr1fter Posted February 13, 2013 Author Posted February 13, 2013 SA gloves? is he making them again? What Marcel said. I reached out to him asking if he had any smalls and luckily he had some extra. I finally had something going on for me with my small hands haha Quote
gr1fter Posted February 14, 2013 Author Posted February 14, 2013 Day 3 Received my Balaclava today. Since my undersuit has not yet arrived. I will pretend to be a Ninja... Quote
gr1fter Posted February 15, 2013 Author Posted February 15, 2013 Day 4 Received my undersuit. I went with the Red Kap Coveralls. They were at a great price ($29) and fit really good. Here are the list of mods I plan to do to the suit: 1. Creating a Neck Collar 2. Removing 4 pockets 3. Sew in Suede rider patches 4. Add 2" Elastic Strap crossing the thighs where the rider patches are 5. Sew in a Suede butt flap 6 Add Velcro to the legs and arms so I can tighten them and be more tapered. Quote
gr1fter Posted April 5, 2013 Author Posted April 5, 2013 Its been a while but I have made some slow progress. Thought I'd update my progress as my armor should be arriving within 2 weeks. I removed all my patches and I added the neck collar to my flight suit. next up, I purchased the suede for the riding patches and I will be sewing them into the suit and adding the butt flap and also adding Velcro straps to close up the arms since they are really loose. I received my cummerbund set from Marcel. I will be looking for some foam to fill the pouches, but I was going to wait til I completely finished my flight suit. any advice for the pouch foam would greatly be appreciated. Tonight I started on my Boots I purchased Men’s Leather Suede Desert Boots from UK ebay. I did not have a hair dryer since I do not have any hair I used an iron as my heat source and it worked quit well (just make sure you iron the reverse side!) I stretched and tacked all the vinyl over the boots, with the vinyl heated it was really easy to stretch. I then had everything stretched I removed all the thumbtacks except about 4 at the toe and placed the e6000 on the boot and re-stretched the vinyl back over the glued boot. final product Now I will wait for the glue to dry and remove pins and trim the access vinyl. I will update this post when i move to phase II of the boot. Quote
Chunk Posted April 19, 2013 Posted April 19, 2013 i use the Red Kapp Coveralls for all my Imperial needs. What I do is add elastic & make a stir up to hel keep the pant leg down. Quote
jyjellyfish77 Posted May 23, 2013 Posted May 23, 2013 i use the Red Kapp Coveralls for all my Imperial needs. What I do is add elastic & make a stir up to hel keep the pant leg down. Good note Joe, I'm going to use that idea. Quote
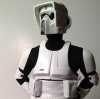
gr1fter Posted May 23, 2013 Author Posted May 23, 2013 Update: Added the strap to my boots Created my flak vest Added the Calves to my boots Recieved my headband for my helmet Recieved my Armor! Completed my boots. However I think I may redo them because I need to fix the dog bone, its too wide and I need to add the sewing stiches to the dog bone which I neglected. I am going to try to take the dog bone off but I have a feeling its not gonna be pretty and when i trim a new thinner dog bone, I feel like everything is going to be noticable. We will see... Did a Test fit with my helmet, flightsuit, cummerbund and flak vest and holding up the chest plate. I decided that the flak vest is a tad too big so I am going to take it in a couple inches. Quote
gr1fter Posted July 18, 2013 Author Posted July 18, 2013 I'm back. I started on my armor! I started with the knees, biceps and forarms. I sewed and velcro'd the straps. I glued the T-bits on. I drilled and rivoted the top strap on the knee plate. (not pictured) I created my TD I sewed together T-straps for my Chest / Back Armor and Shoulder Bells and sized up my armor. This is where I am currently at. I need to work on my belt next and have a few questions which I will ask below. Love to hear the feedback. Thanks, Current questions I have: What do I need for the cover strap that connects the Front / Back armor and the T-Straps. My SC kit did not come with this. Is it Canvas? Is it supposed to be Cream or White Color? Is the Chest Armor supposed to go over the Cummerbund? If so, do i use Velcro or something to hold it in place? Are my Flak Vest arms too long? Do they need to be shortened to before the Shoulder bells end? Last but not least, How am I looking? Quote
jyjellyfish77 Posted July 22, 2013 Posted July 22, 2013 Bro you might need to trim up some of the armor so it'll fit if you have problems. Looks good though. The chest should keep the bun up but I'm going to add suspenders to the bun that I'll hide under the chest piece. I don't know the answer for the vest part. Quote

Recommended Posts
Join the conversation
You can post now and register later. If you have an account, sign in now to post with your account.