TheSenate501
-
Posts
63 -
Joined
-
Last visited
-
Days Won
4
Everything posted by TheSenate501
-
For the flight suit it is a one piece suit that was tailored to my measurements as per KriptonTop’s instructions. The collar is not a mandarin style unfortunately but it is an open collar! For the butt flap and thigh patches are made of real suede and the thigh straps are elastic and 2 inches wide!
-
As for neck coverings I have a basic balaclava that is lightweight and breathable! I also have a neck seal that is all fabric. The seal does have a Velcro closure, however the actual Velcro is 1 and a half inches wide, but the actual stitching that is visible is .5 inches
-
Since I now have all of the soft goods, minus the gloves, here is what I received! Here is the vest: The shoulders are ribbed and padded on the inside And the back is secured with 2 inch Velcro that is right over left!
-
Soft goods finally came in and I seem to have a bit of an issue regarding sizing with armor and my pouches. I have a small torso and due to that I don’t have a lot of room to work with when it comes to spacing. In the pictures below my belt is above my hips at my waist, but where my cummerbund is it causes my pouches to go over the belt. I know I have to trim my chest armor at the shoulders since there is a gap in the back but I don’t know if I’ll be able to still have enough since it looks like I’ll have to trim a good amount to raise the armor and give it a snug fit. This is also how much space I have from the bottom of the pouches to the bottom of the cummerbund, not a lot of room for the belt to cover 😬
-
Since I am still waiting for my soft goods to arrive, hopefully sooner than later, I decided to start assembly on the back tank! I have drilled a 3mm hole into the black greebling and have applied E6000 and am now waiting for it to cure before I drill the next hole into the actual tank! The greebling sits at roughly 5/8 of an inch from the top of the tank. I have also put the striping decals on as well as the rank bar decals! The pinstripe is roughly 1/2 an inch from the inside corner of the tank and 4 inches down from the top of the tank. The rank bars start roughly at an 1 1/4 inch from the top as well and are roughly 3/4 of an inch away from the edge. As always here are the pictures to correlate with what I have said!
-
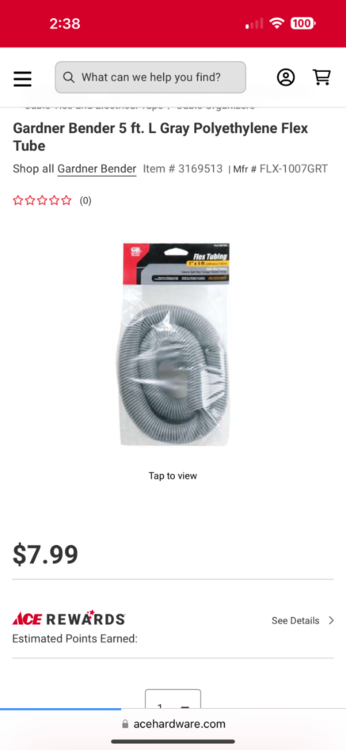
I went to Ace and Lowe’s and didn’t really see anything that would have been stiff enough, however I was able to get in contact with MonCalsProps and they were able to get me hooked up with a replacement hose and belt clips!
-
Could this hosing potentially work? Only thing I’m not too sure about is how stiff it’ll be or how to make it stiff
-
Thank you for the feedback! I am still waiting on all my soft goods to come in, I do believe I’ll need to get some off-white pouches though. I didn’t know what color I’d get with the armor so I just told them to give me white pouches
-
Got the drop boxes affixed, they are roughly 1 inch away from my belt. My left one sits a bit lower than my right one, roughly a quarter of an inch or less! I affixed my left box with a rivet since there was more material to go through and my right box with a binding post!
-
I also seemed to have damaged my plastic pipe 🙃 I’m assuming I’ll need a new one now. Are there any vendors that sell individual replacements?
-
When doing my thermal detonator clips I thought I got the measurements correct but it seems when I put the holes in the plastic it warped my marks and one clip is higher than the other. Will this be a big issue or do I need to order a new tube?
-
Went ahead and tried on the back and chest armor to see how they stack up and so far it looks like a good fit! So far my chest armor sits right above where my ribs end, so about halfway down my chest! Sorry about the picture angles and quality I’m not the best at selfies lol. I will reupload some better pictures when I have another hand!
-
Awesome, thank you for the fast reply!!!
-
Seems I have run into a bit of a head turner for the thermal detonator, on the reference photos it shows the teeth of the zip tie facing outwards away from the detonator. But, when I try to affix my tubing to the detonator box I can’t get the zip tie to hold due to the orientation of how the teeth must enter the locking mechanism. Any suggestions or am I just missing something 😅
-
Thank you for the kind words! MonsCal gave me two stickers that I will put on after I bind the top to the tank!
-
Speaking of photos lol, I am now patiently waiting for the greebling to now bind to my armor as well as having one last piece dry before I attach it to my tank! For the paint I went ahead and used Rust-Oleum gray automotive primer and Rust-Oluem black flat protective enamel. I put two coats of each on all the greebling for the thermal detonator, bicep armor, and back tank parts! Only reason the back tank isn’t being bonded with E6000 like the other pieces is because when I was washing the plastic I accidentally broke one of the small tabs off, but that was easily solved with some loctite super glue!
-
Boots and holster are now done! Holster has been secured with four 3mm rivets and I put it a half inch below the top of the boot. Holster also has the five vents in the front of it. Pictures:
-
I have now strapped all the biceps, forearms, and knees, I have included pictures of all pieces of armor strapped with their appropriate measurements as well as a test fit of the armor! As of right now I can say it all fits decently, only thing that is loose are the forearms since I have chicken wings 😭. Hopefully when the flight suit comes in it will be a tighter fit but if it isn’t could I potentially use some Velcro on the flight suit to help secure it? Also, when doing my first knee I did mess up my riveting a little bit and the armor cracked at both rivet points. I have included pictures of that as well but as of right now the armor seems to be holding strong!💪
-
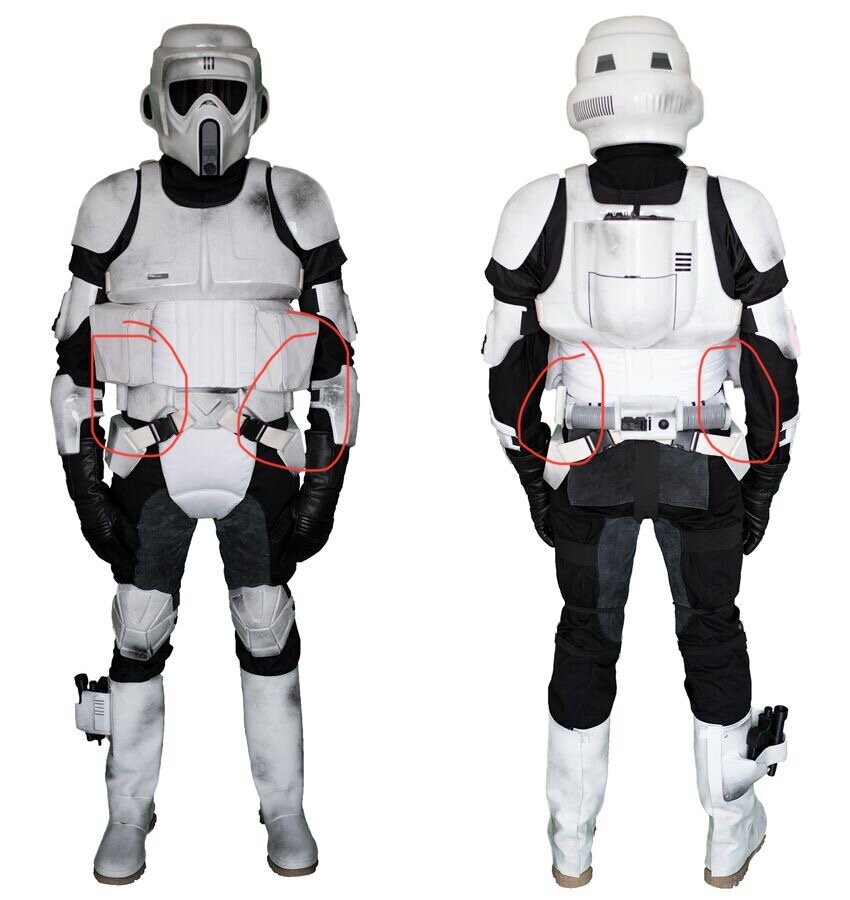
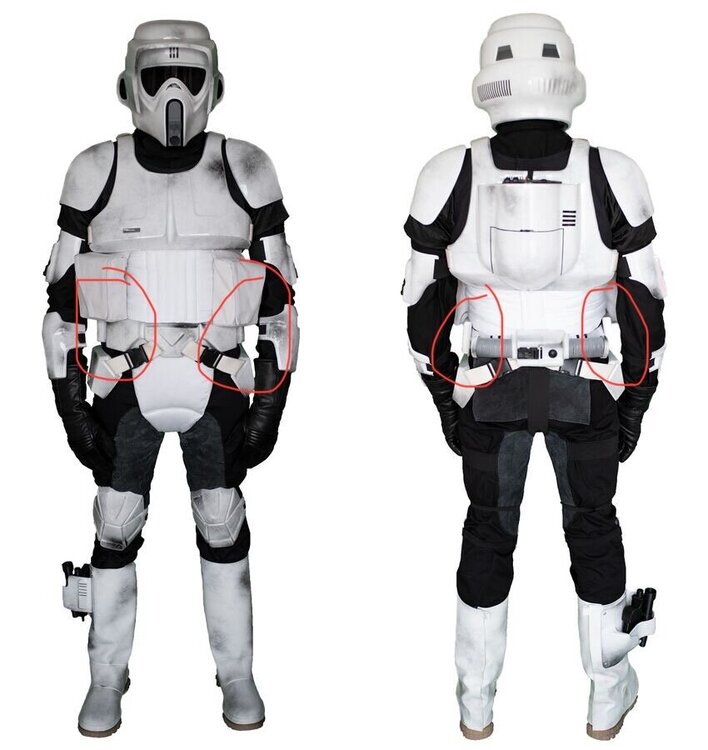
My bad I may have worded my question badly. I was wondering about the back two boxes of the front four that actually make up the belt, I used the photo you provided as well as the ones on the CRL as when I looked at them the seem to be squared off around the wearer. I went ahead and circled them to better show what I’m trying to say 😂
-
So after assembling the backing for the belt I have a question. In order for my belt to sit at waist level I may need to make it tighter than it is otherwise it will fall to my hips, the one potential issue I see is the form of the belt itself. I see no where in the CRL that states the belt has to form a certain way but when I look at the reference photos the belt seems to almost stop at a 90 degree angle on the back boxes. As of right now that is what I have, but if I want to make it tighter to my body since I am a slimmer build the boxes would need to come in a lot more. Would this pose an issue? Here are some pictures of the belt while I am wearing it (I do not have the drop boxes on yet):
-
I will be sure to watch! I’ve watched the armor build tutorial probably 20 times now but didn’t even know this one existed!
-
After waiting like a kid on Christmas (and one delivery hiccup) I have finally gotten the armor from MonCalsPropShop! The armor looks fantastic and I cannot wait to get working on it! One question I do have is should I wait for my soft parts to come in before assembling the straps for the shoulder bells, knee pads, etc? In the meantime I have included a link that has all the pictures of the armor and parts that were shipped! If I should include any other pictures please let me know!!! Link: https://drive.google.com/drive/folders/1-Mm5uVaYk9ujNZv_Xb8j2fDPGEoHxb2D
-
Awesome and thank you! I’ll go ahead and get started right away!
-
I have gone ahead and posted a link to a google drive where I will be uploading my pictures for all my armor! So far there is a helmet folder that shows pictures of the helmet so far!
-
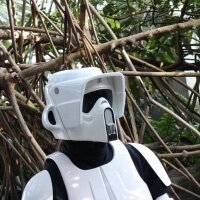
Here are some pictures of the helmet I purchased: https://drive.google.com/drive/folders/1-EyvoS_WtZNDP3FaVGI5uLTYSalQ-svn Also just two questions: One, are the indents on the back right of the helmet in the correct position? I noticed on the CRL and in some pictures they are further to the left-center of the back of the helmet. Two, I asked the vendor to not put the decals for the back left of the helmet on since they don’t look right on Etsy and they provided the decals for me to put on. Are there any measurements I need to follow, or should I line them up with the back left vent decal?