

Larcwide
-
Posts
68 -
Joined
-
Last visited
-
Days Won
3
Everything posted by Larcwide
-
Hey Sixes, I don't have easy access right now to the files I'm afraid, but the back pieces shouldn't be taller than the front at the side seams (which is where I think you are comparing?). Did you add seam allowance to the pattern pieces? I have a feeling that I may have exported the SVGs with the seam allowance included already, so if you added your own - the back pieces would end up with double the allowance where they join and end up being too long when combined - though even so, that would be about 2.5", not 4. I can take a look at my original files over the next couple of days and confirm the lengths match, and maybe do a new export without seam allowances baked in.
-
Sewing foam should work and is, I believe, the method KOtrooper used for theirs. Another option, the way I did mine, is to sandwich some batting material between two layers of fabric and then use a twin needle to stitch the ribs in.
-
Hi IRoS! Welcome to the forums. If you need any help with the patterns, just give me a shout! Would be great to get feedback if anything needs changing to help others. For the belt buckle, I’m not familiar with Sean’s files, but if you haven’t already you can check out the post here that has pictures of the different belts:
- 14 replies
-
- 1
-

-
- 3d print
- sean fields
- (and 2 more)
-
I think one of the biggest issues with evaluating the files you linked is that, to the best of my knowledge, nobody has printed them yet. So all we have is the renders from the store, where it’s tricky to see all the details. @TooTall has started a WIP using these files, so it will be interesting to see how they look.
-
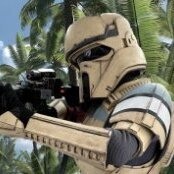
I saw these files posted on the Facebook group and they looked interesting. It's difficult to get a good idea of all of the details from the available pictures. It looks like it has most of the requirements, nothing jumps out to me as missing, but we can't see if the handplates have the slots for example. To me there is something off about the proportions. This could just be due to the rendering though. Proportions will also change based on each person's needs. As an example, the bottom of the shin covers look too "pointy" to me. Here's a comparison vs. the screen used to try and show what I mean: As far as I'm aware noone has printed these files yet, so we can't see what it really looks like, but it looks to me to be a viable option, just don't know how much work may be needed on it.
-
Attention: New Vanguard Approved ST-27488
Larcwide replied to BikerScout007's topic in Announcements
Thank you all for your help! Great to be part of this detachment and hopefully I can pass some of what I’ve learnt onto future Pathfinders. -
Larcwide's Squad Leader Vanguard Request (APPROVED)
Larcwide replied to Larcwide's topic in Vanguard Deployment Request
Hi team, just wanted to get your feedback on my changes if I could please. Gloves getting a much needed weather, especially around the finger joints: Tricky to get the photos to show the work on the palm, its had a wash of various brown acrylics, trying to get the dirt effect especially around the raised parts: And the breeches have a had another pass to bring the weathering up: Again, the camera is struggling to pick up the darker parts where I've used different shades of browns, but here's a photo showing where the coat hanger was when adding the weathing to hopefully show that there is some! Let me know what you think! -
Larcwide's Squad Leader Vanguard Request (APPROVED)
Larcwide replied to Larcwide's topic in Vanguard Deployment Request
Thanks! They both make sense and I will work on those next week and get back to you once done! -
Larcwide's Squad Leader Vanguard Request (APPROVED)
Larcwide replied to Larcwide's topic in Vanguard Deployment Request
I realised I was missing an image of the butt of the rifle showing the bolts there, then when finding that iamge realised that I had put up an older set of photoes for the E-22. So here are the updated ones (changes from the ones I updated were the scope/hengsler weathering being silver and more weathering around muzzle and between barrels/body). -
Larcwide's Squad Leader Vanguard Request (APPROVED)
Larcwide replied to Larcwide's topic in Vanguard Deployment Request
Breeches: Knee diamond: Laces: Kama: Shins: Raised strip ending under strap: Boots: E-22 (hero): Bolts, bolts and more bolts (and some lights): Talon swing lugs: Hengstler (and lights): It should be noted that the brass weathering on the scope and Hengstler has been changed to silver, but apparently I forgot to take photos of it after the change. Bonus image of me and @Rad representing the Pathfinders! (Just ignore the fact my magazine is in backwards!) Please let me know if you need any further images and of any changes you would like me to make. Thank you! -
Larcwide's Squad Leader Vanguard Request (APPROVED)
Larcwide replied to Larcwide's topic in Vanguard Deployment Request
Chest plate: Plastezote used for foam: Buckle: Slotted in and raised: Back plate: Top circle recess and strap housing recesses: Left back box: Right back box: Stepped ledge: Abdomen/belt: Rear material with zip: Shoulders: Biceps: Forearms: Gloves/handplates: Front slot: Rear plate/belt plate: -
Hi all, I managed to get out on my first troop this weekend which was great. I wanted to do at least one troop before requesting Vanguard just to make sure everthing actually stayed together and didn't need modifications! Nothing broke or fell off, so I feel ready to submit! Armour: MPSB (including straps, buckles, belt boxes and back boxes) Helmet: Nico Henderson E-22: Kuroi Sabato with 1943 scope Gloves: Endor Finders Undershirt/Neck seal/Breeches/Kama: Self made Paints: Montana Sahara Beige, Pebble, Shock Black, Red Orange Ford Nordic Blue Toyota 3E5 Red Pantone 124 Yellow RAL 8022 Black Brown for base coat Full kit photos: Helmet: Emblem: Chin strap: Curved lens and second ridge: Oblong recesses: Top mandible recesses: Rear vents: Neck seal: Zip top to bottom: Undershirt: (Including being optional onsie!) Armpit mesh: Thumb holes:
-
Tusken Raider turned Biker Scout
Larcwide replied to Cat's topic in Scout Trooper: "The Mandalorian" WIP
Hey there! As Aradun mentioned I sewed my own neck seal for my Shore. I’m not familiar with the Scout but a quick look at the CRL and from what Aradun said it should be the same sort of pattern. It’s a fairly simple pattern, you can just take a t-shirt pattern (or measure/cut an old one and trace it) for the bib part, with the back cut in half. Then just a rectangle the length of the neck hole for the ribbed part. If you’re going fabric on the outside you can just double the height and fold it, or if you want leather/vinyl cut one in that and one in soft fabric for the inside and stitch together. Add something between the layers - I used batting/quilting, but I believe people have used 3mm airline tube if you want a more defined curve (but stiffer neck). Stitch the ribs, then stitch to the neckline. Add the zip and you’re done! Hopefully that makes sense, but let me know if not and I’ll be glad to help. -
If Paul hasn’t shipped your straps and greebles yet, he does the slider buckles for the belt, so you might be able to add it onto your order.
-
Yeah, I wondered the same when I printed my Mr Paul files. Still none the wiser now! As you say there’s nothing that goes there to align to. If you find out, please let us know and satisfy our curiosity!
-
Sorry, not sure if you’re asking about a shirt pattern? If so I decided not to do a pattern for it. Trying to match the screen used ones made for a very complicated pattern that people without any sewing experience would struggle to be able to follow. Most of that is then never going to be seen under the armour. If you wanted to make your own, you can just use a long sleeve pattern (or cut up an old long sleeve) and add the mesh in. Stitching all of the ribs is the tricky part!
-
Whoops, I had forgotten I had put that note in! I've edited the post now to remove it, as Aradun said I have now gone through approval. I'll be looking to put them through level 2 once I've gotten through induction and been on my first troop. Any questions with the pattern, please do ask and I will be glad to help. I don't have any experience with the Tank Trooper, but I know they use a lot of the same parts. A quick look at the CRL seems to suggest that the shape is the same, but I don't see anything about the laces or seam lines, so I'll have to defer to someone with more knowledge on that one.
-
After a couple of tweaks to the blaster (a tad more weathering and replacing the brass dry brushing on the scope/eagle plate with silver) I have now gone through clearance! ST27488 officially approved! Thank you all for your advise and guidance for getting to this point, it really is appreciated!
-
Adding the back and finishing the waistband Match the front edge of the back piece to the back edge of the front assembly, right sides facing (this shows a good example of right/wrong sides looking different): Stitch the pieces together, 1” from the edge and press the seam towards the back piece: Fold ⅜” of the seam back over, as you’ve done before, and topstitch again: Add the other half of the velcro to the right side, front edge of the waist facing piece (make sure it’s the piece for the opposite side that you did the velcro before!). I would also recommend overlocking the bottom edge of the facing as it is the one piece with a raw edge not stitched: Fold the waist band down (so its right side and the right side of the front assembly face) and lay the nylon webbing over the top of it (the nylon webbing should be around 4” from the front edge): Lay the waistand facing, right side down on top of the waist, sandwiching the nylon webbing: Stitch just the top edge, from the waist/top front stitch line to the front edge (ignore the stitch holes going all of the way round, I definitely didn’t get this wrong, nope). Pull the long, free part of the facing so that it is on the front side of the kama: Fold the waist back up and you can lay the facing and waist pieces right side together: You can now stitch the long and short edges together, ⅝” from the edges. Be careful that you don’t accidentally catch the nylon webbing in these stitches, as it will bunched up between the pieces. Once stitched, trim as much of the seam allowance away as you can and clip the corners at an angle. This will make turning the waistband a lot easier: Now you will need to pull the waistband the right way round (use a long, blunt object to hlp push it through) and you should end up with this (don’t worry how crumpled it looks, its just weathering!): Fold ⅜” of the unstitched (bottom inside) edge of the facing over and press it: Pin the seam in place where along front top/waist seam: Then stitch in the ditch (stitch in the seam so that the stitch will be hidden) through: The stitch should be almost invisible: But catches the folded edge on the back: The rest of the waistband facing lower edge should be left free. At this point you should have two mirrored halves that look like this, almost there!: Fold the free part of the waistband facing up (but leave the ⅜” folded back) and place the two halves right side facing. Stitch along the join, 1” from the edge, stopping when you reach the “corner”: Clip the corner, this will allow us to fold the different angles of the back without creating a big lump of fabric: Press the seam you’ve just stitched open, then press 1” of the unstitched edge over: Then as before, fold ⅜” over again, press and topstitch: Now try the kama on and figure out the length you need. There should be about 3” of fabric extra at the bottom to hem. Fold the amount up for the correct length and press. Then fold it back on itself, leaving around 2”. Then do a single topstitch 1¾” from the bottom edge. Finally add a 14mm eyelet close to the front edge top stitching, following the instructions for your eyelets (note that you’ll be cutting 3 layers of canvas fabric so the included cutter may not be up to the challenge!) Now sit and admire your creation!
-
The front Take the main front piece and lay the middle front piece on it, matching the bottom edge of the middle with the top edge of the main, with right sides facing. This means the side that will face out. If you’re using plain canvas fabric there probably isn’t a right side, so just make sure you mirror what you are doing for the two halves. Stitch the pieces together 1” from the edge of the fabric. We’ll mostly be doing 1” seams to allow us to hide the raw edges later. Once folded open it should look like this: Trim as much of the middle piece seam allowance as you can (this will reduce the number of layers we’re trying to fold and stitch through later): Press the remaining seam allowance up against the middle piece. Pressing is different to ironing as you won’t be moving the iron, just putting it down for a few seconds then lifting it up. This helps create nice clean folds and sets the stitching too: Match the bottom edge of the top front piece onto the top edge of the middle front piece, right sides facing. Stitch them together, stopping when you reach the middle/main stitch line: Trim the top piece seam allowance, as we did before and press the remaining seam up towards the top piece: Fold ⅜” of the two seams you’ve created over towards the inside and press them (you should be left with a ⅝” allowance, but with a folded edge and the raw edge is sandwiched between the seam allowance and the main piece): Top stitch the seams in their correct position. Topstitching is stitching that holds a seam that will be visible on the outside of the finished article. For the kama I used a thicker upholstery thread for the top stitching to try and match the look of the screen used ones. You also want to have a longer stitch length for the top stitching, somewhere around 5mm. You should do two parallel sets of stitches per seam, one close to the fold and the other about ⅜” away from the first. This is why we left ⅝” seam after folding it, as that should be enough for both sets of stitches to catch the seam. The two sets of stitching should cross each other around an inch from the front edge. I forgot to take a photo at this point, but see later for how the topstitching should look (sorry!) Fold 1” of the front edge to the wrong side and press it (ignore the shiny fabric you can see, I was added myself a small pocket to the inside of the kama for a key, which you can try if you want!): Then, as before, fold ⅜” of that under again and press it: Open the front edge back up and take some 1” nylon webbing. Lay it along the outside of the top seam (see the topstitch on the bottom seam). Trim the edge of the webbing to match the front edge (tip: you can use a lighter to melt the cut edge of the webbing to stop it fraying) and stitch it within the front 1” seam allowance. You can see I’ve stitched it twice for security. Make sure you have plenty sticking out the top to attach to the waistband later: Fold the front edge back over (don’t forget to refold the ⅜” that gets folded back over) and top stitch the front edge as you did previously. The two previous seams should reach a point together on the fold: This is how it should look from the wrong side: Match the bottom edge of the front waist to the top edge of the top front, right sides facing and stitch them together: Add a strip of velcro to the right side of one of the halves: Press the waistband up:
-
Hi all, As I made my own soft goods for my Shoretrooper build, I thought it would be nice to make the pattern pieces I drafted available to the community to use, along with instructions on how to piece them all together to make something you can wear. I would class this as a beginner skill level requirement, it is mostly straight stitching. Somebody with no sewing experience should be able to do this without too much trouble. Before making your kama, I highly, highly recommend you make a muslin first. A muslin is a making the garment using very cheap fabric first. This is for two reasons, one it lets you go through the instructions to make sure you understand them, check how much fabric you need and more importantly, lets you check the sizing and make adjustments as necessary before using your nice fabric. You can use any cheap fabric, or make sure of old fabric to make your muslin, just so long as you don’t use stretchy material, as the real thing won’t stretch! For example I made mine out of some green fabric I had lying around from a previous project: Preparation What you need The pattern pieces file from here ~2m of black cloth canvas (I used waxed canvas for a preferred look) Sewing machine Thread - black Optonal: Black upholstery thread for top stitching Velcro 1” nylon webbing 14mm eyelets Iron Pins Getting the pieces ready The pattern pieces have been created entirely with me in mind. I am tall and skinny, so as-is they will be the wrong proportions for everybody else. To get a good start point for scaling the pattern pieces I recommend using the “Back” piece to measure from the waist of your breeches to the top strap of your shins. Using the front (straight) edge of the back piece, measure this distance and add 4”, then scale around that to start. Start by washing your fabric, using what it recommends. This will help clear any excess colour off as well as potentially shrinking the fabric slightly (which you don’t want to happen after you cut it or stitch it). Next cut out all of your pieces. You’ll notice that all of the pieces need two copies of each. The easiest way to get these is to fold your fabric along the selvages (this will be the long edges), then lay your pattern piece on top and cut through the two layers, getting two mirrored copies. Once you’ve cut the pieces out you will want to iron them (carefully if using waxed canvas!) and then optionally finish the edges. I say optional, as these instructions will mean that all but one raw edges are hidden and safe from fraying, but for added safety you can do it. I didn’t as the waxed canvas I used will naturally protect against fraying, combined with the raw edges hidden. If you do decide to finish the edges, this means putting an overlock stitch over the edges to stop them from fraying (which this fabric will). While this is an optional step, I would highly recommend it. It will be a long and boring process, but is well worth it to keep your garment nice through many troops! If your sewing machine doesn’t have an overlock stitch, you can just use a normal zigzag stitch. This is from my breeches as it’s easier to see the stitch in contrasting colours. Once you’ve finished the edges of your cut pieces you’re ready to start putting them together! You should have these pieces, plus the waistband facing:
-
Welcome! As KOtrooper mentioned I also did my own soft goods and have put the breeches pattern in the soft goods forum if you do want to go with making your own. For the undershirt I would go with the sweatshirt pattern, but stitching all of the ribs does take a lot of time. For gloves, I would say just buy them from Endor Finders. For fabric types, KO has it right - duck cloth for the breeches and jersey (t-shirt) fabric for the undershirt. Unfortunately I’m UK based so can’t give you any leads on where to get it. I actually ended up not being able to find brown duck cloth that I liked, so got some beige and dyed it with some Rit dye to get a colour I was happy with, so there are options if you can’t find exactly what you want. For the ribs I put quilting/batting between two layers of the jersey fabric and used a twin needle to sew pin tucks. For the neck seal I used a faux leather backed with some more jersey fabric with a couple of layers of batting between, but used a length of 3mm tubing while stitching to add more depth to the ribs (I then pulled it out and let the batting keep the shape, but I think some people leave the tubing in). However, as BikerScout007 said there are a few vendors you can buy the goods from as well, so either option is viable. Any questions, just let us know and we’ll be glad to help!
- 3 replies
-
- 2
-
-
- armor
- shoretrooper
- (and 2 more)
-
I've done a big push the last week or so with the end firmly in my sights, so hopefully I have ticked almost everything off. I've finished up the E22 pieces and did a the final coats of black. : All of the bolts were added in and the scope lenses added, then got a brown wash to dirty up the crevices, difficult to see in the full shots but hopefully can be seen in the close ups. Then a drybrush of silver of almost all of ot, except the Hengstler eagle plate and the scope, which were drybrushed using a brass. The strap was made and attached using the Talon quick release swivels: I weathered the kama some more: As well as a bit more on the breeches: And the boots got a good kickin': I added the foam to the forearms and adusted the abdomen to bring it up an inch or so, so the chest covered about half of the box (it could probably come up half an inch or so more, but very small adjustment). After all of this I put it all on for another set of shots (complete with my Canine Patrol Companion): I look forwarded to your feedback as always.
-
Not a huge update, but always worth doing progress updates just in case someone spots something before I get too far in! I've been continuing to work on the E22. I've added the area in front of the grip and the final lights under the M300: The wiring has been finished off and the magazine area added to hold the battery: The twin barrels are in progress with filling and sanding: And the (hopefully correct) scope is going through the same process: I'm leaving adding the allen bolts in until after I go back and finish the painting and I've got those ready to go, but I'm not sure what type needs to go through the trigger: As its a countersunk area, is it the same as the ones on the power cylinders or is it a crosshead or a slotted?
-
I've not started adding the additional weathering to the soft parts yet, as I've been concentrating on the E22 for now and its starting to take shape, I'm going for the hero version, so adding the LEDs as I go. The two LEDs on the breadboard still are to go under the M300. It was quite dark while I took these, so here's the LEDs in some day light: As you can see the cabling is all coming out to where the magazine goes, which is the perfect size to fit that 9V battery. I have the Talon quick release sling parts: M300: And the two types of M4 allen key screws:

