

Larcwide
-
Posts
68 -
Joined
-
Last visited
-
Days Won
3
About Larcwide
-
Hey Sixes, I don't have easy access right now to the files I'm afraid, but the back pieces shouldn't be taller than the front at the side seams (which is where I think you are comparing?). Did you add seam allowance to the pattern pieces? I have a feeling that I may have exported the SVGs with the seam allowance included already, so if you added your own - the back pieces would end up with double the allowance where they join and end up being too long when combined - though even so, that would be about 2.5", not 4. I can take a look at my original files over the next couple of days and confirm the lengths match, and maybe do a new export without seam allowances baked in.
-
Sewing foam should work and is, I believe, the method KOtrooper used for theirs. Another option, the way I did mine, is to sandwich some batting material between two layers of fabric and then use a twin needle to stitch the ribs in.
-
Hi IRoS! Welcome to the forums. If you need any help with the patterns, just give me a shout! Would be great to get feedback if anything needs changing to help others. For the belt buckle, I’m not familiar with Sean’s files, but if you haven’t already you can check out the post here that has pictures of the different belts:
- 14 replies
-
- 1
-

-
- 3d print
- sean fields
- (and 2 more)
-
I think one of the biggest issues with evaluating the files you linked is that, to the best of my knowledge, nobody has printed them yet. So all we have is the renders from the store, where it’s tricky to see all the details. @TooTall has started a WIP using these files, so it will be interesting to see how they look.
-
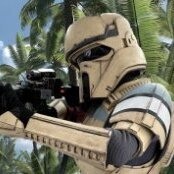
I saw these files posted on the Facebook group and they looked interesting. It's difficult to get a good idea of all of the details from the available pictures. It looks like it has most of the requirements, nothing jumps out to me as missing, but we can't see if the handplates have the slots for example. To me there is something off about the proportions. This could just be due to the rendering though. Proportions will also change based on each person's needs. As an example, the bottom of the shin covers look too "pointy" to me. Here's a comparison vs. the screen used to try and show what I mean: As far as I'm aware noone has printed these files yet, so we can't see what it really looks like, but it looks to me to be a viable option, just don't know how much work may be needed on it.
-
Attention: New Vanguard Approved ST-27488
Larcwide replied to BikerScout007's topic in Announcements
Thank you all for your help! Great to be part of this detachment and hopefully I can pass some of what I’ve learnt onto future Pathfinders. -
Larcwide's Squad Leader Vanguard Request (APPROVED)
Larcwide replied to Larcwide's topic in Vanguard Deployment Request
Hi team, just wanted to get your feedback on my changes if I could please. Gloves getting a much needed weather, especially around the finger joints: Tricky to get the photos to show the work on the palm, its had a wash of various brown acrylics, trying to get the dirt effect especially around the raised parts: And the breeches have a had another pass to bring the weathering up: Again, the camera is struggling to pick up the darker parts where I've used different shades of browns, but here's a photo showing where the coat hanger was when adding the weathing to hopefully show that there is some! Let me know what you think! -
Larcwide's Squad Leader Vanguard Request (APPROVED)
Larcwide replied to Larcwide's topic in Vanguard Deployment Request
Thanks! They both make sense and I will work on those next week and get back to you once done! -
Larcwide changed their profile photo
-
Larcwide's Squad Leader Vanguard Request (APPROVED)
Larcwide replied to Larcwide's topic in Vanguard Deployment Request
I realised I was missing an image of the butt of the rifle showing the bolts there, then when finding that iamge realised that I had put up an older set of photoes for the E-22. So here are the updated ones (changes from the ones I updated were the scope/hengsler weathering being silver and more weathering around muzzle and between barrels/body). -
Larcwide's Squad Leader Vanguard Request (APPROVED)
Larcwide replied to Larcwide's topic in Vanguard Deployment Request
Breeches: Knee diamond: Laces: Kama: Shins: Raised strip ending under strap: Boots: E-22 (hero): Bolts, bolts and more bolts (and some lights): Talon swing lugs: Hengstler (and lights): It should be noted that the brass weathering on the scope and Hengstler has been changed to silver, but apparently I forgot to take photos of it after the change. Bonus image of me and @Rad representing the Pathfinders! (Just ignore the fact my magazine is in backwards!) Please let me know if you need any further images and of any changes you would like me to make. Thank you! -
Larcwide's Squad Leader Vanguard Request (APPROVED)
Larcwide replied to Larcwide's topic in Vanguard Deployment Request
Chest plate: Plastezote used for foam: Buckle: Slotted in and raised: Back plate: Top circle recess and strap housing recesses: Left back box: Right back box: Stepped ledge: Abdomen/belt: Rear material with zip: Shoulders: Biceps: Forearms: Gloves/handplates: Front slot: Rear plate/belt plate: -
Hi all, I managed to get out on my first troop this weekend which was great. I wanted to do at least one troop before requesting Vanguard just to make sure everthing actually stayed together and didn't need modifications! Nothing broke or fell off, so I feel ready to submit! Armour: MPSB (including straps, buckles, belt boxes and back boxes) Helmet: Nico Henderson E-22: Kuroi Sabato with 1943 scope Gloves: Endor Finders Undershirt/Neck seal/Breeches/Kama: Self made Paints: Montana Sahara Beige, Pebble, Shock Black, Red Orange Ford Nordic Blue Toyota 3E5 Red Pantone 124 Yellow RAL 8022 Black Brown for base coat Full kit photos: Helmet: Emblem: Chin strap: Curved lens and second ridge: Oblong recesses: Top mandible recesses: Rear vents: Neck seal: Zip top to bottom: Undershirt: (Including being optional onsie!) Armpit mesh: Thumb holes:
-
Tusken Raider turned Biker Scout
Larcwide replied to Cat's topic in Scout Trooper: "The Mandalorian" WIP
Hey there! As Aradun mentioned I sewed my own neck seal for my Shore. I’m not familiar with the Scout but a quick look at the CRL and from what Aradun said it should be the same sort of pattern. It’s a fairly simple pattern, you can just take a t-shirt pattern (or measure/cut an old one and trace it) for the bib part, with the back cut in half. Then just a rectangle the length of the neck hole for the ribbed part. If you’re going fabric on the outside you can just double the height and fold it, or if you want leather/vinyl cut one in that and one in soft fabric for the inside and stitch together. Add something between the layers - I used batting/quilting, but I believe people have used 3mm airline tube if you want a more defined curve (but stiffer neck). Stitch the ribs, then stitch to the neckline. Add the zip and you’re done! Hopefully that makes sense, but let me know if not and I’ll be glad to help. -
If Paul hasn’t shipped your straps and greebles yet, he does the slider buckles for the belt, so you might be able to add it onto your order.
-
Yeah, I wondered the same when I printed my Mr Paul files. Still none the wiser now! As you say there’s nothing that goes there to align to. If you find out, please let us know and satisfy our curiosity!
