Hello there! ( Kenobi 05/25 whoohoo!)
I've accumulated parts and things since approximately mid august of last year but finally starting to get some serious work done so figured it's time to start the WIP thread to take in suggestions and, document. My goal is for a level "1+" approval and, then work on details to make it a level 2.
Even in this early stage this has been such a rewarding experience from meeting a ton of great people online to developing skills which are adjacent to costuming that I've always wanted to develop. I'm really interested in the community and charity work the 501st does and, giving back to my community through something I love.
Armor pieces; DIY Mr. Paul's STL's, I've done several pieces in PETG already but, recently made the decision to go all in with ABS.
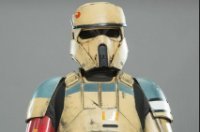
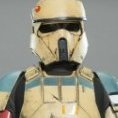
The helmet is a Sean fields that was resin molded by Sean Bradley. After 2-3 failed attempts at a Niko Henderson helmet and, a very rough completed one in PETG I wasn't happy with the amount of time it was taking and, needed to jumpstart my enthusiasm for this project so I had Sean finish it. Exceptional work and, it worked as planned, accomplished more in the last month than the last 5.
Spent much of today lowering the visor which sat just a bit too high. I used latex 'paint' to do chip weathering , still researching (and welcome) suggestions for the dirt weathering. I've got the acrylic paint, the application method is what I'm looking to hone-in. Some suggestions I've seen are to water down a mix so it can be washed on . Some suggest a Sponge? Dab in areas or 'wash' like a bath?
Also interested for any ideas to integrate an i-COMM into the snout greeble. The box around the 'speaker' part seems like it will be tricky. I have a resin molded piece I've considered trying to demel out the snout part but I think it will be too messy and leave me with a bunch of broken pieces instead of a usable 'hole' in the resin mold to insert the iCOMM into