Andy88
-
Posts
31 -
Joined
-
Last visited
-
Days Won
2
-
Perfect night! Literally finished weathering on the abdomen just before we left! Very messy fit so we didn’t miss the start but still managed to get a couple pic requests from a few passing by. Just shins to be done! I need to hem my undershirt too it is very baggy around the arms. :X
-
I would highly suggest going the 3D printed route given your height. I’m printing Paul’s files which are built for a 5’10” and I feel at the very edge of the limit for that to fit well. I”m 6’ tall, most kits are designed around that medium build average height frame. I would at least contact them to ask their thoughts but my gut says you’re going to have noticeable gaps with another 4” if going with an Off the shelf solution. Sent from my iPhone using Tapatalk
-
Project restarted ! Printer tuned to .6 nozzles means prints now take about 40% less time. Abdomen part reprinted as there was layer shift I felt wouldn’t pass in the prior Forearm parts getting reprinted for the same reason. All goes well, printing will be done by the end of this week! https://imgur.com/a/ML55k0Z Sent from my iPhone using Tapatalk
-
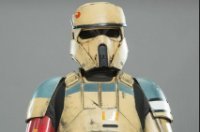
Well Megacon Orlando has come and gone, I had the upper half done but no abdomen and, decided to wear the bucket for testing which was a great benefit! Battery pack easily lasts 4-5 hours on a single charge with both fans. Nose padding could use some adjustment but not a huge deal. Met my local Garrison's squad leader, the Chartiy Leader (also a ST!) Tom and, handed out a lot of lego Mini-figs for some sweet pics. 10/10 well worth it as a convo starter. extra points if you get this reference! Hard to see but this guy had a full Thrawn combat vest/helmet from Rebels inside as well. 10/10 the abdomen fits great! using a chemical bond on the joins vs CA really helps
-
Okay, this is my bucket’s final form. 3xAA battery box with a usb cable. Li-pro rechargeable batteries. Compact, light weight, the box outputs slightly less than 5V but the fans were loud anyway so they’re quieter this way.
-
hey guy! I sold you the boots! Great to see you post a thread up here. I've got a raw niko helmet print I was going to post on the FB page. If you want it lmk. just shipping. DM me for deets.
-
spoiler alert! that's exactly what I'm doing. moving stuff around I''ll definitely have room to stick some batteries for the helmet fans in my bucket now. I also used some mesh loom to tuck the excess wiring in. waiting on a new battery solution then I'll mesh loom the helmet fans too in the back. 10/10 would recommend mesh loom to a friend. cheap and you can use the excess around the house. https://www.amazon.com/dp/B07FXF12HC?psc=1&ref=ppx_yo2ov_dt_b_product_details
-
Not a lot this update, 3d printing problems persisted, definitively going to need to do a gag or just go helmet this Con. Some small updates, elastic to close parts. also, I'm re-evaluating my helmet situation and relocating everything for a better fit. cable cord vs duct tape Yes I did get a machine to delve into that hobby! Found that using a big slim battery in the back part for helmet fans vs in the helmet would be better.
-
long term I've decided to invest into a good sewing machine and, developing that skill. A really good one is a lot less expensive than I originally believed. I think I will take your suggestion and, find someone to hem in the sleeves for the con. Printer is fixed- new Hotend, new Thermosister and heater soldered in, less than an hour of tuning and, first XYZ cube is flawless! I should pick lottery numbers tonight lol. THE PRINTING WILL CONTINUE UNTIL MORALE IMPROVES.
-
I was thinking of buying my way out of it as I literally have 0 sewing skills. It took me a solid hour last night just to hand stitch some threading into the stretching bungle fabric to strengthen them for the shoulder bells. No sewing machine. Is it worth investing time/hardware into one for alterations? Not sure I would have the time to craft soft parts unfortunately. Tight on time so tough to decide to make the next wave order with IB or find someone local. :X
-
I've got the bottom part printed that has the cutouts for snap fittings and yes it will be tight as is! Not really too concerned about it. This is secondary also a goal for some weightloss. 15lbs since March! I'm not sure how I could resize it without expanding the dimensions in every direction. I am flexing a bit in that picture and sort of shoved up the biceps /shoulder bells to make the chest to bell gap shorter so it probably will sit naturally a bit lower (and close more) . Something to come back to when I acutally go for an application.
-
Weekend update! Printer failure, hoping this wont set me back too far. Very very sloppy test fit tonight. My observations; I should have sized down to Medium on the undershirt. way too much bunching, it's causing my bicep pieces to open. Shoulder bells are too low, going to raise them. hoping some adjustments in the velcro are enough. Shoulder bell to bicep length is good? The back really shows the bicep problem. I printed these in the open STL thinking I needed the size. Would this fail approval if open? Accidentally Tucked the neck bib inside the shirt. Let's not talk about the forearms. Lots wrong going on there
-
weekend update! color perfected! Chest part; Smooth as a twi'lek's bod it was short lived; 2 part epoxy used to bond the collar Test fit
-
Update: ⛈️ing proceeding, I've been partial to a good quality exacto knife to make the chips versus latex paint and a brass drill brush to get the 'scratches' then followup with my brown/black wash over; The brass scratches capture the wash in the cuts making them highlighted. Had to touchup inside the boxes with black for overspray. I TRIED to weather the chest piece but unfortunately the tape also left adhesive on the paint which made it impossible. It was just sticking to the paint and not coming off so had to sand everything back down. What a pain. This is acutally my THIRD attempt at sanding it back down, first was finished with filler primer which cracked, then resin which didn't turn out great. Don't know what's going on here, I wiped everything down with 99% IPA each time but there is some kind of adhesion or surface prep thing going on that this '3rd time' charm seemed to fix with spot puddy. Wish me luck tomorrow in finishing. Finally, Back piece weathered but I'm sad to report the collar came off after gently setting it down. Fortunately it happened now instead of while trooping and, there's no real damage to the plastic or visible paint . I used CA glue and hardener but, clearly the glue didn't grab a lot of surface area because, the parts don't have a lot of contact. It seems like they're designed to fit together better so I am guessing the CA from joining the back parts together prevented this piece from joining more fully with the back part and , therefore most of the CA didn't actually adhere to anything. My first thought is that I should really spend 3-4 hours digging it out and resurfacing but, I wonder if I should just E6000 this to give it some flex given this joins into the chest part? I'm going to reach out to the STL guy to ask his thoughts but, I would welcome recommendations here too. Forearm first part raw shot!
-
I’m in the process of building with Mr Paul’s files as well with his resin molds so feel free to hit me up if any questions on slicing the big pieces apart! Also will say his resin buckets needed trimming, particularly the chest pieces that fit into the recessed spaces. Looking forward to your progress! Sent from my iPhone using Tapatalk