ImperialWalker
-
Posts
34 -
Joined
-
Last visited
Everything posted by ImperialWalker
-
I am working on the Jesus S Scout trooper and nearing the end of the priming stage. On the original helmets there was a bit of plastic used to fuse the two halves of the visor. I am wondering what your thoughts are on adding this detail even though it is not required.
-
 That is basically the plan. The bolts here in Canada are $20 and would require some sawing and such to be able to glue on. I enjoy the idea of having genuine bolts on there (color, design, and authentic), but at the same time, $20 to saw them apart when I could 3D print an accurate version... If I can't get a 100% accurate version, I'll likely purchase the originals and do as you suggested.
 -
You can see how they're offset. This is just for the JS Helmet though. What you are suggesting would be awesome for many others and I suspect this helmet could be modded as well.
-
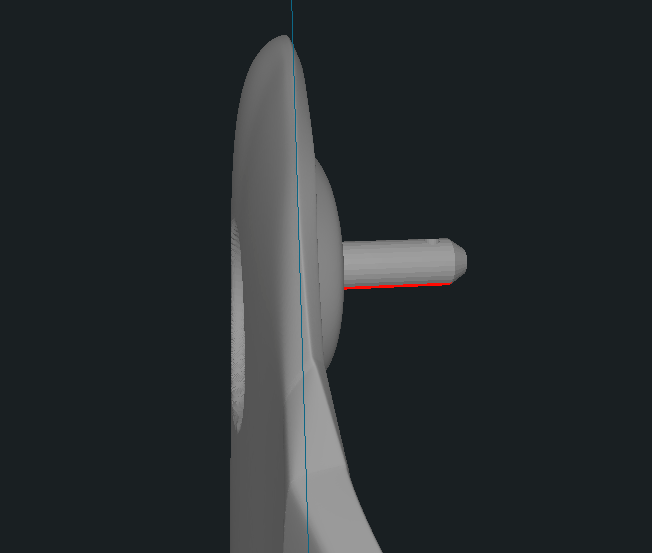
Keep in mind, like I mentioned in my review, the JS helmet doesn't allow for the bolt to go all the way through. He, for some reason put the bolt/pivot point offset from the 3M hole so if you were to drill through it wouldn't line up.
-
That would be awesome! Thank you. I have attached some images of his bolts.
-
The Jesus S model can't accommodate the real bolts anyway because of his odd pivot design choice so they would be faux versions. It would be awesome to have the option. Getting real ones is cool, but they're $20 and I'm not even sure they would work. A printed version would at least allow me to play with it to see if it is worth getting a genuine one.
-
Thank you! I read the standards, but I seemed to have missed the 22mm. Does anyone have an accurate STL of these bolts? I believe I found the snout greeblie on these forums somewhere. It had a few options one being a filled in aerator which I also printed, so I can add that one instead. I'll take a look in the vendors list. As a Canadian things can be a bit more difficult to source. I appreciate you taking the time to reply. These will get me on the right track for sure.
-
Jesus Salmeron 3D Print Helmet Review
ImperialWalker posted a topic in ROTJ Biker Scout Armor/Helmet
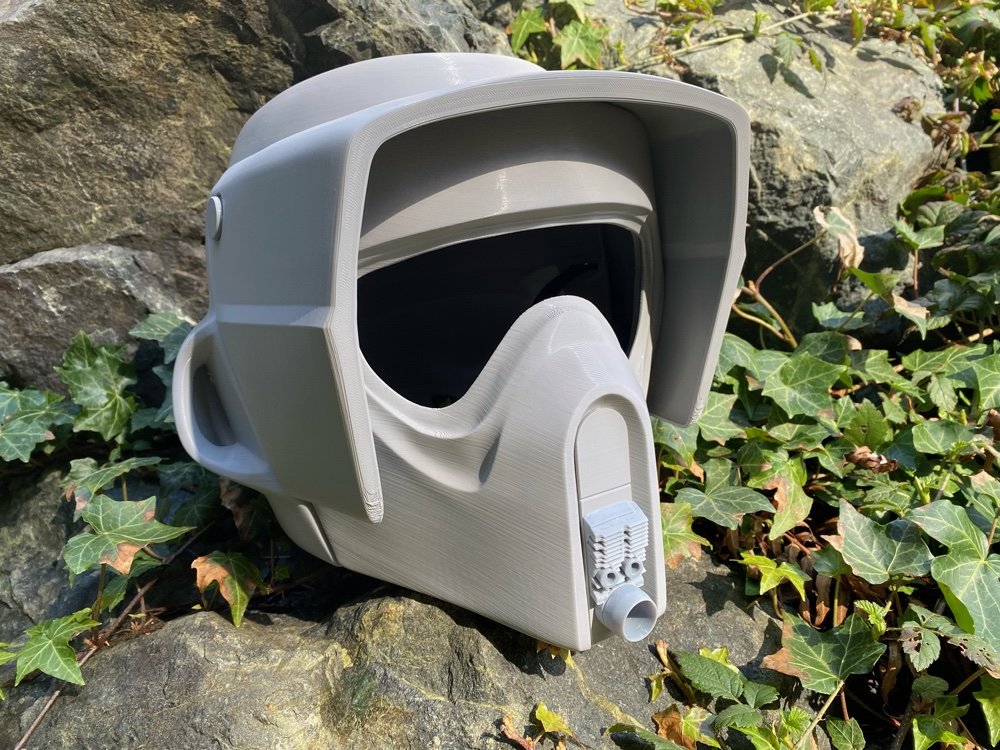
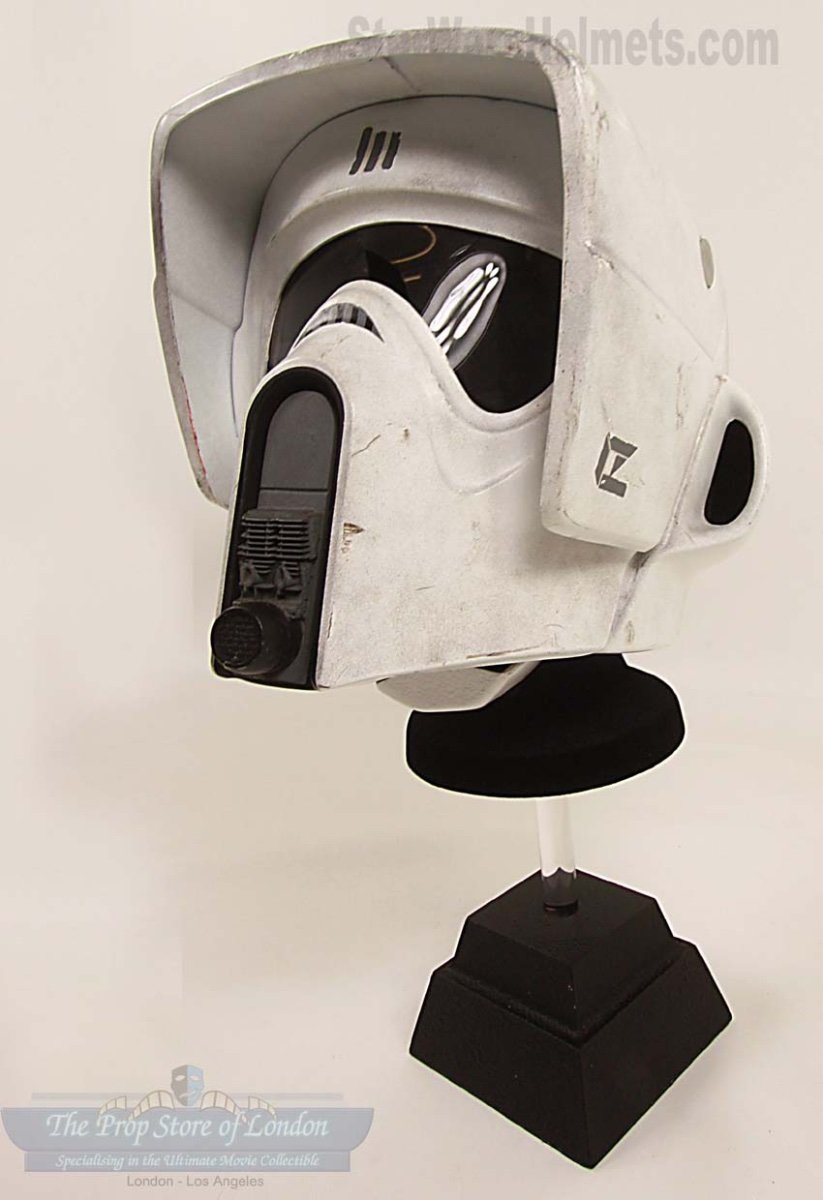
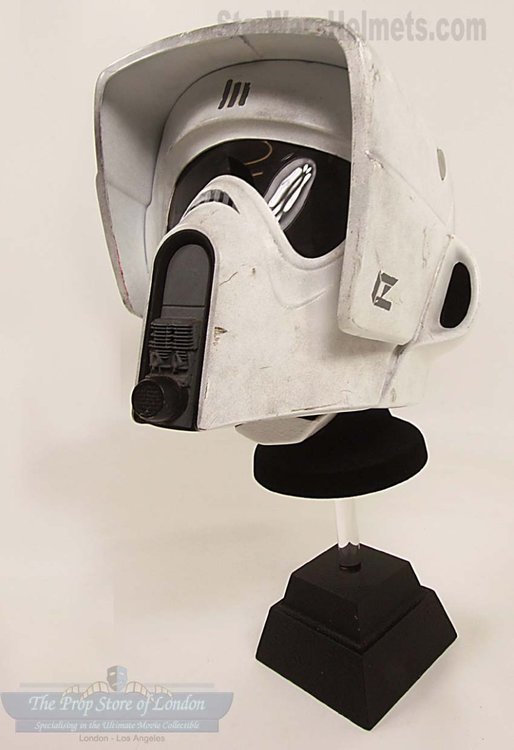
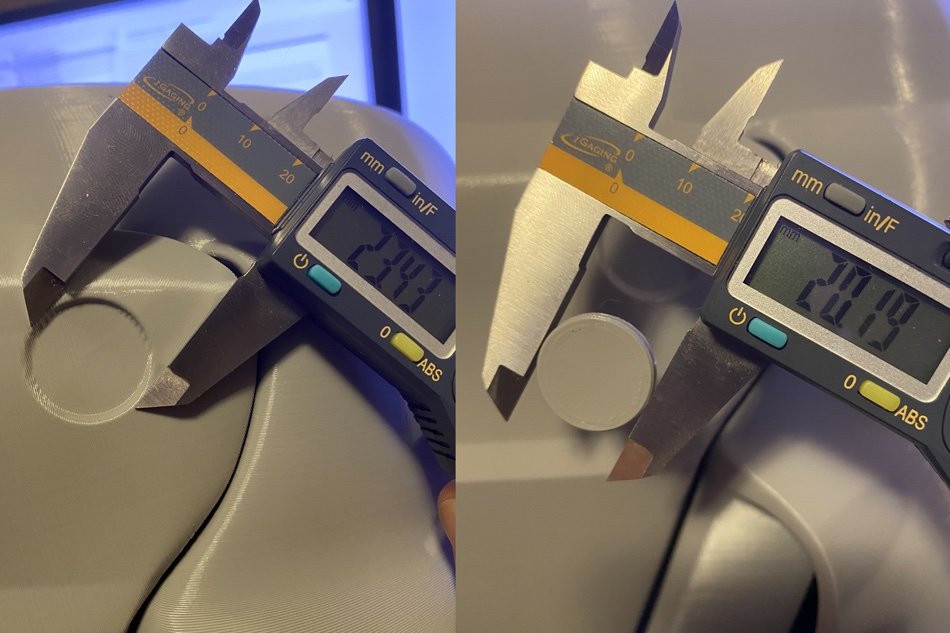
This helmet came highly recommended on this forum as one of the most accurate 3D prints available and that with minimal alterations it was easily approvable. After having it sit in my project folder for a while I finally decided to bite the blaster and give it a print. Using Hatchbox PLA for the main helmet and Creality Standard Resin Plus for the snout greebie I started the multi-day print last week. Everything printed nearly flawlessly and for the first time in 30+ years I had a respectable Scout Trooper bucket in my hands. As someone who worked in the film industry as a make-up FX artist, loves films/props and makes a living obsessing over small details, accuracy is something I enjoy striving towards. So, having sat down with this helmet for a bit, I've decided to do an in-depth review for anyone who is thinking of printing this as well. ... Printing The printing went fairly well. The model does come with pre-made supports, but they can only be used if your slicer is Simplify 3D. For those using others (Cura in my case) you will need to rely on auto supports or manually add them. The only real issue I had with the models is that the chin guard, "3M bolts" and snout come as a single STL. Unless yo manually break this up in Meshmixer or some other 3D program you have to print them in a single print. Not ideal for anyone wanting to print at a different orientation, on a different printer, or simply not print one or more of the parts. Jesus should break these up into individual files. Assembly I have to say that one of the best and worst aspects of this helmet is the assembly. The model is designed with diamond shaped keys that allow the visor and the face to line up. Great idea on paper, but in reality it is not that well implemented. The reason is because while the keys are nice, they are excessively long. If we were talking about vacuum-formed parts this would not be an issue as they can be quite flexible, but depending on your print settings the parts can be quite ridged. This means that when you try and distort the parts to get the keys aligned there is a increased risk of snapping a part. In addition, anyone who has 3D printed large parts knows that they can warp as they shrink. This is why when designing models there needs to be considerations taken for tolerances. The long and very tight keys make the assembly a very risky endeavour. This same issue pops up where the face attaches to the main helmet. Jesus has modelled long pegs designed to slip into holes on the main helmet, but like before, these are excessively long requiring a lot of flexing of the parts... more than I was comfortable with. In the end I sawed off the excess keys giving me just enough to slot the parts in place. This shortening meant that there was very little need to flex the parts to the point of snapping. Were I to offer advice to Jesus, it would be to shorten these keys significantly. Not only would it help in the assembly, but it would reduce the need for printing supports. I would also suggest he improve the tolerances a bit to allow for warping and shifting of the prints. Finally, the visor is designed with two printed pegs that allows it to rotate on the helmet. This is great, but 3D prints do not work well like this. I used custom 80% fill on these parts and I am still concerned with the strength. To avoid snapping these it would be preferable to have the option to add in a proper 3M bolt or a metal bolt. I will be looking for ways to customize this, but I wouldn't rely on the printed peg for a wearable helmet. Pivot Point On the original helmets from what I understand the pivot point (where the face meets the main helmet) was achieved by using a 3M bolt. For some reason, Jesus decided that this bolt would be fake and the pivot point would be in a different position inside the visor. This unfortunately means that without significant modifications there is no way to drill out the bolt intent and replace it with a genuine 3M bolt. Jesus recommends using a bearing to allow it to move freely, but as many seem to have noted with this helmet, getting to to sit in the open position often requires some interesting modifications. This model leaves little room for this. In addition, the fake 3M bolts do not appear to be accurate in either size nor shape. To my eyes the genuine 3M bolts look to be about 21-22mm. The bolts that come with this print are about 20mm which seems small to me. I will have to wait until I get some genuine ones to confirm. I am not sure why Jesus chose to design it like this. My suggestion would be to figure out why the design isn't working correctly and adjust the pivot points to accommodate modifications or at the very least a genuine 3M Speedglas bolt. JESUS SALMERON I am aware that "recasting" and theft of 3D prints is a issue for many and so many designers add in their logo or design in an attempt to stop this. Jesus is no exception. I have no tolerance for designers who add their logo in a viable place, so I give Jesus credit for only adding it once and in the inside of the helmet. Unfortunately he decided to make it huge. This not only adds additional print time, but it creates an annoying issue if you're looking to use fibreglass or electronics in that area. I understand the reason why it is there and artists should sign their work, but this is an excessive logo that is intrusive. I think a more subtle logo would be appropriate and appreciated. Snout Greeblie One of the most disappointing aspects of this model is the lack of snout detail greeblie. He does mention this in the description and provides a link to Ebay, which is no longer there. This required me having to track down an accurate 3D model. Having worked with the 501st to improve some detail, I am confused as to why he has not worked with someone to provide an accurate model, or a working link to one. Accuracy Details in the Design I understand that a 100% replica of a vacuum-formed ABS helmet from the 1980's in 3D print may be an impossible task. It simply may not be practical to design parts to the same thickness of the original ABS. However, there are some aspect that to my eye stray from the original design to the point where I am a little disappointed. -- Visor thickness -- The front edge of the visor seems thicker than it needs to be even for a 3D print. This thickness can't really be noticed throughout the rest, but it would be nice if Jesus found a way to bring it more in line with the thickness of the original ABS. -- Helmet Lines -- When looking at the original helmet, the line that starts at the front of the visor seems to continue around to the back of the helmet. This line is where the curve of the ears start. In this design, Jesus seems to have this line disjointed. So when you follow the visor line around the helmet, it isn't continuous. Part of the reasons is because the transition between the ears and the top of the helmet isn't as defined as on the original. The second reason is because it appears the angle on the visor is not correct meaning the visual lines don't line up as they should. Jesus could easily fix this with a visor redesign. -- Forehead -- On the original helmet the forehead / brow has a slight concave curve to it. On this design it is very subtle if there at all. It is a small detail, but the lack of it on the Jesus design does make it a tad less accurate or interesting visually. -- Thickness -- The original helmets as you all know were thin ABS meaning that there was no internal thickness. Jesus has opted in his design to add thickness to many of the parts creating what amounts to an internal structure. This is pretty cool, but it does also cause some issues. Firstly, it take a lot more time to print. For me, the back of the helmet alone took 3.5 days. It also adds a lot of unnecessary weight to the helmet. I used 8% infill and without paint, fibreglass, bondo, foam, visor, and internal electronics it already has significant bulk. Overall Opinion and Suggestions I am no expert on this armour and these critiques are based on my observations and limited research. I will say that overall it is one of the most accurate 3D models that can be purchased out there and there are many. I do however feel that if Jesus were to do a second round of scrutiny it could hit a level of accuracy that may be as close as possible to an idealized 3D printed version. I am overall quite impressed and I will not be unhappy to have this displayed on my shelf. The following are my top suggestions for version 2.0. 1. Improve some of the accuracy of the smaller details particularly the 3M bolt Pivot, the helmet lines on the visor and forehead. 2. Model and include proper 3M bolt representations 3. Remodel the pivot point so a 3M bold can be used or at least more flexibility with more robust hardware 4. Split the chin file into separate STL files and include accurate bolts and snout details. 5. Rework the internal structure to be functional (fan mounts, foam mounts, hardhat mounts), or reduce the thickness to improve print times and options 6. Address the keys to allow them better tolerances and length 7. Remove the watermark/logo and replace with a more appropriate size/position 8. Include a basic "How To" PDF for assembly Hope this helps!- 1 reply
-
- 1
-

-
Hello All, I just got done printing the JESUS SALMERON version of the Scout Trooper helmet. My goal is to get to as close to accurate as possible working within the confines of that model. I'm not likely to ever do a full armour (perhaps if the helmet goes well), but I would like to get the helmet to as close as Lancer quality as I can for my own personal satisfaction. I've spent weeks looking up topics on here and while there is more information I could read in a lifetime, I can't seem to find information about a few things. Below are the questions I have and would appreciate any help. - What are the exact dimensions of the 3M Bolts? I have some in my shopping cart that were recommended on this site (with the concave indent). However, I am concerned they won't fit on this helmet as they look significantly bigger than the ones that came with the model. I am aware that because the 3D model isn't completely accurate the bolts can't be used as a pivot point, so they would be completely aesthetic, but I want to assure they fit before I order. In addition. It seems there are no accurate 3D models of these bolts available online. Would anyone be interested if I were to model some? - What is an updated snout paint list? Many threads from years ago recommend Testors paint for the snout. Unfortunately Testors brand is a shadow of its former self and sourcing the exact paint seems difficult if not impossible. With he line of current paints on the market (AK, Vallejo, etc.) I am looking for a modern equivalent to the colors recommended. - Accurate Snout Mesh and details? I've seen a few people recommend using strainers from the dollar store as mesh, but others say that a thicker wire is recommended. There seem to be a few kits for TK kits, but I haven't found much on these forums for the scout. What gauge and weave type should I be looking for? Also, I've seen a lot of helmets where the mesh seems filled in. Even on the original helmet it doesn't seem to be hollow. What are the standards for this in terms of detail. Should it be filled in? - Elastic Chin Straps I have read that 1" elastic webbing should be used for the chin strap. Is there a specific kind or will any elastic (in black) do? - Visor Material? All the links to the recommended face shield seems to be unavailable. I know with the TK the eyes are required to have a tint of green, but I can't seem to find any information on what is recommended in 2022 in terms of product, tint, etc. The Mando build group are using welding shields, but is this appropriate for this build? ... I think that is a good start. Thanks everyone. P.s. For those wondering, the attached photo is straight off the print bed. The snout greeblies are resin while the rest is PLA. I'll be doing a review on the Jesus helmet after this if you're interested and I'll try to remember to link it here. If I forget, remind me please.