


DontDissTheFett
-
Posts
42 -
Joined
-
Last visited
Everything posted by DontDissTheFett
-
DontDisstheFett’s ROTJ Build Thread
DontDissTheFett replied to DontDissTheFett's topic in ROTJ Biker Scout WIP
Thank you, I really appreciate that! Had a few missteps in the beginning but slowly but surely it’s coming together! Sent from my iPhone using Tapatalk -
DontDisstheFett’s ROTJ Build Thread
DontDissTheFett replied to DontDissTheFett's topic in ROTJ Biker Scout WIP
Oh my, no it does not. I tend to like whatever my helmet is better than that Kropserkel. Thank you for pointing that out! Sent from my iPhone using Tapatalk -
DontDisstheFett’s ROTJ Build Thread
DontDissTheFett replied to DontDissTheFett's topic in ROTJ Biker Scout WIP
I bought the helmet off a member of the Replica Prop Forum a few years ago. He said it was a Kropserkel and that he assembled and painted himself as a display piece. I didn’t really have any reason to doubt him because I didn’t know about different helmets so I just assumed that’s what it was. It’s construction is all abs, just like the SC kit If that makes a difference. Sent from my iPhone using Tapatalk -
DontDisstheFett’s ROTJ Build Thread
DontDissTheFett replied to DontDissTheFett's topic in ROTJ Biker Scout WIP
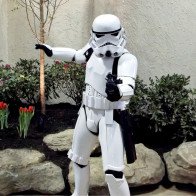
Ok, time for a bit of an update.. I tried several times to get a good white circle painted on my tank topper but I just wasn’t happy with it so I borrowed my girlfriend’s daughter’s Cricut and made a half inch circle vinyl decal and it fit perfectly. With that out of tbd way I wanted to tackle the belt. After some practice I was able to sew some white velcro tbd 2 pieces of nylon webbing, then glued it to the plastic belt, cut some plastic strips and riveted it in. I was actually quite proud of myself because I’ve never used a sewing machine before. With the belt together, I started fitting the drop boxes and for that I figured I needed to have the racing suit on and I figured while I had that on I’d go ahead and try everything on so far. I had my girlfriend pin the straps in the back just to try to get an idea of placement. Looking at it I see I forgot the rear buckles so I guess that changes the placement a bit.. . How’s it looking so far? I still need to: -attach the drop boxes -Sew my shoulder bridge covers -Put elastic in the shoulder bells to keep them tighter on my arms -Roll the shoulders forward a little -Side strapping -Put on the holster -Fix the pouches on the cummerbund Sent from my iPhone using Tapatalk -
DontDisstheFett’s ROTJ Build Thread
DontDissTheFett replied to DontDissTheFett's topic in ROTJ Biker Scout WIP
And with the fine touch help of my mini Dremel, a thin cut off, and my trusty set of needle files I was able to get the slots cut in my belt and test hooking up the strapping and boxes. I didn’t have enough 2” webbing to do the belt the way I wanted so I ordered some from strapworks, should have Thst in a few days. While I wait I’m going to get the returns on tbd tops of my boxes removed, sew my bridge cover, and clean up the slight return edge on top of the belt. Sent from my iPhone using Tapatalk -
DontDisstheFett’s ROTJ Build Thread
DontDissTheFett replied to DontDissTheFett's topic in ROTJ Biker Scout WIP
Test fit with the shoulder bells. I haven’t put the retaining elastic in yet so they’re a little out of whack sitting too far back but I think I’m happy with the progress so far. Sent from my iPhone using Tapatalk -
DontDisstheFett’s ROTJ Build Thread
DontDissTheFett replied to DontDissTheFett's topic in ROTJ Biker Scout WIP
They are sewed. I wish I would have noticed when I first received it; I was just trying to acquire all the soft pieces while was waiting for my armor to arrive and didn’t examine it like I should have. Sent from my iPhone using Tapatalk -
DontDisstheFett’s ROTJ Build Thread
DontDissTheFett replied to DontDissTheFett's topic in ROTJ Biker Scout WIP
Thank you [emoji120] Sent from my iPhone using Tapatalk -
DontDisstheFett’s ROTJ Build Thread
DontDissTheFett replied to DontDissTheFett's topic in ROTJ Biker Scout WIP
Ok so I decided to take a break from the cutting for the night and start working on putting the front and back together, and getting the shoulder bells attached. I put the front and back together with a 3” strip of loop side Velcro. I was “thinking” that for more stability there I could affix a matching piece of hook side, then on its sticky back affix and loop facing down. That would give more structure to the joint area, still have fuzzy Velcro on my shoulders, and still allow me to attach my anchor for the bells. Has anyone done that before? My plan is to use a zip tie anchor with Velcro attached to its bottom and affix it on the bridge while keeping it completely secure (I used industrial Velcro) and allowing me to adjust it. Here are the shoulder bells drying, I still need to put the retaining elastic on though. My 1x1 anchor with industrial velcro attached My wampa wear gloves came in so I decided to go ahead and try on everything I had ready so far. Please excuse the placement. All the arm pieces are adjustable with Velcro except the biceps and wouldn’t you just know it those are the things that are loose lol. I’ll be readjusting those. I also noticed they my front pouches are uneven; one is 1 7/8 and the other is about 2 1/4 from the top edge. I could be wrong but I think I see the pouches on the crl model and the scout pics on scoutopdia as being a bit uneven. Is this actually a problem or do I need to try and fix it? -
DontDisstheFett’s ROTJ Build Thread
DontDissTheFett replied to DontDissTheFett's topic in ROTJ Biker Scout WIP
Thank you, Chopper. I’ve been going back and forth with scoutopedia but admittedly I’m having a little trouble getting used to the difference of this build versus the TK, where there were exact measurements for everything. I understand why here there are not but it’s taking a little bit to jolt my mind into a different mode. I guess I want to be precise as possible but this build isn’t about exact precision. I appreciate your help as always. Sent from my iPhone using Tapatalk -
That’s great, thank you! Did you split the scope in half by any chance too? Sent from my iPhone using Tapatalk
-
That blaster came out great! I’d like to slice it up the same way you did because it looks like you had a really clean print and I am not a fan of supports either. Any suggestions Thst you can share of any best practices to do it and situate them? Sent from my iPhone using Tapatalk
-
DontDisstheFett’s ROTJ Build Thread
DontDissTheFett replied to DontDissTheFett's topic in ROTJ Biker Scout WIP
Thank you, that’s helpful! It’s a little difficult to see exactly because of the watermark. It actually looks like the left side is on the horizontal surface and the right is on the vertical. Is the cut towards the back on the horizontal surface, or would you say it’s the corner of the right angle and widened so it takes up a part of each surface? Sent from my iPhone using Tapatalk -
DontDisstheFett’s ROTJ Build Thread
DontDissTheFett replied to DontDissTheFett's topic in ROTJ Biker Scout WIP
One other question about the slots on the belt- Do they go on the vertical surface (marked in green) or the horizontal surface (marked in red)? Sent from my iPhone using Tapatalk -
DontDisstheFett’s ROTJ Build Thread
DontDissTheFett replied to DontDissTheFett's topic in ROTJ Biker Scout WIP
Good advice, thank you [emoji120] Well I went to Home Depot after work and picked up a big multi pack box full of different bit for the Dremel and i came across a little tiny Dremel apparently marketed for hobbyists. Seeing Thst mine is a “regular-sized” one I figured it might be a bit easier to control and lend itself to a lot of uses where a more fine touch might be needed. I used the little Dremel with a sanding drum and tried to take down the returns on the SC drop boxes. Does the entire edge need to come off, or can a small “lip” be left over? Original: Now onto the slots: I used a very thin cutting wheel first on some scrap and felt that I could control it well enough so I went in tbd end for a thicker wheel just to cut down on filing time to enlarge the slots. Once I cut the slot I used a few needle files to clean it up. I did make a mistake on one side and cut the slot a little past the indented area. I’m not sure that it matters but it does kind of bother me. Is this going to be a problem? I can clean this slot of with more filing but I definitely should have used the thinner wheel. Sent from my iPhone using Tapatalk -
DontDisstheFett’s ROTJ Build Thread
DontDissTheFett replied to DontDissTheFett's topic in ROTJ Biker Scout WIP
Thank you! And thank you for the tip with the dremel. I was thinking of either tracing a pencil line or laying a piece of painter’s tape across to follow. Ill have to pick up a pack of cutting wheels since I can’t locate where mine went lol but I feel a little more confident now. Thanks! Sent from my iPhone using Tapatalk -
DontDisstheFett’s ROTJ Build Thread
DontDissTheFett replied to DontDissTheFett's topic in ROTJ Biker Scout WIP
Ok! So I cut two pieces of elastic, one for the top and one for the bottom and melted holes in them with my soldering iron. I originally just riveted the elastic to the bottom of the tank but I didn’t quite like how the tank fit so I drilled it out. It took a little doing but I was able to fit in the top rivet and elastic and at the same time have the bottom Rivet go through the tank and the hole I drilled in the back, sandwiching in the elastic. I actually had to glue the elastic with its hole lined up with the hole drilled in the back so when I put the tank over it I could put the rivet through all three items and then put a washer behind. All in all I think it looks pretty good. I bought some small parachute buckles that I’ll sew on each end to connect the elastic together then Velcro the buckle to the back. Then and of course paint the white circle. The rivet emerging out of the backside of the backplate. Next up: order the belt clips for the TD and cut the slots in the belt and drop boxes. I’ve seen suggestions of just using a Dremel and cutting across but I’m a little nervous about that lol. Is there a preferred way many like to do that? Sent from my iPhone using Tapatalk -
DontDisstheFett’s ROTJ Build Thread
DontDissTheFett replied to DontDissTheFett's topic in ROTJ Biker Scout WIP
So my backplate came and just like Jeff said, SC has a much larger scoop out to fit a rivet gun in. I sanded all the rough cut edges and polished them with 0000 steel wool and took 3/4” of the shoulder straps like I had done with the other. I reapplied the rank bars and moved them up to look more inline with the screen scouts and used a soldering iron to put some holes in some 1/2” elastic. Now I’m ready to put the tank on. Does this look like a good position for the lower rivet? Sent from my iPhone using Tapatalk -
DontDisstheFett’s ROTJ Build Thread
DontDissTheFett replied to DontDissTheFett's topic in ROTJ Biker Scout WIP
Thank you! Sent from my iPhone using Tapatalk -
DontDisstheFett’s ROTJ Build Thread
DontDissTheFett replied to DontDissTheFett's topic in ROTJ Biker Scout WIP
And one piece done. These files print beautifully. I’m just going to keep printing until the mailman brings my backplate. I do have a question on tbd lower tank rivet- I’ve heard people say they riveted the lower rivet through the tank and elastic right into the backplate and others have said just rivet the elastic to the tank and NOT I to the backplate. Which is correct? Sent from my iPhone using Tapatalk -
DontDisstheFett’s ROTJ Build Thread
DontDissTheFett replied to DontDissTheFett's topic in ROTJ Biker Scout WIP
Thank you AradunFF! Since the work week has started again I thought it would be a good use of time to start on a MrPoopie blaster Sent from my iPhone using Tapatalk -
DontDisstheFett’s ROTJ Build Thread
DontDissTheFett replied to DontDissTheFett's topic in ROTJ Biker Scout WIP
Thanks Harbinger! I love being able to whip up little parts to help put things together. Speaking of that.. This weekend was busy so I wasn’t able to get much done but I did manage to put together the TD. The vacuum tube snap snugly over the 3D printed rings and won’t need to be glued after all; in fact, they’re not coming off without a fight lol. Drilled a few holes and stuck a zip tie in and voila. I do need to source some clips for it though. Tomorrow the new backplate will be here so I can get the tank on and start strapping the shoulder bells. Sent from my iPhone using Tapatalk -
DontDisstheFett’s ROTJ Build Thread
DontDissTheFett replied to DontDissTheFett's topic in ROTJ Biker Scout WIP
Thank you Chopper. Thank you for that. I relocated my drill points to about 3/8 from the top and center on the flat piece. I cut some spare plastic and glued it behind for reinforcement, drilled my holes, cut my elastic, and popped them in with a rivet. Next I glued the greeblies on the TD and 3D printed some rings to affix to the inside of the TD end caps. I sized them so the TD tube actually snaps onto them, but I’ll end up gluing them on too. Once they are dry tomorrow I’ll assemble the tube, drill the holes for the zip tie and finish off the TD. Jeff at SC was incredibly fast and already shipped out my new and improved backplate and it’s scheduled for delivery on Monday. As soon as I get that I can attach the tank, and attach the bridges to work on the zip tie method for holding the shoulder bells. Once that’s done what’s left is: Cut slots in belt and drop boxes Affix webbing to to plastic belt Weave through the strapping for the drop boxes Affix the holster Rig up the side straps for the chest/back. It’s coming along! Sent from my iPhone using Tapatalk -
DontDisstheFett’s ROTJ Build Thread
DontDissTheFett replied to DontDissTheFett's topic in ROTJ Biker Scout WIP
Ok a little bit of a progress update.. I bought a plastic container from Walmart and cut out a nice patch to cover up the entire hump area on my backplate. I only considered patching it for my benefit as the hole is only visible from the inside. I talked to Jeff from SC and he said the new backplate has a much bigger recess to allow easier riveting from the bottom so rather then mess around with alternative methods I just went ahead and got one. He’s already shipped and it should be here Monday. I took the time while I’m waiting to pull out the sewing machine and make some strapping for the knees, forearm, and bicep pieces. I was originally going to just glue bought after thinking about it the extra work of sewing Velcro was worth the adjustability. I bought some Velcro brand sewing Velcro which was just horrible so I ended up using sticky back industrial Velcro. It gummed you the needle a bit on the sewing machine which required a few wipes of mineral spirits to cleanup. Although a little bit of a pain it was worth it I think for the strength of the industrial stuff. I also glued the t bits in and want to now get ready to glue a reinforcing plate behind and rivet the 2nd strap in the knees. Once I do that I’m headed to the TD. I measured about 1/2” down and a 1/2” in, is this a proper spot to rivet the 2nd strap? Sent from my iPhone using Tapatalk -
DontDisstheFett’s ROTJ Build Thread
DontDissTheFett replied to DontDissTheFett's topic in ROTJ Biker Scout WIP
That’s a really good idea and that sounds like the way to go. Unfortunately I already cut a hole in the hump and that worked out well, until I put the tank on. Maybe I messed up cutting.. I’ll try this alternative and perhaps I can patch the hole I made. Sent from my iPhone using Tapatalk
