

FN1313
-
Posts
50 -
Joined
-
Last visited
Everything posted by FN1313
-
Alright, I got my boots and materials to build them, so here's what I've got. I've been following this guide from @cheesewhoopy Biker Scout Boots Tutorial. Let me add, it's a fantastic guide, so give it a read over. I actually got the same boots and didn't realize it until I started working on them. They are on Amazon pretty affordable. Kingshow Water Resistant Premium Work Boots First thing I did was draw out the design on the soles to cut out. After I saw more detail that the squares around the heel actually cut up to the seam, so you will see that in my cuts. And here's an added small video I did explaining my process some just for those who want more visual aid. Boot Sole Cuts Video
-
@Stroker Here you go.
-
Yeah didn’t know what the best term was, had my hard codpiece with my FOTK, so I didn’t know if that was still the term or what.
-
I will have to get it in a few days. It’s all with my family who have the sewing machines and all.
-
Got the soft parts from KriptonTop on Etsy. These are the deluxe soft parts which have the better material to be more accurate. The suit fits just like I thought it would, perfectly. If you get the same undersuit, measure everything 1 inch bigger to give some space otherwise it will fit too perfectly. You'll thank having that extra spacing. Here's a closer look of the diaper and the cummerbund I plan to sew the top of the diaper to the bottom of the flak vest. Each part came with Velcro that is not already sewn on so you can size and then determine where to place the Velcro so it holds everything in it's proper place. I will detail more of how I put it together later when I can fit it with my armor pieces.
-
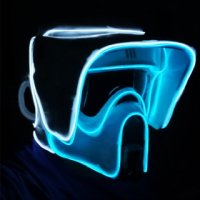
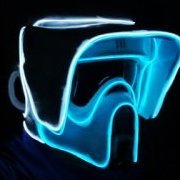
After drying I used Loctite to glue the grey covers in place for the visor. And now he sits with his brother while we wait for the rest of the kit.
-
And because I'm a dirty guy, I decided to weather my helmet. How so? First I took a black paint rattle can and sprayed little puffs of paint from 2 feet away, this gives the dirt look and light weathering. I then did some puffs a little closer in some spots to emphasize a little more dirty, but not a lot of these. The best trick I found was putting the same enamel paint I used on the snout in a plastic cup and pouring in a bit of water to "wash" the paint and thin it out. The enamel didn't thin like acrylic paints, but I liked what it did instead. I used some shredded paper towels that I dipped in and some spots got wet with paint and others with water. I then brushed the wet paper towels along the helmet in spots that I would think wear would happen and that gave it the black scuff looks you see below. Finally I used some 200 Grit sandpaper to scuff up some of the heavier black paint areas to make it look scratched up there as well and not just painted. This gave it a true wear look.
-
Finally to start putting things together.
-
Finally painting. I used some Rustoleum 2x gloss white paint and just sprayed light layers every 15 minutes until I had an even distribution of the paint as such. Did the same on the face cover. After such I let the paint sit a few days to cure properly. I then used some black enamel paint I picked up at the local hobby shop to paint the snout area. I used a sponge type brush to avoid the marks you get from regular horse hair paint brushes or so. I let this dry overnight and then applied decals and glued the snout greeblies in with the Loctite glue.
-
But it's worth the beauty. I then used some primer filler to see if there were any spots needing touch up. There were a few, so I filled them using Bondo Spot Putty. and layered over the seam for added filling.
-
As mentioned I will have two helmets. The first I've already got from Cucblack aka KriptonTop. The second which I will build much later probably will come with the armor kit. Here's the build process I followed with the Cucblack helmet. The helmet unpacked From here I used an exacto blade and did score and snap method to cut off all the additional plastic and cut holes into the eyes and ear sections. I then used some masking tape to put things together how the helmet would be formed so I could see how it fit together and which spots would need some additional trimming to fit. I also at this point drilled holes into the sides of the visor to determine where to put the nuts and bolts that came with it to connect the faceplate/visor to the helmet. Now that I had the basic sizing and build, It was time to glue things together. I used some Loctite glue and the extra plastic provided to glue the helmet sides together on the inside. After the glue set I used fiberglass cloth and fiberglass resin to fill and strengthen the seam. I also added fiberglass and resin to the inner ear vents as you can see above to strengthen them as the plastic there was a little thin. After that solidified, I needed to fill the seams. To do this I used Bondo filler. Note here I had to fill once, and then let it cure a day, after I had to do another layer to fill completely as there was still a dent left behind from filling the first time. Here's how it was after: Now to sand... and sand... and sand. did I mention sanding?
-
Links to Build Sections (in progress) Build materials Helmet - Cucblack aka Kripton Top Boots Soft Parts Armor > Boot/Holster > Thermal Detonator > Back Plate/Tank > Chest, Back, and Shoulders > Arms > Knees Basic Approval Submission Photos >>>note: the TD was upside down in these photos. So use them as reference points, but know that I had it put on upside down.
-
Hey everyone. I’m working on building my second armor kit and have decided for a scout. My first kit was a TLJ FOTK and due to immobility, size of storage and visibility, I opted to give a scout the run for my next kit so I can have one for versatility. That being said I’m going to be documenting my build and progress here. First, my components: Helmet KriptonTop/Cucblack helmet kit Also getting a spare with my armor kit Armor Studio Creations armor kit Soft goods Deluxe Biker Scout soft goods from KriptonTop/Cucblack Gloves Imperial Boots Boots Currently going to get from a garrison member otherwise I will build my own. Long term I aim to go Lancer with this build as I don’t see too much difficulty in doing so. But I may get basic build done first then add to it. We will see. progress pics and guide to come.
-
I don’t know how to build this helmet
FN1313 replied to Commodore's topic in ROTJ Biker Scout Armor/Helmet
I actually just got my helmet from Cucblack as well. His shipping was fine too. I’ve been building mine and it takes work, but it’s more time consuming than difficult. The trick is sanding and bondo. Paint will need to happen, but thankfully it’s not going to be near as bad as my FOTK kit was lol.
