.jpg.5014b1289a331de28f43029363a07ea0.jpg)
bobafett4ever
-
Posts
110 -
Joined
-
Last visited
About bobafett4ever
- Birthday 12/16/1977
Recent Profile Visitors
262 profile views


-
.thumb.jpg.15b547649cf84992898190b29a4460d3.jpg) Interesting. I usually have it under my nose, but over my mouth... using it to hold my mic in place. I'll have to try under the chin next time and see if that has any effect. I wouldn't have ever thought of that... so thanks
Interesting. I usually have it under my nose, but over my mouth... using it to hold my mic in place. I'll have to try under the chin next time and see if that has any effect. I wouldn't have ever thought of that... so thanks -
Hello fellow troopers. I enjoy wearing my Mando Biker Scout, but in NC, where it's nice and humid a lot, I've come to realize that no matter what I've tried with wipes, toothpaste, shaving cream, etc... I just can't keep the visor visible for more than a few minutes. In my Gunner Helmet, I run 2 HenrysHelmetFans and it works great... so I was thinking of at least trying 1 of his fans in my Biker Scout Helmet. However, the problem is that it's a small helmet. In fact, I can't even wear my glasses in it. I have to put in contacts. So, I was wondering if anyone has a pic of how they put a fan in their biker scout helmet, and bonus, if you wear contacts, does having a fan in there dry out your eyes and/or make it miserable? TIA
-
Mandalorian Scout Lancer drafting
bobafett4ever replied to BikerScout007's topic in Scout Trooper: "The Mandalorian" HQ
Sorry, I was obviously typing faster than I was thinking... I used 1 inch elastic, not 1/2 inch. -
Mandalorian Scout Lancer drafting
bobafett4ever replied to BikerScout007's topic in Scout Trooper: "The Mandalorian" HQ
Good point - yes, the velcro used for the shoulders, arms, and knee pads was black 1/2 inch... the velcro used for the chest to back was 1 1/2 white. I think when I attached my armor to my shoulders, I made little elastic T shaped sewn straps then velcroed them. But I'd have to dig it out to confirm specific measurements. I believe I went by Christina's build for doing that, although I can't remember if she did snaps or velcro. I used no snaps... all velcro on mine. -
Mandalorian Scout Lancer drafting
bobafett4ever replied to BikerScout007's topic in Scout Trooper: "The Mandalorian" HQ
I mean. to me, I feel like what we did for the CRL really is Lancer type stuff already. I'm not really aware of anything that we could have done better, or more accurate, as I feel like the little things we found we made the basis for the CRL. I know some folks mentioned not 3M taping the helmet together so that for going for Lancer, you wouldn't need to go back and bondo then re-paint the helmet 'gap' to achieve a one piece look, but I did 3M it and it's worked great for me so far. In fact, I don't think I could tell the difference if I tapped or used e6000. There really isn't a gap to speak of, and I feel that you weather around that area anyway so I'm not sure that needs to be a thing, but again I'm newer to this so just my thoughts. I saw mentioned elsewhere that the pockets on the legs need to be straight across the flap, but re-watching the episodes, I feel that only the one trooper that asks for the chain code in Episode 7 may have that... but the others in episode 8 appear to that that little "wave" or regular flap that all the old school pilots/gunners have. I'll keep an eye on this to see if I'm able to help out in any way. Personally, the hardest part for me was the weathering and I don't like how mine looks. I don't wear it often because I feel like it looks like a kid did it, lol. I wish I had the talent to do it to make it look more authentic like theirs's looks (or like the others that did it around the same time as me)... maybe that could be a Lancer thing? Air brush oil painted instead of the sponge with acrylic paint like I did? Maybe that's too picky. Not sure I can't wait to see how this finishes -
So, in case you're curious, I did end up using the 3M tape and have done a couple troops and haven't had any issues. I'd recommend. I'll probably not go for Lancer because I don't want to have to paint the helmet, so 3M tape worked for me!
-
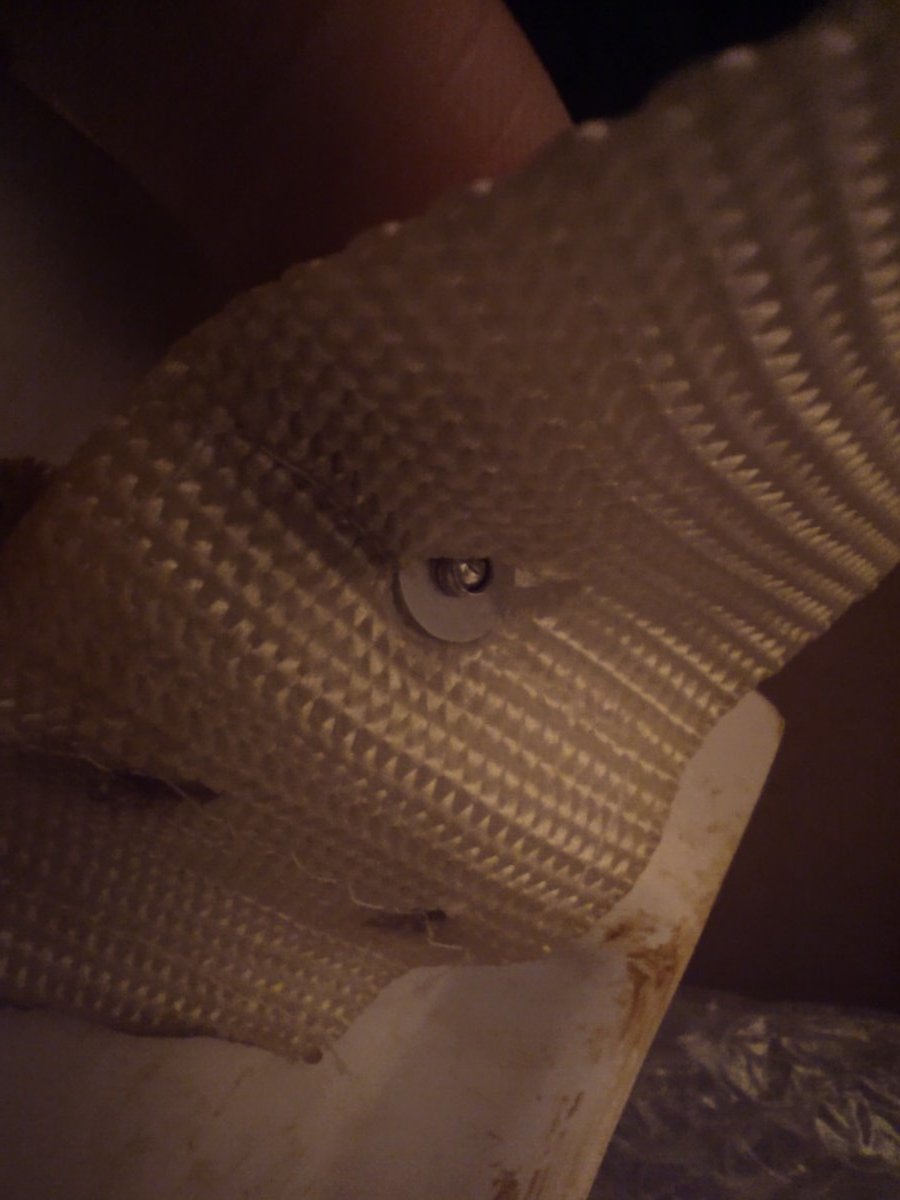
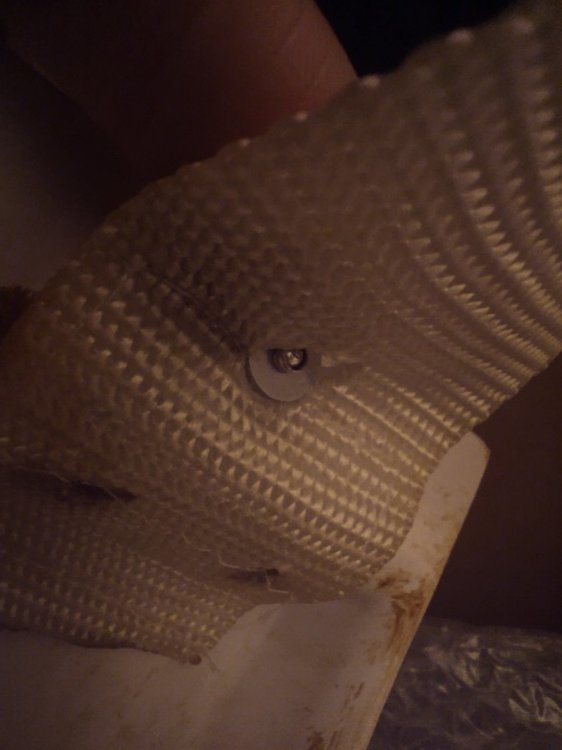
Oh... ok... mine has a little dimple / bead on top so I guess I'll have to sand that down then try to drill. Thanks SO SO much! Have a great day.
-
Again, thanks so much. I confirmed they are aluminum, so I'll get that cobalt steel bit and try that. Last question (I hope, lol)... but how do you drill it out without the drill tip wanting to spin everywhere but on the little section of the backside of the rivet? I'm sure I'm missing something here... but I'm not that tool savvy. I appreciate the info!
-
Great, thanks. I don't have enough slack, but can definitely try to stitch another piece and re-punch the whole. One question, what's the easiest / safest way to remove the old rivet? I tried once to remove a rivet (when originally putting everything together) on the backplate / backpack and it melted through and caused a nightmare to fix... so I'm really worried to ever try to remove a rivet again, lol.
-
Heya folks. I've only worn this costume twice, but somehow, my belt seems to be pulling apart at the rivet. I have no idea how to fix this, if you even can. Any ideas or thoughts? TIA!
-
bobafett4ever changed their profile photo
-
The strapping/elastic is a different size. The pouches are held on differently. The strapping on the back clips is different as it goes over the clip, and makes it non-functional. It's a little more complicated then just flipping the knee pad upside-down Yes, I'd say same flight suit is used (TIE flightsuit). I'm not sure what the shoulder bridge was/is, but I'd say it's the same as the Mando Biker Scout where it's held on by using elastic Velroed to the chest / back plate, and out to the shoulder armor.
-
TB - Scout Trooper - The Mandalorian is now LIVE!
bobafett4ever replied to BikerScout007's topic in Announcements
Great job everyone... and great job @Zeronin Yours looks fantastic, like you just walked off the set! Hopefully we'll see more of these troopers in Season 2!! -
Looks great! Pics look perfect. Wonderful job, troopers!
-
Although I've been in the 501st since 2017, I've only worn soft costumes, with 11 approvals, up until this year. I decided to embark on a new journey with The Pathfinders, and make a Mandalorian Biker Scout. I'd never worked with armor before and had no idea what I was doing. After must debate and discussion, I too decided to purchase Studio Creations Biker Scout armor, and attempt my build. I must say, I'm glad I did. Not only have these forums been very supportive, but SC did a create job pulling and cutting it. The price was great. I got it in 2 weeks from my order date. I emailed them once and they responded within 48 hours. I am very happy. My only cons would be this (which aren't anything big, but good to note if you're new and going to purchase SC armor). 1. It comes with a green lens. That's useless... you'll have to get a black one. 2. The instructions say to attach the belt to the webbing, on the back, with 2 rivets on each side. That's incorrect. It's one rivet on each side. That wasn't too hard a fix but it was annoying none-the-less. 3. Most of the Velcro/webbing provided is for the RotJ scout, and can't be used with the Mando Scout, as it's different sizing. All-in-all, I'd highly recommend. If it's anyone's first time, go SC. Remember however, if you've never done armor before, prepare to also purchase tools/glue/velcro, etc
-
How's this CRL coming along? Anything else we need or just awaiting pictures? Any progress or updates?