


shashachu
-
Posts
44 -
Joined
-
Last visited
-
Days Won
2
About shashachu
Recent Profile Visitors
176 profile views


-
Hi, sorry I missed this notification! I'm the same height as you (5' 3") but not quite as slender (~118 lbs). Overall I found the scout armor quite forgiving for a shortie. My build thread is here Unfortunately as I purchased my armor from another member, I don't know what maker it is. I think if any hard part is going to give you trouble, it'd be the chest. As you can see in my thread I shortened the shoulder 'straps' to get the chest to sit higher but otherwise I didn't have to make any major hard part adjustments. Go ahead and give it a read and feel free to shoot over any questions.
-
Some tips for keeping your scout costume together while trooping
shashachu replied to Chopper's topic in ROTJ Biker Scout HQ
Have you come up with any better solutions for keeping the TD on? I also considered Velcro but worry that it'll be even harder to clip on my belt. -
Thanks! For some reason that link isn't working for me. I wonder if I'm missing access to some sub-forum?
-
Had my first two troops in my scout this past Saturday. A car show in Chinatown and a Relay for Life event: Some thoughts: - The visibility is great! I can see kids, and I can see my feet when I'm walking. - My TD fell off during the car show so our handler picked it up. I cut back some of the box so that it wasn't sticking out so much and I think that'll help. - I took in the legs of my flight suit too much - it's too tight around my calves. Will have to re-sew that. - The costume is HOT. My vest and flight suit were pretty damp when I was done. - I'll probably need to add some velcro to my bicep armor to keep it from slipping down. Otherwise, I had a great time! It's a fun costume to wear, and I like how it's gotten more exposure recently via the TV shows and video games. People seemed excited about it.
-
I found out yesterday that my Scout can fit in a 25 gallon Husky bin, even with the helmet in a helmet bag. I'd originally bought a 40 gal Sterilite/Home Depot bin, but someone in my garrison mentioned he can pack his scout in one of these. I use this one for my TK, so I tried it out and everything fits! I much prefer this particular bin because of it's slim profile; it can fit in the trunk of our Civic. I'll probably refine my packing strategy over time, but here's a way I can currently fit everything in, and close the lid with no resistance: The boots (especially the right boot) and the helmet are the most problematic to fit, but it's not too bad. All the small armor parts are inside the chest/back armor, and the cummerbund is folded up next to my helmet bag. The holster is just kind of sitting in the gap between the bottom of the back hump and my helmet. I'll probably add a blanket or something to line the bin, but I'm pretty pleased everything fits.
-
I was looking through my old TK building supplies and I actually found some 1/8"x3/8" aluminum rivets and 1/8" steel washers so I don't need to wait until the Amazon delivery tomorrow. I took @AradunFF's advice and backed the rivets with a small piece of scrap ABS as well as a washer. Unfortunately one of the washers didn't stay on, but that rivet seems secure enough for now. I have a feeling I might be fiddling with the holster for a while. Hopefully I don't have any issues while trooping. The blaster I have has a magnet embedded in the grip, and I was planning on riveting the other magnet to the boot since it had a hole in it. Unfortunately the magnet broke in half when another magnet hit it, so I ended up just gluing a new magnet on the top of the boot with E6000. As luck would have it, if needed to be exactly where I sewed the boot blouser, so I had to reposition that as well. I also noticed that the front of the blaster has another magnet in it, so I glued another magnet on the underside of the holster. Here's the finished boot (with a clamp holding the magnet in place while the E6000 dries.)
-
Thanks, Brien! And yes once I actually got motivated to work on it, it went pretty smoothly.
-
So, I was approved! I did let my GML know I need to repair the boots before I can troop. Thanks again to everyone for all of the support and tips!
-
Thanks! Thanks a good idea. I have lots of scrap ABS to I'll probably do something similar. I actually did the same with my TK belt because I had problems with the rivet tearing through the canvas belt.
-
An interesting night. I decided to tackle some of my TODO items while I waited to hear back from my GML. First, I added thumb elastic to the sleeves and stirrups to the pants: . Then I was fiddling with my right boot and....the rivets popped out. They were backed with thin plastic (looks like a for-sale sign) instead of washers, and the plastic cracked. In some ways this is the universe helping me out, because I'd been thinking my boots were too tall, but I didn't want to deal with drilling the rivets out, so this was a bit of a blessing in disguise. After some measuring, I decided to take a full 1 1/2" off the length of the boots. It was a bit of a challenge to sew since the vinyl was already glued to the boots: Do not recommend. I also repositioned the inner velcro to make the boot circumference smaller. Here's the left boot after resizing, next to the original right boot: I know that the boots should be stitched in white thread instead of brown for the greatest accuracy, but since the stitching was already in brown, I decided to stick with brown rather than restitch the entire boot. And here's both boots after resizing: I also took this opportunity to sew in the boot blouser on the right boot: Finally, since the boots are shorter, I decided to shorten the holster as well: I didn't take too much off because I didn't want to risk making it too short and not having it cover the old lower rivet holes. I have some rivets on order from Amazon and they're not arriving until Sunday, so I think that's all I can do for now. Is a washer enough to back the holster rivets? Or is there something else that people usually do?
-
Thanks, Corey! Appreciate all of your help as I worked on this costume. One area that I definitely think needs reworking is the right boot, especially when the blaster is in it. I took your advice and put a boot blouser, but it's elastic and I think the elastic is not strong enough to keep the boot from sagging with the extra weight. So I may replace it with nylon webbing and see if that helps.
-
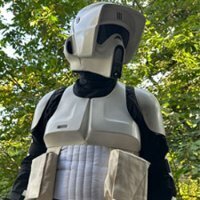
Here's a side by side of when I put on the armor directly after unpacking it from the box vs submission:
-
So, I slightly impulsively decided to submit last night! I looked at my TODO list and realized I considered the remaining items 'nice to have', not required, so I went ahead and asked my wife to take my submission photos. Overall I'm feeling really happy with the way things came together. I didn't have to do much with the armor, but this was my first time doing any kind of significant work with soft parts, and I ended up doing a lot more than anticipated. Looking at the photos I realized that the soft parts came out very very dark (white armor against a white wall) so I just DMed my GML a couple closeups showing that I do indeed have the riding patches and butt flap. Fingers crossed!
-
More soft goods work. I started to feel bothered by how baggy the flightsuit was on me, so I did some quick and dirty tailoring and brought in the legs and some of the butt/lower back area. I failed to take full before pictures, but you can see in these that the legs are pretty baggy: And here's the suit after. Definitely not perfect but I no longer feel like I'm swimming in the flightsuit, especially in the lower legs: . . .
-
Had a great 2 weeks with my family! Now that I'm back, I went ahead and shortened the vest sleeves last night. Although I don't have everything 100% dialed in, I'm confident enough in the positioning of things that it felt pretty safe to do it. Here's the new sleeves length, which I'm pretty happy with. I think I'll need to lengthen/loosen the shoulder armor elastic strap a bit it order for them not to bunch the sleeves, but otherwise I like the way they look.

