


dodger0729
-
Posts
35 -
Joined
-
Last visited
About dodger0729
Recent Profile Visitors
302 profile views

-
Realized I haven’t updated my thread in quite awhile. I used the XTC-3D to help ease the sanding and it worked pretty good! So then I sanded back the XTC when I had some time and then painted it to see the imperfections. I also finally bought a much needed sander and was able to sand everything back. I also constructed the thermal det and XTC-3D’d it. I haven’t worked on it yet since I wanted to finish other parts. I finally decided to apply bondo on the other armor parts since the tiny spots were bothering me. I’m debating whether or not I’m being too much of a perfectionist with this. I think I could weather over certain spots. But this is also my first gloss costume so that is the debate I’m having now. I just keep forgetting I do have a chance to weather it. Sent from my iPhone using Tapatalk
-
These are Disneyland/ Galaxy’s Edge exclusive action figures supposedly. Rumors are these aren’t going to be in the movie and just for sale within the park. Possible character interaction with guests within the land but the packaging actually has Batuu in it. Maybe they will be in the comic! But they might suffer the fate of the AT-M6 driver who was only an action figure. Sent from my iPhone using Tapatalk
-
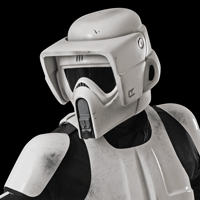
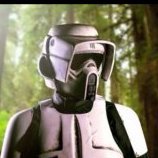
Okay! Finally!! 6 months later and I got the amazon welder’s face shield in. I had some time on my hands before heading home so I decided to work on the helmet as much as possible. So I basically finished the helmet! Minus weathering, I got the rubber pieces on, put the new visor in and cover the front frown with window screen! The visor’s nice because it obscures my eyes but is still green! I was able to also cut he visor wide enough that I could super glue in the visor! Overall I’m happy with it! Now onto the armor Sent from my iPhone using Tapatalk
-
Small update! Fixed the chipped paint[emoji1695] still drying. I also glued the ears on. Hopefully I can get to glueing in the window screen material and the rubber. Still have to order the new visor. But hopefully I can finally start focusing on the armor. Sent from my iPhone using Tapatalk
-
Cleaned up the lines with an exacto knife today! I was playing with the visor to fix it and my lense snapped! So I’m going to pick up this one from Amazon I used them in both of my clone builds and it is still green. Plus it obscures my eyes more and I can cut it to the size I want! I’m also going to buy some testor’s paint pens to clean up the black lines and I got my black sand. Just need to repaint those white areas that were messed up and finish the helmet! Thanks! It still isn’t up to par of what I’d like it to be but it’s getting there! Sent from my iPhone using Tapatalk
-
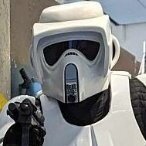
Haven’t had much updates as of late because of research papers and finals and such. Finally got around to repainting the white on the helmet. Then I outline all the grey squares with black. I used acrylic flat black modelers paint and a brush that had dried hard with paint before. I’m going to get a restore paint pen to clean up the lines. Only issue I have faced with the helmet is the tubes. When I pulled the tape some of the White came up in one of the spots. I’m going to have to repaint it. Overall the rustoleum enamel gloss white is wayyy better than the regular paint. Takes longer to cure but is so smooth. I also got my EC-17 in the mail. I can’t remember the model name. I began working on it since I wanted to test this new 3-D smoothing product. It’s actually a lot smaller than the regular holdout blaster. I’m also going to have to heat gun the holster since my blaster can’t easily be pulled in an out. I used a soldering iron to open up the holes more since a lot of the pieces weren’t fitting together. Sent from my iPhone using Tapatalk
-
/
-
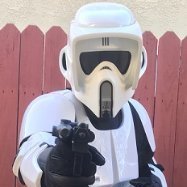
I’m so close I can taste it! I spent all day touching up the paint on the helmet. Using spray paints and such it can be a long taping process. But I am so happy with the results! I taped on the side ear greeblies just to see what they looked like!;P But I paint the black ovals as well! Second coat of filler primer on the shoulders. I’ve noticed it is better to have a heavy hand. It will be thicker and may need to dry longer but will be worth it. Sent from my iPhone using Tapatalk
-
Nice! His kit actually includes the baton, Ec-17 and holster if you buy the belt Sent from my iPhone using Tapatalk
-
Well I have some interesting updates. Looks like I’ll be repaint white and black tomorrow. From afar it looks okay. But the OCD in me will continue to work on the paint. On the other hand I was able to get the first coat of primer on the shoulder bells as a test. I will do the second coat tomorrow and hopefully have a better update. Sent from my iPhone using Tapatalk
-
Who did you purchase the kit from? Sent from my iPhone using Tapatalk
-
Okay so I got some done today since midterms are over! Been working out how I am going to smooth out the the lines and ridges of the 3D print. Started with 80 grit sandpaper then went to 120. Figured it would lessen the line effect a little more. I messaged Denis and he gave me his method. He use Dupli sprayable clay. However we can’t get it here. I am going to try rustoleum automotive primer. Then I will do as follows: 1 coat of primer- dry 8 hours 2nd coat of primer- dry 8 3rd coat of primer- dry 24 Hours then sand. Hopefully this will be enough to smooth out the lines. Here’s the result of the sanding: I also got some time to work on the helmet! I sanded back the white again, polished the black a bit and taped up the helmet. I ended up cleaning up the lines around certain parts. Then I painted the white, waited 1 hour and painted the gloss. Here’s the result. Going to have to shine and polish the white. And for a little giggle I balanced the greeblies on the helmet. Regardless the inly thing left on the helmet is the grey, the detail lines and the pipes. Then I can finally weather it! Super excited. Sent from my iPhone using Tapatalk
-
This is awesome! Gives me some stuff to think about when I get to this point! I am a long way out but hopefully will get here soon. I too didn’t have my holster! I didn’t even get my blaster lol. But Denis has been great! And said he would send it out! So hopeful! Sent from my iPhone using Tapatalk
-
The black sand is going to add a black texture to certain areas to simulate exhaust build up. It is literally just black sand. It’s used in hobby models for an asphalt or black beach effect. I used a dremel to cut out the visor Sent from my iPhone using Tapatalk
-
I’ll be using automotive vinyl white spray paint. It flexes like leather paint but without need to brush it on. Sent from my iPhone using Tapatalk
