

shwarzwald
-
Posts
21 -
Joined
-
Last visited
Recent Profile Visitors
87 profile views

-
Don post repair and upgrade
shwarzwald replied to shwarzwald's topic in ROTJ Biker Scout Armor/Helmet
I use rustoleum plastic x2 primer. However make note you need to scuff the surface before primer will stick. I had to do the dame thing with the hasbro clone trooper helmet as well. -
Don post repair and upgrade
shwarzwald replied to shwarzwald's topic in ROTJ Biker Scout Armor/Helmet
Some updates! Lots of sanding. However I've come to a point where I would rather build up to a point that way I can keep the cracks completely in check. So as you can see below the top of the visor is pretty much done and the side needs a few more layers of sandable primer added. In addition I may add more material to even out the spacing between the visor and helmet. Once that has been completed its on to the lens area and overall sanding. -
I'll be keeping an eye on this thread. If you can make yours approvable then I'll know what level I should aim with my don post. Heck I'm still working to get it back to default.
-
scratchbuilding the helmet
shwarzwald replied to locust star's topic in ROTJ Biker Scout Armor/Helmet
Wow v.2 turned out even better! Glad to see you came back to work on it. Nothing worse than reading a thread and seeing it stop only half finished. -
Don post repair and upgrade
shwarzwald replied to shwarzwald's topic in ROTJ Biker Scout Armor/Helmet
As you can see I now also have sufficient backing to further prevent the cracks from getting worse. Also I have extended the lens area down a little bit and made them more even. It's still in the rough stages, but I would like to hear back if you guys think the lens area is fine now. (Pending sanding and such.) -
Don post repair and upgrade
shwarzwald replied to shwarzwald's topic in ROTJ Biker Scout Armor/Helmet
Ok I got the snout drying and needs to be filled a little more. Next up on the plate is addressing those cracks before they get worse. As you can see there I filled in the rivot holes and have filled in the crack on the top of the visor. Next up preventing the crack on the right side from getting worse. I have adequately made a channel in the crack and have filled it. In addition I am getting primer filler onto the helmet to build a new layer. Overall the helmet has a decent amount of strength back. I'll be addressing the lens area next. Just a bit too much was cut away. -
Don post repair and upgrade
shwarzwald replied to shwarzwald's topic in ROTJ Biker Scout Armor/Helmet
Alrighty first up I'm working on the snout. I went ahead and cleaned up the hole and made a new backing plate for support. New plate has been glued in. (E6000 with 24 hour cure) Also used jb plasticweld to fill in the gap and will be sanding it down flush. -
Howdy guys so a little while back I purchased an old don post helmet from a member here. He had done some of the basic alterations such as removing the logo and getting rid of the bad snout greeblie. Now its in my hands to fix and improve. So without further ado I present you the helmet. Basic don post with almost no warping present. Previous owner cut out the greeblies completely. Also he trimmed the visor area a bit. (A little too much.) Nearly impossible to see, but from the left rivot and outward there is a crack. Worse yet is the crack stemming from the right side of the visor hinge. All these issues and more will be addressed and improved upon in the following thread. I hope you guys enjoy the thread as I will update it with plenty of pictures.
-
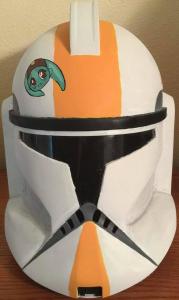
Might sound a bit odd, but I use knee pads. I have one in my phase two helmet. This is what it looks like before you cut or alter it.
-
Wow that turned out great!
