jc27
-
Posts
26 -
Joined
-
Last visited
Recent Profile Visitors
105 profile views


-
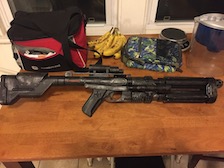
Here is my finished E-22 printed from Sean's files with a functional flashlight. Sorry the pic is so small, I haven't figured out how to upload a larger picture and still keep it under the required file size.
-
My printer only prints ABS. I printed it at .2 layer height and 20% infill. If I had printed in a highe rinfill or layer height it would have taken more. It took about a week to print.
-
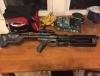
I went through 3 spools of filament (the davinci printer I have uses smaller than standard spools at 600 grams rather than the standard 1.2 kg spool). So about $60 in filament and about $10 in paint, and I already had the sandpaper and bondo. Here is a pic of mine primed and ready to paint and before I flipped the scope around.
-
Has anyone received their boots from imperial boots? the site says that the biggest they make is a 12 (US), I wear a 13, and I am curious how their boots fit. Its going to be hard for me to find boots that are my size (same thing with just about any shoe/boot I try to get), so hopefully the imperial boots version are a little big.
-
I had to reprint the flashlight and mount so I reprinted the mount for the hengstler so it faces the "correct" way. My buddy showed me a pick from a disney display of a screen used suit and the hengstler is upside down, so I thought I would be different and mount it like that, but after looking at the assembled rifle, I decided to flip it back.
-
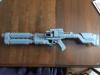
Finished priming and assembly of Sean's e-22. I put on the hengstler according to a buddy's pic from a display at Disney, even though people have said its upside down.
-
I am printing the last of the parts, so I am hoping to have a mock up assembly done by the weekend.
-
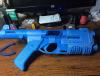
I am just about done printing Sean's E-22, here is a pic of the grip section (its held together with painters tape). Once all the parts are printed (I am almost done, but also out of filament), I will start the sanding and filling process. I started using the Smooth-On XTC-3D epoxy, and so far it seems to work.
-
I started printing the E-22 files that Sean F. has provided (they are awesome by the way). I am hoping to have the printing completed by the coming weekend. My question is for anyone else who has built his kit, how does the counter box get attached to the rifle?
-
sounds good. Right now they are running a package deal discount of $200 for pants gloves and boots, which seems like a good deal.
-
I see that imperial boots is now offering pants, but they have a velcro closure at the ankle that goes up about half way up to the knee, is this ok for a level 1 approval?