

CatfoodRob
-
Posts
176 -
Joined
-
Last visited
-
Days Won
5
1 Follower

About CatfoodRob
- Birthday 02/04/1957
Recent Profile Visitors
382 profile views


-
If it’s got a decent yhickness of clear coat over the base paint , you could try rubbing compound on the laquer to see if you can remove a tiny layer , as it’s usually the outer most molecules of clear coat that start to yellow
-
Chris’s ROTJ Scout Trooper Build WIP
CatfoodRob replied to Jediwannabe's topic in ROTJ Biker Scout WIP
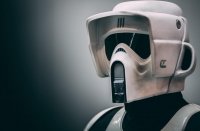
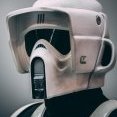
The stencil they use is a vac formed shaped cover that sits over the helmet half’s and dictates the pencil lines . The stencil is slipped over the helmet half and a pencil line is drawn around the shell indicating cut marks . I thought the scout helmets were sent out with pencil marks . withour rs pencil marks, you should be able to see the original mould marks inside the helmet half’s . This is an accurate as the pencil lines . The two half’s never fit together exactly , start at the back and tweak the front . at the studio they use plastic weld ( it melts the plastic and hardens quickly ) for glueing in the inner support strips , and use abs slurry ( off cuts of abs melted in plastic weld glue ) as a filler for the outer seams . After sanding that a fine car filler is used to fill scratch marks from the sanding . it takes the best part of 6-8 hours to get a helmet kit ready for paint . -
Chris’s ROTJ Scout Trooper Build WIP
CatfoodRob replied to Jediwannabe's topic in ROTJ Biker Scout WIP
Go with the pencil lines that the helmet came with they’re dead on . Also watch rs props YouTube videos featuring rob building one of these . Inside the helmet you can also see the original mould marks as an extra indication . The visor builds itself once the helmet half’s are decided upon , the faceplate dictates the visor . personally, having built a few of these , I would never order a kit scout helmet ! lol that was your big mistake . Always order a built helmet with your kit ( advice here for future builders) But, when they are finished they are a true sight to behold . when you eventually finish the build, you join an exclusive screen accuracy club and will have a great felling of achievement. -
Scout Bag Items Sourced
CatfoodRob replied to dreadmaster's topic in Scout Trooper: "The Mandalorian" Weapons/Accessories
Whilst I admire your wish to create one from scratch , I would have thought it far simpler to order the correct bag ( eBay U.K. have them all the time) than try to source the correct material to make one from , and find a sewing machine that is super heavy duty to sew with . -
Gloria's ROTJ Biker Scout Build Thread
CatfoodRob replied to Glory530's topic in ROTJ Biker Scout WIP
Looks great, especially with the pouches raised . The gap between faceplate and helmet looks large on the left side , is that something you can adjust ? loving the boot work by the way . -
I find the knees slide down when trooped, fo I sewed a square of Velcro into the appropriate place on my overalls and glued Velcro inside the knees , thus the elastic is just for show really, the knees ( and forearms) are held in place by the Velcro and always stay in correct alignment .
-
Remove the black with automotive cutting compound . A small bottle should be only a few dollars from the auto store . If there are actual scratches under the black marks , you have realistic weathering ! It’s such a small area no one would notice .
-
If you bought a genuine RS from the studio, it would have come with a pencil mark around the helmet half’s , indicating the cut line . did you cut it shorter than the pencil line ? If so you may need to assemble it with a gap which you will fill after assembly and before paint .
-
ROTJ Scout Trooper 2022 CRL Update - the Open Collar!
CatfoodRob replied to BikerScout007's topic in Announcements
Brilliant video Mickey ….time to start your own YouTube channel . again, the open collar is something we wanted with the Rs props suit a few years ago, but went with the mandarin because it was what everyone wanted at the time . Unlike the T bit modification, which is already in place , with screen accurate moulds, the open collar will take time as it requires a re design of the undersuit . But as it’s now in the CRL it’s only a matter of time. -
Congratulations all around . A great step forward ,and such a simple modification for any scout to carry out .
-
Imperial Boots Cummerbund and Vest Set
CatfoodRob replied to EC-17 Holdout Blaster's topic in ROTJ Biker Scout Soft Parts
The piece of webbing that attaches to the bottom of your cod piece is , I believe a requirement . It’s seen on all the movie scouts and goes up under the rear of the belt , and is visible outside of the rearmost piece of suede that goes down your rear . -
Hotel booked, just waiting for the tickets to go on sale. See you all in the detachment photo !
-
RS Propmaster Scout Kit Build and New member question.
CatfoodRob replied to bwsnyder2005's topic in ROTJ Biker Scout HQ
Yep that’s it, but you really need the two inch wide variety. -
Elbow pads on knees and vice versa ? Sent from my iPad using Tapatalk
-
On my rs holster, I used my fingers to prise the holster sides away from the boot material on the rear edge. This gave me enough room to glue a couple of neodymium magnets inside the holster where the blaster trigger guard sits . As the rs blaster has a metal trigger hard, it holds it in place no problem . Sent from my iPad using Tapatalk

