

RickyBoyBlue
-
Posts
155 -
Joined
-
Last visited
-
Days Won
6
Everything posted by RickyBoyBlue
-
 FLIGHTSUIT The simplest part of this TB build probably was the flightsuit. I bought the exact same Redkap coveralls that I bought for my original Biker Scout. Instead of being required to add strapping and suede stuff, all that was asked was to remove visible pockets. I narrowed the legs a bit as they're too loose on me (small Trooper, remember?), also added a panel to close the neck. This was the button on the shoulder that connects to the two-tubes from the shoulder: In order to easily and neatly store the flightsuit in the bin, and ease of suiting up during troops, I already incorporated the arm tubes to the suit. This was done by stitching the tubes to some points of the suit.
 -
HARNESS (Completed Harness)
-
HARNESS (Rigging the Wires with some Mad Mods) I know adding the wires is a straightforward task. Though I'm anticipating wild wires flailing out of its position during actual troops. In this regard, I decided to sew-on the wires on to the strapping. The nice thing about the suggested red tubing, its stiffness and/or tautness lends itself to easy sewing. I sewed the tubings on strategic spots in the strapping. While there is still some play for the tubing, I'm now assured that they'll be always lined-up. For the couple of "tube holders," I initially thought of 3d printing some. But I went with some of the most practical route -- plastic drinking straws. I cut up some, paired it and CA-glued them together, then proceeded to spray painting. I applied them to the strapping by CA glue and I also sewn them on the strapping. For the four rear tube guides (forgive me for making terms up. LOL), I did the same as those in the front. Though much prep was given to the two tubes that go to the right arm. Take note that the end of the two tubes that go to the right arm, I rigged it on a piece of strapping with a snap. This is with the intention that when suiting up, this snaps on to the right shoulder, hidden by the shoulder armor, and independent from the tubes that go down the right arm. Like the left harness, I intentionally made the right harness independent as well so that it's easier to store them in the bin, and it's less cumbersome when suiting up during troops. Similar to the left, I also installed magnets so it stays in place all the time.
-
Easy fix. Thanks for spotting and thanks for the advise, Keith.
-
HARNESS (Shoulder Harness - Mods) Call me paranoid and OCD, but I want my shoulder pads to stay on the shoulder during troops and I want all ends to stop at approximately the same height. Also with this many costume parts to put on (which is so typical of the Biker Scout), I want to make sure that I don't do a lot of adjustments when suiting up for a troop. I want each part to be where they should properly be all the time. Therefore, neodymium magnets to the rescue! I zap-glued the magnets on the back of the shoulder harness, two rounds on both ends and one half bar in the middle. Then I proceeded to zap-glue the magnet pairs on the armor... I'll add some more goob of zap and E6K around the magnets later. But these parts are more secured than how it was before. I'm satisfied with this move.
-
Right now, it's temporarily "soft-glued" with E6K on all corners so that I can already install (or re-install) the clips. I also mean to install magnets on the holes. You're right about using it as a small storage. We don't have our sandwich pouches on this one!!!
-
HARNESS (Shoulder Harness - Assembly) And yes, this was THE MOST scary part of the build for me. This is the main reason why I decided to push myself to learn to work the sewing machine. There is no way you can achieve a decent-looking padded shoulder harness without using it. I tried looking for passable H-harness type rigs. There's none that comes close to the reference. I started with creating a cardboard template, then proceeded to cut my faux leather. The dimension of my padded shoulder strap is 13" x 3.25" Sandwiched between these two pieces of faux leather are some batting material to give it some "fluff." Using my new-found, not-yet-there sewing skills, here's how the shoulder harness came out: For the webbing, I went with velcros to secure the ends that connect to the belt harness (vs. direct-stitching it on the belt harness). I did this for two reasons -- 1) I only have an estimation of how low or how high my belt harness vis-a-vis the shoulder harness at the time I was building these parts. More importantly, 2) I don't want my harness rig to be one huge tangle of webbing and padded straps when I store them in the bin. I want to be able to store each section of the harness inside the bin for maximization of space and also to prevent creases on the faux leather parts and whatnot.
-
HARNESS (Completed) UPDATE: (As advised, I removed the top buckle): Original Belt Harness:
-
HARNESS (Belt Harness - Assembly) This is the part of this build that I'm most anxious about. While this is the part that gives this specific Scout Trooper that distinct look, this is also the part where I'm not most skilled at. I'm referring specifically to the padded areas where the 2" straps go through. For the belt harness, I went ahead and created a pattern on cardboard, cut the front and back of the faux leather. I sandwiched the cardboard in between the faux leather, glued them on. I did the most reprehensible thing on this part - i hand-sewn on the edges to give it that "finished" look. It was a decent attempt and I came up with a crude but usable part. But I wasn't happy about it. Harnessing some courage to experience something new... We have a basic sewing machine that has been lying around in the house that I've been meaning to learn to use for a long time. This costume helped me to finally summon all courage to jump into the (basic) sewing game. The first attempt was cleaning up the hand-sewn parts of the belt harness pads and added the "finished look" stitches on the edges. It's not the best, but a whole lot better. I'm thinking this part ain't gonna be seen a lot since this will be on the side of my body and when my arms are down, they'll practically going to be hidden. Hope y'all cut me some slack on this one. Belt Buckle This was the easier part. I printed the buckle part. For some strange reasons, it came out small. I printed another bigger one. Then I decided to put them together. Spray-painted the smaller one metallic and placed it over the black-painted bigger piece. I super-glued this over a functional 2-inch snap buckle.
-
CONTROL BOX (Completed) UPDATE Back magnets now installed. Good practical design @MrPoopie! Now me and @AradunFF have a place to store our snacks in during troops!
-
CONTROL BOX (Assembly) Again, another pretty straightforward print job, some sanding, bit of putty, priming, and spraying. Note that I printed my box at 85% scale. Seems the right proportion for me in relation to references, I'm a bit of a short trooper. Thinking of a way to attach this box to the harness, I went ahead with the spirit of the ROTJ Scout Trooper, specifically the thermal det. I decided to install clips on the back of the box. I drove to my closest local Tandy Leather and grabbed a couple of their belt/holster clips. When clipped to the belt harness, this baby ain't going nowhere!
-
Hey Dennis: Your build looks to be going so well already! I'm looking forward to your lighting rig on the baton. I'm looking at doing another one after I'm done with this.
-
BATTERY PACK (Completed)
-
BATTERY PACK (Mods) This is a pretty straightforward print. Here are some of the mods I did for this part... Wire Connector: I wanted an easy way to attach an detach the wires coming from the harness to the battery pack. I made the connector detachable from the main body of the battery pack. First, I glued a piece of screw through the (white) base of the connector. Then I secured pieces of neodymium magnets by the hole of the battery pack. With this simple mod, the magnets ably secure and "hold" the connector in place when inserted through the hole. Since I practically closed the hole of the bottom white part of the connector, I'm afraid the (black) top part of the connector won't have enough space to glue-in the wires... To give the wires some solid area to adhere to, I decided to cut a small portion of a drinking straw, painted it black, and glued it in the top part connector part. So this is a simple effective mod that does not do anything to affect the aesthetics of this costume part. Securing the padded webbing: I assume that during troops, the padded webbing that's wrapped around the battery pack will move or shift from its place. Anticipating this, I simply installed velcro points on the body so that the webbing will always be it needs to be. Here's the paired padded webbing:
-
RIOT BATON UPDATE: (I re-colored some parts as per advise and based on references) (Original Completed Version)
-
RIOT BATON (Internal Parts) All the internal parts slid into a 3/8in pipe. To create the mechanism that locks the telescoping part when extended out or when retracted, I went a different route than how Justin did his. First, I printed three pieces, of a portion of this part, to create "rings": I glued two of these "rings" permanently on the inside rod. Ring 1 interlocks with the baton part above, when telescoped, Ring 2 interlocks with the 3rd ring that is glued on the end of the 1 1/4" PVC pipe when retracted. Initially, I intended to use the smallest magnets I can install on the surface of these rings to interlock them to their paired parts. Alas, the magnets I ordered weren't small enough. Being the impatient builder that I am, I resorted to the crudest method I can think of - velcros. So what I ended up doing was gluing velcros on these rings and their paired parts. Here's illustrating how the bottom parts interlock when retracted: The bottom paired "ring" is glued at the end of the 1 1/4" PVC pipe, which is essentially the part that slides into the butt part. Here are some of the parts lined up together, side by side. With the help of the rings, the internal rod slides smoothly inside the 1 1/4" PVC pipe and interlocks with their pairs as needed. I hope my explanation of my method made sense. LOL While I really wanted to use magnets, this method works for me at the moment. Maybe at some point, I'll do another baton with magnets and flickering lights?
-
RIOT BATON (The Outer Layer Parts) I decided to begin with the riot baton and pursued to finish this as quickly as I can. There's nothing like a finished major part of a character to inspire building the other necessary items. I started from the bottom up. Printing, a lil bit of sanding, then primer-filler. For the middle shaft where the handle slides in, I utilized a 1 1/4" PVC pipe. Spray Paint Mod: The exterior of my baton was spray painted with gloss and satin finishes. Whenever I finish accessories with handles (ie blasters, rifles, etc), I don't use spray paint. I use plasti-dip instead. This gives the grip a rubber-like texture and feel. Same technique I used for the handle of the baton.
-
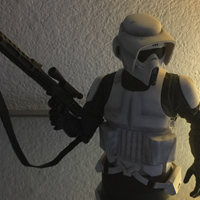
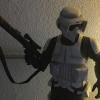
Hola Pathfinders friends! Having played (still playing) JFO, I'm awed by this character and how the simple addition of accessories elevated the (already cool) look of the Biker Scout. In this regard, I decided to plunge into this project, which started January 7, 2022. Being that I have an approved, and Lancer-level Biker Scout costume already, my aim for this build is to see how I can switch seamlessly between the ROTJ Scout and the JFO using the same common parts as much as it is aesthetically possible without compromising the integrity and spirit of both variants. For this build thread, I'll concentrate on the specific JFO parts and deviations from the ROTJ's. Will also share some practical mods and some insights into my experience building this character. Of course my appreciation to @MrPoopie for a very detailed build thread and for making the 3d files available. Thanks too to our fellow Paths who also shared their build threads and shared their tips. Without further ado... NEW PIECES / ACCESSORIES: 1. Riot Baton Outer Parts Internal Parts Completed Baton 2. Battery Pack Some mods to the battery pack Completed Battery Pack 3. Control Box Assembly Completed Box 4. Harness Belt Harness - Assembly Completed Belt Harness Shoulder Harness - Assembly Shoulder Harness - Mods Rigging the Wires with some Mad Mods Completed Harness 5. Flightsuit Simple mod Completed Flightsuit 6. Bicep Armor MODIFIED ROTJ PARTS: 1. Thermal Detonator 2. Back Armor (Topper details) 3. Belt 4. Cummerbund 5. Gloves Mad Mod #1 Mad Mod #2 Completed Glove Mad Mod #1.5 Completed Glove (ver2) APPLICATION FOR APPROVAL: Submission Photos Approval COSTUME DETAILS: Bucket - Altmann Body Armor Parts / Belt / TD - SC Flight Suit - Redkap Boots - Self made using Kingshow and Indoor/Outdoor Marine Commercial Vinyl Neck Seal - Trooperbay / Anovos 3D printed parts - files by @MrPoopie
-
TB-67627 Requesting Lancer Status (APPROVED)
RickyBoyBlue replied to DesertScout's topic in Lancer Deployment Request
Good luck Alex -
Thank you all, fellow and esteemed scouts. Your words are very kind. Thank you Mickey for the guidance from since last year when I started the journey. Thank you Constantin for your patience and guidance through the application process. Cheers!
-
TB-74259 Requesting Lancer Status (APPROVED)
RickyBoyBlue replied to RickyBoyBlue's topic in Lancer Deployment Request
Thank you very much for the kudos. Your words are highly-appreciated. An affirmation of hard work is always a welcome gift. -
TB-74259 Requesting Lancer Status (APPROVED)
RickyBoyBlue replied to RickyBoyBlue's topic in Lancer Deployment Request
Oh wow!!!!!!! What a way to wake up on a Sunday. Thank you, Thank you, Thank you Strider and the rest of the Review Team!!!!!!! Achieving costume excellence, laboring on it myself, and representing the characters well are the things I obsessed about since I joined the 501st. Like so many, to be an approved Biker Scout of the Legion is already a huge personal achievement in itself. Who wouldn't want to be one of the coolest, if not arguably the coolest-looking Imperial warrior of the Empire? Being a Lancer has been one of the most intimidating, tough, and challenging approval processes in this organization. To deserve it -- You. Really. Have. To. Earn. It! It is now my humble pleasure and privilege to join the ranks of the few. Thank you! Thank you! Thank you! -
TB-74259 Requesting Lancer Status (APPROVED)
RickyBoyBlue replied to RickyBoyBlue's topic in Lancer Deployment Request
RE-SUBMISSION OF APPLICATION PHOTO, FULL COSTUME: Dear esteemed Lancer Review Team: I hope I have fully met all the required improvements for my costume as I hope that this set of pictures exemplifies the ideals of a Lancer Scout. For your kind re-consideration. Thank you very much! TB-74259 -
TB-74259 Requesting Lancer Status (APPROVED)
RickyBoyBlue replied to RickyBoyBlue's topic in Lancer Deployment Request
Hi Strider and the rest of the Lancer Review Team: I have posted updated pictures of items needing improvements. Please refer to the latest pictures above on items: Item #1 of 6 - shortened mud Flap Item #3 of 6 - shortened (and tapered) sleeves Item # 4 of 6 - bund height Item # 6 of 6 - upper arm armor facing side Additional Item 4 of 4 - lower code piece arch Thanks! -
TB-74259 Requesting Lancer Status (APPROVED)
RickyBoyBlue replied to RickyBoyBlue's topic in Lancer Deployment Request
ADDITIONAL ITEM #3 of 4: - The stitiching on the back on the one boot looks awfully black but I’d let that pass as weathering ;-) NOTE: This picture was taken September of 2016. Yes sir, the stitching was white. This is real-world weathering. ADDITIONAL ITEM #4 of 4: - The cod piece itself looks pretty good but the arch stitiching should be (much) lower (please see reference picture) UDPATED PICTURE: (08.28.17) This is as low as this short trooper can bring the arch down. Thanks.

