

yoshix
-
Posts
123 -
Joined
-
Last visited
-
Days Won
4
Everything posted by yoshix
-

CB - Kashyyyk Officer — Battlefront 2 is now LIVE!
yoshix replied to BikerScout007's topic in Announcements
Big thanks to @BikerScout007 for working closely with me on this. And thank you everyone that participated. -
I ended up not painting them and ordering the aluminum black. I sanded them a little bit more after the photo from above so they are a little lighter. I'm going to glue them on today.
-
After searching around the internet for a while for something similar for the two buckle, I decided to make them. I'm really happy with how they turned out, only problem is because they are made out of aluminum they are very shiny. There's a product called aluminum black that would nock it down a peg but I think I'm going to try paint first before spending another $20. The buckles aren't glued on yet so I can easily change them.
-
CB - Kashyyyk Officer - Battlefront 2
yoshix replied to BikerScout007's topic in Kashyyyk Trooper HQ
I agree, my under suit is a little dark, a side effect of dying it. But I think darker is better that the alternative of too light. I don't think it's dark gray patches though, I think its dark tan. The camo on the cumcummerbund seams to seep down from the pack and chest (hence why I thought it was dirt) Could we maker that a level two requirement as well? I'm very hesitant about coloring the cummerbund. It would be really hard to get an even or targeted coloring especially because it's made of two different materials, nylon strap and (what I assume is) a cotton blend. If need be, what I was thinking was maybe dilute so bleach and try to spot apply it, then try to add dye to those spots. What do you think? -
CB - Kashyyyk Officer - Battlefront 2
yoshix replied to BikerScout007's topic in Kashyyyk Trooper HQ
@BikerScout007 I did notice some sporting on the cummerbund but I figured it was supposed to represent dirty/battle warn. I can attempt to color it but I may need some guidance on that. As for the under suit, I used the standard kashyyyk trooper British Desert camo DPM dyed brown. I can take some different pictures if you like, but I can see the camo in the picture you edited. Can you clarify? The pictures look great by the way! -
I'm pretty sure for the older kashyyyk crl white was an option, that's why I went with white. From what I can tell the reference photos make them look a dark tan. I don't think there's any way around it. After a little bit of suffering and seeing how expensive boots are, I think I'm going to try to paint the ones I have.
-
I just went through the crl draft and the only problem I see with my costume is that my boots are white. This gives me two options, I could paint the boots I have or order the Beige Desert Military Boots. I'll look into buying the books.
-
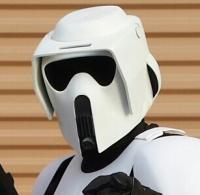
Helmet is pretty much done, just need to do some of the black decals. Third 'or I should say fourth times the charm. The new helmet is as wide as the small Helmet and as tall as the larger helmet. After seeing it for the first time I was worried it wouldn't be wide enough, but from the pictures you can't tell at all. I'm hoping to start getting photos of the individual parts this weekend.
-
I've got the new helmet and hope to be done in the next two weeks. I'm a little burned out so it's taking me longer than usual but it's still in the works.
-
A little update, still waiting on helmet three.
-
I'm going to bite the bullet and have a 'medium' helmet printed. Fingers crossed that that one will be just right.
-
Hard to believe it's been a year since I started this thread. Time flies! This was just a test I did with the incomplete helmet to see if I like the proportions. As you can see the larger helmet definitely helped with my tall head and think neck. However It's giving me a super bobblehead which I was afraid of. Probably the solution would be the helmet size in-between the large and small but I can't keep buying helmets so I'm just going to have to work with what I have. I'm leaning more towards using the smaller helmet and may tightening the neck seal or changing the neck seal somehow to not be as prominent. Thoughts???
-
The new helmet has a few differences from the other. One thing I really don't like was how it slopes down and doesn't line up with the front. So I bondoed it to get the right shape. It's a harder stronger material that the other one. I knew you could use different stuff to print with but this is my first experience with seeing the difference.
-
A few days ago my 'first ordered' helmet came in and similar to the other helmet it's a bit larger. I'm thinking my problem with the long neck may be solved by a larger helmet. So I decided to go ahead and do up the larger helmet to see if it helps. Maybe I was wrong to insist on a smaller helmet. @BikerScout007 we can certainly get the process going. I need a few weeks to finish up the second helmet so feel free to take your time on it.
-
Helmet is done! I really like this picture. Unfortunately it's one of the only good ones. I'm questioning my as to maybe I should have gone larger with the helmet. I'm many photos my head looks like it sticks up really high. It doesn't help the my neck seal is a little think. I'm also thinking about tightening the neck seal but I don't want it to be too uncomfortable.
-
Helmet is in, it's go time! It shouldn't take more than two weeks to complete the Helmet. Note as I'm comparing my old and the 3d printed one. I got pretty close to getting it looking decent. However it's the little details on the 3d model that really make it pop. The size, as you can see is pretty much the same size as the old one with 12% smaller. I was sure at 12% smaller it would be larger than it is. It's just barley big enough to work so I'm glad I let him talk me out of 15% smaller. I almost insisted on 20% smaller, that would have been a disaster. Most likely 10% smaller would have been the way to go. So hard to believe how much 12% makes a difference.
-
Helmet update - the second ordered Helmet came in but it's about the size of the Deathstar. Here are some comparison shots with my small Helmet. Massive bobblehead. I feel like I put too much work into this costume just to have an oversized head. I asked the maker for an exchange to see if he would print me up a smaller one. He agreed and after throwing around some numbers I came up with 12% smaller should suffice. However that means it's another month to print. Yeah. Even next to my original white kashyyyk Helmet it looks big. I am happy with the 3d model and the print quality seems to good so I'm looking forward to seeing the smaller helmet when it comes in. The first Helmet I ordered has not arrived yet. I'm pretty sure it's lost in the mail.
-
Helmet update - still no Helmet. However, with some free time I changed my neck seal to the 'ribbed' style. I was really dreaded this as I'm no seamstress. To be honest my original plan was just to ignore it, but I knew somewhere along the line someone was going to say "shouldn't the neck seal be ribbed" I think it came out 'okay', could be much worse.
-
I also noticed the shoulders should slope down (left), and not come to a point (right). An easy change to make it more accurate. I can change a thousand things but until my helmet comes its useless. Waiting is so frustrating.
-
One thing that started to bother me after obsessing over the reference photos, is that my upper arms appear to be too small. I didn't think I would have time to make new ones but because I still haven't gotten my helmet in I set out on this daunting task. Started out with a pattern that I thought would be a good size. Then transferred over to a 4" pvc pipe. Cut out was easy enough with a jigsaw. My 4" pipe didn't appear to be big enough for the higth I was going for so I cut a slit and added a piece to the inside. I was going to use my original control box I it provided to be too short. Making a new one was easy enough, just took a little time. It's also more on the style of the game new. This was the part I was most afraid of. I used a lego piece to simulate the shape I wanted. Then I covered it with bondo. I did my best to shape it into two fairly even shapes. Also bondoed the inside seam.. And maked a little wooden block for the middle. From what I could tell the game ones are more 'low profile' than what I had previously. I did a test fit with the rest of the armor was was very pleased with the results.
-
A quick update, helmet is still not not in. It has now been four weeks since it ship. I know shipping takes a little longer these days so I haven't given up hope. But I have decided I need a backup plan, so I ordered a new helmet from a different vendor. I figured if the original helmet comes I can cancel the new helmet or send it back. New helmet will most likely take another month or longer to get here. The waiting game is real. In the meantime I found another small thing that I would like to change. Will show more progress soon.
-
Fixed the pants and made a few other small adjustments. Looks better! still waiting on my helmet to get here. It shipped from Europe two weeks ago so it should be here any day now.
-
So again, looking at the side by side comparison I noticed my cod had the wrong shape so I made a new one. This one is more rounded and less triangular. I also took the time to make a few of my pouches to be a bit larger including my drop down pouches. I also changed these straps to be thinner. Test fit - I didn't put my boots on that why I cut the pictures off at the bottom. Also, the new cod doesn't have velcro on it so you'll just have to imagine it's a little higher and you can't see that line on the top. I learnd a few things with this test fit. One, I Think my pants are too baggie, I'm going to change them. I also think my cummerbund needs to be tighter under the arms. Let me know what you think. Anything that needs attention?
-
I have a three year old so I can totally understand that 😝
-
Outer buckles are done. I need to redo the inner side. It's hard to tell from the pictures but I swear the straps are green.

