tfett40
-
Posts
48 -
Joined
-
Last visited
-
Days Won
2
Everything posted by tfett40
-
Teddy’s Mandalorian Scout Build
tfett40 replied to tfett40's topic in Scout Trooper: "The Mandalorian" WIP
My soft goods were done by Chris. Weathering the soft goods is easy. You will still be using the original desert yellow-brown/red mix. Using a small thin paint brush, dab the tip in the paint (do not go heavy). Follow the seams with the paint brush to make this detail stand out. After each line, use a wet cloth and rub it up and down the seams to spread the paint. Once all the seams are done. Use the remaining yellow-brown mix and airbrush it the both the cummberbun and flightsuit to your preference of weathering. Once again, I am limited on the images I can post, so click on the link to see the process: https://imgur.com/a/NO9Wguj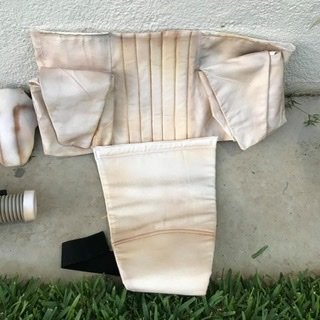
-
Teddy’s Mandalorian Scout Build
tfett40 replied to tfett40's topic in Scout Trooper: "The Mandalorian" WIP
Step #3 After the first layer of paint dries, I start applying heavier weathering of the yellow/brown mix with the airbrush. While the paint is still wet, I take a dry cloth and start dabbing the fresh paint to create distress marks at certain points on the armor and helmet. Try not to over do it. Less is more in my opinion. Once, I was happy with this layer or weathering, I pulled back the maskol. Once this second round of weathering detail is done, I protect it with a light coat of clear coat spray ( I like using Testors). The reasonIng for clear coatings is because on the next round of weathering, if I am not happy with It, I can simply take water and rub it off and start over without really affecting my first round of weathering. Since this site limits me on the size and number or images I can post, here is link to more image of the armor up to this point: https://imgur.com/a/xUbJlIk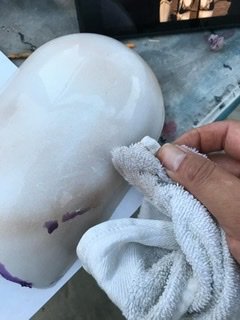

-
Teddy’s Mandalorian Scout Build
tfett40 replied to tfett40's topic in Scout Trooper: "The Mandalorian" WIP
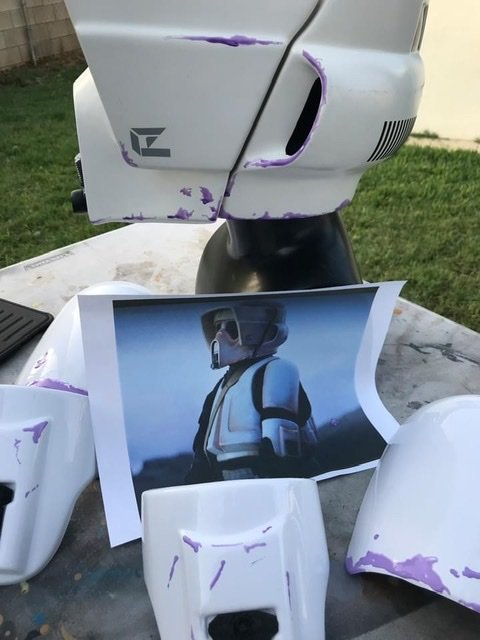
This is how my first pass of weathering looks. There is still alot of shine and white to the armor, so I will continue to add additional weathering layers, little by little. Still keeping the maskol on the armor during this process. Keep in mind I am using the same method for both the armor and helmet, which are painted at the same time.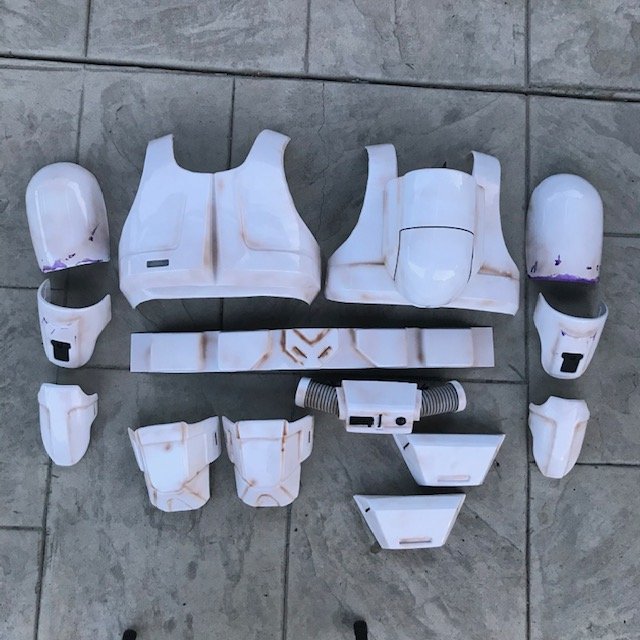
-
Teddy’s Mandalorian Scout Build
tfett40 replied to tfett40's topic in Scout Trooper: "The Mandalorian" WIP
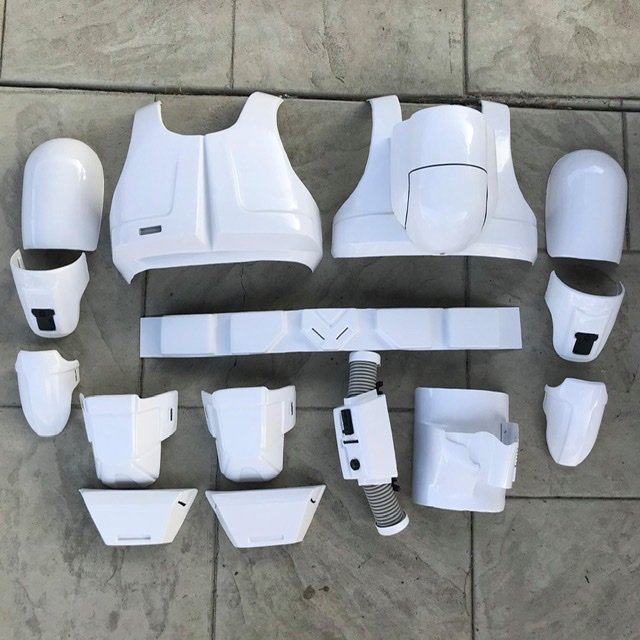
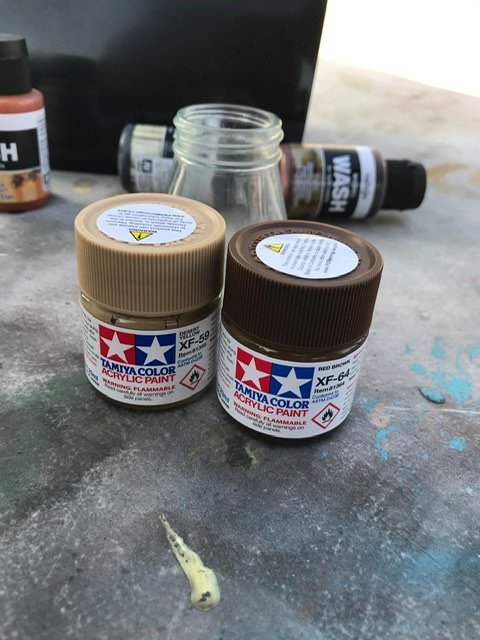
Trimming and sanding is the not so fun part. No need to go into that boring stuff After all the boring stuff is out of the way, time for the fun to begin...paint. A few months back, I painted a Remnant Stormtrooper Helmet and was happy with the results. So I will be taking the same approach and techniques for the Scout. To get this look, I mainly used an airbrush. The paints I will be using are Vallejo and Tamiya Acrylics. The Remnant colors are earth toned with mixes of yellows, browns, blacks and reds. I like using the airbrush because I have better control of how the paint is applied. Step 1 I notice several areas on the armor and helmet that had spots that were barely weathered, to achieve this, I used Maskol to mask those areas and used screen captures to guide me. Step #2 Mix up Desert Yellow ( 75%) and Brown-Red mix (25%). I use this combo as my base. I used a lot of the screen captures from the show and photos I took from D23 to guide me in how heavy I applied the paint. Definitely follow the grooves on the armor and darken those section. Start with a light coat of paint on the armor/helmet, 360. Step away, take a photo, evaluate and add more where you think is need.


-
I’m taking the plunge into building the Mandalorian Biker Scout. Despite its initial inaccuracies compared to the original, I actually like the weathered down beaten look to it. To get this to look right, I opted to get the Walt Trooper Factory armor and the RS Props Helmet.

-
The MANDALORIAN Biker Scouts
tfett40 replied to Rosso's topic in Scout Trooper: "The Mandalorian" HQ
Here are shots I took at D23 this year of the Biker Scout they had on display. Based on the pattern of the jumpsuit pockets, it looks as if they opted to use a Tie Pilot jumpsuit and no vest. Since my image files are too large, here is a link to Imgur: https://imgur.com/a/Pv02DBw -
The MANDALORIAN Biker Scouts
tfett40 replied to Rosso's topic in Scout Trooper: "The Mandalorian" HQ
I'm on it Mikey! -
The MANDALORIAN Biker Scouts
tfett40 replied to Rosso's topic in Scout Trooper: "The Mandalorian" HQ
I was just happy to see Scouts back in action and on the bikes. -
Sean..Boba, Kylo now a Scout....when is the madness going to stop??? @syllander Lou (darth Voorhess) sells a nice lightweight Holdout blaster that fits in your SC armor boot nicely and it is fitted with magnets to secure it.
-
Got my suede patterns from Max's Sci Fi and had my tailor attach them along with the thigh elastic and velcro for the armor to prevent them from shifting. Lastly, I commission Max's Sci Fi to complete my vest, cubberbun and pouches.
-
Nice job
-
Picked up my Pathfinder boots today from Chrisx909x. He did a great job, cut perfectly to size. Beyond what I expected. He saved me a lot of time and grief because I lack the skill of sewing, so dont hesitate to seek his help. Get ahold of Chris here: http://forum.bikersc...showtopic=13640
-
Sorry. that was a half mannequin I purchased in the clothing district in downtown Los Angeles for $40. It has a tiny 32 inch waist, so I placed the Kylo Ren Belt on it and then the Biker Scout belt over it to get a more accurate size to my waist.
-
Form?
-
Very good. Drilling out the slots, really helps out. Did you use the stickers that came with the kit for the tank? Or go with vinyl pinstripes?
-
looking good man. Congrats on getting this done.
-
The one thing I had to figure out was how to attach the end caps to the thermal detonator. I was concerned that there was not enough contact on the tube to glue down the end caps and that they would fall or break off if bumped to hard. I resolved this by gluing caps to small Gatorade bottles, which was a near perfect fit. To make the fit snugger, I just wrapped duct tape around the bottle caps and done. Lastest addition is the Under Armor Balaclava :
-
nice work so far
-
Thermal Detonator: The SC tubing comes an off white and needs to be painted. Good thing I had some grey primer to get this done. While the paint dried, I drilled the 2 center holes for the zip tie and glued on the greeblies with E6000 and used blue tape to hold them down as they set. I picked up the thermal detonator clips from The Clip.com http://www.theclip.com/store/Metal-belt-clip-661-Tempered-Belt-Clip.html Make sure you order Black Powder Coated. I ordered the nickle plated and had to spray paint black. I attempted to use a rivet to attach, but it would not hold due to the groove in the tube, so I had to opt for a 1/8 screw with nut to attach the clips.
-
Belt & Drop Box: With the SC Armor, the slots on the belt and drop boxes needed to be trimmed out. The directions call to use a razor to do this. But I had a difficult time keeping a straight line and the razor slipped on me a few times. So to avoid the razor slipping on damaging the surrounding armor I did the following: 1) Used a 1/8 drill bit to cut several holes in a row to the length of the straps 2) Used a dremel to sand out the gaps and create a hole 3) Slide in the webbing. I did this process for both the drop boxes and belt. The next thing I did was attach the snaps onto the straps and used a combo of Zap-CA and E600 to add snaps onto armor. In order to connect the belt onto the armor belt, I used a combo of Zap CA/E6000 again and used clamps to keep it into place until it dried. Before this, I added velcro at the ends. Once the glue dried, I used a 1/8 drill bit to drill a hole to fit the rivet. Make sure prior to riveting you add the washer to the back to help rivet to prevent it from over expanding and damaging your armor. Next Step was attaching the back drop boxes straps to the back of the belt. First I made sure the belt fastened to the proper length of my waist and put it on a mannequin. I made sure the straps were aligned evenly and placed snaps. I am not concerned about the buttons showing, as it will be covered by the thermal detonator.
-
I use lots of velcro on my Boba Fett and I just do not feel it is secure enough, especially when it gets dirty and worn, the hold is not as strong. I end up adding magnets to help. With the TK, it was the same issue and snaps just worked better, which is why I opted to use them here
-
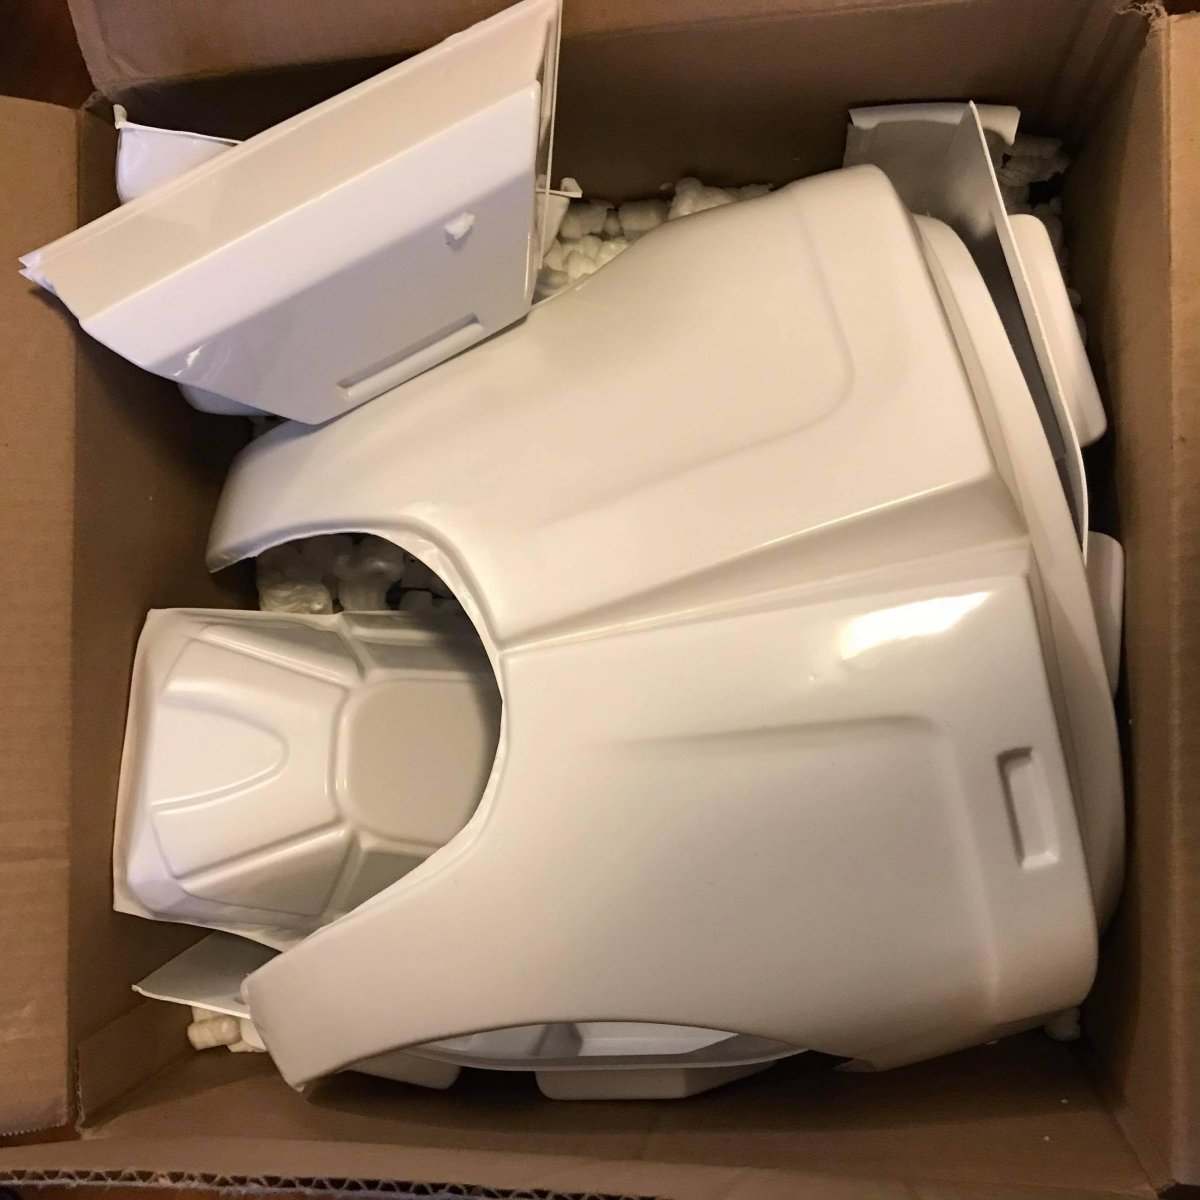
My SC Armor arrived and delivered in 1 1/2 weeks! Pick it up here: http://studiocreatio...morforsale.html First thing I decided to tackle were the biceps/upper arm armor: Added some E6000 to the T-bit, let it tact up and pressed firmly into place and used blue tape to hold it down to set for 12 hours I have opted to attach the bicep armor using snaps instead of velcro. In order to do this, you will need the snap fastener and 5/8 snaps. I used left over abs strips from a TK build to use as backing to glue down the male end of the snaps. Once it dried, I glued to the interior of the bicep armor, clamped it down and let it set and dry. To attach the female snaps, I folded over the elastic and used a belt hole puncher to make a small hole so the snaps can attach easier. If you do not, you might have a difficult time getting the backing to join properly. I learned from a TK build, if you do not overlap the elastic, it will tend to tear and stretch off the snap, which is why I overlap or fold over. I premeasured the 1 & 3/8 elastic to wrap around my biceps. Tip, measure with jumpsuit on or you might make it too tight. Once you got it, snap away. *Note, my biceps are 16 1/4 inches, not flexed. This armor is snug. So no more curls or tricep workouts for me. I heard the KS Armor Kits are better suited for bigger guys, so you might want to take that into consideration when choosing your armor. I used this method to snap up the forearms, knees and shoulders:
-
I am taking the leap into the ScoutLife. The Biker Scout has been one of the coolest characters in the Star Wars Saga for me, so time to build one I can call my own. This build is for basic approval and will be very picture heavy. I am a visual person, and when building my Fett, lots of pictures helped me greatly and I am hoping it will help other newbies like me. Some of the techniques were taken from other build threads, my own thoughts or on the advise from Chrisx909x who has been a great help. I had purchased Hyperfirm's Scout Blaster some time ago and really enjoy the idea of being able to drop something and not having it shatter or break. Email Lewis at HFX Productions to purchase one: Lewis@hfxproductions.com My next purchase was Wampa Wear Gloves. Thanks to NJBoden's You Tube video on how to properly measure for my gloves and his review: His tips really helped, after I measured, I was extremely hesitant in ordering an XXL, but he was on point, they fit perfectly. Plus delivery was less than a week for me. Purchase here: http://www.wampawear...r-scout-gloves/ Next arrived my Red Kap Jumpsuit, purchased from Amazon: http://www.amazon.co...eywords=red+kap I generally wear a 46 Size Suit, so I used that in selecting the Red Kap size. Now the suit fit me perfectly in the upper torso and shoulder areas, but extremely baggy in the legs, butt area (think saggy diaper) and too long. I took it to my local tailor who did a great job with altering soft parts for my Fett, so off to the tailor I went. He will be removing the pockets and taking in the legs, butt area, length and forearms for a slimmer fit. Once I get the right fit, I will then get him to help me with the saddle, mudflap and straps. Build Costs at the time I purchased them 2015-2016: Hyperfirm: $60 Wampa Wear Gloves: $66.97 Red Kamp: $29.54 Studio Creations Armor + shipping: $470 2-Thermal Detonator Clips $10+shipping Under Armor Balaclava: $20 Other Required Tools: Handriveter Set: $6 (Harbor Freight) White 1/8 Aluminum Rivets: $6 (Lowe's) Snaps and Snap Fastener (Previous Purchased) Grey Paint Primer (Previous Purchased)
-
Pandatrooper's SC Biker Scout build
tfett40 replied to Pandatrooper's topic in ROTJ Biker Scout Armor/Helmet
Great detailed thread thanks for sharing. Defiantly bookmarking. -
1st timer in need of helmet selection
tfett40 replied to bradyapba's topic in ROTJ Biker Scout Armor/Helmet
Great info to consider when picking one up. thanks for sharing