

jcarlson101
-
Posts
59 -
Joined
-
Last visited
-
Days Won
1
Everything posted by jcarlson101
-
 I've been waiting for this since I saw the TK set. Very interested to say the least!
 -
I didn't make my suit personally. But they sewed Velcro to the flap and suit and that is how they attach to each other. Do you really need the suit and flap to be separate? Probably not... I just know velcro'd flap is a viable option. So is sewing the flap to the suit. Maybe even snaps... Duct tape won't last and bubblegum and spit is right out...
-
My mud flaps are velcro'd, 1/2" I believe. You'd have to deliberately pull up on the velcro for it to fail. They aren't going to accidentally go anywhere.
-
Yet another SC KS Helmet Q(s)
jcarlson101 replied to Kelsey's topic in ROTJ Biker Scout Armor/Helmet
Can't answer SC vs KS, but I have a 22" head and it's a snug fit with 2 fans, batteries, wireless unit, but you should be ok depending on the size of your equipment. I put my speaker behind my chest armor along with he other half of the wireless unit. Not sure how big your speaker is but there is space to put stuff in the "hump" of the helmet that sits behind your neck. Not a whole lot can fit in front of your face (my face at least) your milage may vary. -
Looking good bud!
-
I was able to get approved last week and just finished my first troop today! What a great way to end a month. Thanks to all for your critique and especially to Pandatrooper for his excellent SC build tutorial. It made things super easy. I won't be able to make it to C7 but will hopefully make it out to the next one and meet more of my fellow Pathfinder brothers.
-
Thanks bud, I'll have to fiddle with the pouches and velcro placement and see if I can square them up better. As for the chest armor gap, that's as close as I can get without sacrificing freedom of movement. It's tight enough as it is. You can see the gap better in my action shot. It could be just that side too, that's the side I use to don and doff my chest armor and putting the velcro in place is a pain...
-
Not sure about the bottom little chevron. There is a snap at that point so maybe to keep it stable? Marcel made it so might be able to clarify.
-
Thanks!
-
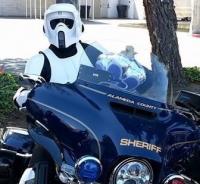
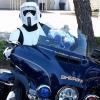
Alright everyone, I finally recieved my soft parts and put the finishing touches on my armor! Let me know if I need to make any changes. And just for fun here is me with my motorcycle helmet on. And yes I went straight out for a little spin after taking the pic. It was a chore putting everything on myself so I didn't want to take off everything yet. Edit: oops possted the wrong pic for motorcycle helmet.
-
If I was cheeky and had enough funds and skill/equipment I would make my own mirror flipped "evil twin'" scout and justify it with that scene... But I digress... I'm with Chef on this one. I know there are theories that the cod was backed with support to keep it's shape, but if I was consulted on the design of the costume from a stuntman's point of view, I know I would be totally adamant about not having my family jewels constantly at odds with the butt floss elastic. I say there is an attachment point at the bottom of the cod for comfort purposes and the various levels of "tent pitching" were due to height differences in relation to the size of the suit or attachment point(s).
-
Found this 3D printed blaster topic below. http://forum.bikersc...showtopic=12130 It's a link to 3D printed blaster from last year with a link to another topic with measurements with a link to to another topic with a link to a PDF blue print of the blaster with measurements. Possibly the same one used to make the 3D file. A bit roundabout but you'll get some extra reading material in about other attempts. I honestly think either this post or the post from link above should be pinned. There is a good amount of helpful resources to those attempting a 3D printed blaster or need a blue print to work a sculpt of their own packed into them.
-
I just held my DVH blaster in my hand just like the pic. Looks about right. What might be throwing off your eye between the two pics is that you can fit more fingers in the hand guard without the gloves. I can fit 4 of my fingers in the handguard, but 3 at the most with the gloves on. I really want a 3D printer now...
-
Congrats! Hopefully I'll be right behind you in a few weeks.
-
Sweet! Hopefully that means my stuff will be here within the next week.
-
I'm in the same boat. I haven't sent any PM since Dec, but my stuff shipped 11/22. Maybe they send stuff from Bolivia to California by Pony Express?
-
jcarlson101's SC scout WIP
jcarlson101 replied to jcarlson101's topic in ROTJ Biker Scout Armor/Helmet
Test fit! Still waiting on undersuit and flak vest so I got on my guido track suit. Pretty much done with everything except trimming up the shoulder bells. I need some critique on the tank decal placement and thigh box placement, but if you see anything else out of place, let me know. -
Where has all the 1 3/8" (35mm) black elastic gone???
jcarlson101 replied to moffsienar's topic in ROTJ Biker Scout HQ
Heh, I went ahead and bought a roll from China... If you want a few yards I can send some your way if you pay for shipping. Just give me a PM if interested. -
jcarlson101's SC scout WIP
jcarlson101 replied to jcarlson101's topic in ROTJ Biker Scout Armor/Helmet
A few more pieces done. Only a few things left and waiting for the flak vest to come in to trim up everything. Decided to do something different with the TD and used a gatorade bottle top to attach the end caps. I might be able to use it for a somewhat usable storage... for a roll of qurters or mentos or something... Hopefully they'll hold up or don't unscrew during a troop... Lancer spec Biceps and Forearms. I messed up a little as I thought all the elastic was the same size. Turns out the Forearms are 1" elastic. I attached tthe correct elastic but the cuts are a little large. Hopefully that doesn't detract from Lancer spec With a little cardboard and duct tape, I made some boxes to put in the pouches. -
Someone correct me if I'm wrong, but I believe your ear hole templates/decals need to be switched to match the shape of the ears better. Personally I cut the ears out for better air flow and paint the area behind the ear holes black to complete the look. For the lens I like the idea of a removable lens in case it gets scratched or if I wanted a mirrored look for some reason. But, I also shaped it to fit better.
-
jcarlson101's SC scout WIP
jcarlson101 replied to jcarlson101's topic in ROTJ Biker Scout Armor/Helmet
Ok I looked at some code in other posts and updated my own so there should be full size pics inline with my posts. Hope that works for your browser Chris -
jcarlson101's SC scout WIP
jcarlson101 replied to jcarlson101's topic in ROTJ Biker Scout Armor/Helmet
They are uploaded to imageshack and that is the forum code provided by them with thumbnail. Click it and be amazed at what you can see! If there is a different forum code that's more convenient, I don't know it and the image site did not provide a better one. -
jcarlson101's SC scout WIP
jcarlson101 replied to jcarlson101's topic in ROTJ Biker Scout Armor/Helmet
Boots arrived so I was able to attach the holster. Lancer Spec Knees done! I also added a little extra cushion by getting a $5 pair of closed foam knee pads from Lowes, trimmed to fit and Velcro'd in. -
jcarlson101's SC scout WIP
jcarlson101 replied to jcarlson101's topic in ROTJ Biker Scout Armor/Helmet
I went with the SC bucket because it was the smaller of the choices, there were no bad reviews, and because of a discount when purchased with the rest of the armor. Ideally I would have purchased an LW that a forum member was selling. Unfortunately I logged on about an hour too late and lost that quick draw match. Lol -
Ok I've finished my bucket since I'm still waiting for soft goods to come in. I didn't think to take pictures until late in the build so here are the finished product pics. Let me know if I need to fix anything! I was able to squeeze a 3M SpeedGlas harness, 2 squirrel fans, wireless mic setup and 8 AA batteries. My head is about 55cm circumference and it's a cozy fit with everything in there. If anyone wants to see how it looks, let me know and I'll snap a few pics and post them.
