SIPPY
-
Posts
94 -
Joined
-
Last visited
-
Days Won
1
Everything posted by SIPPY
-
Damn that's a great idea. I've only used the core flute for the pouches but you're saying maybe make them out of that foam yoga matting or something similar? I have found bending a problem. Always looking for improvements.
-
go and buy a sheet of plastic "core flute". It's what sign people use and is light but durable, I bought some and made my boxes out of that.
-
Go and buy yourself a sheet of coreflute. That's what I've made my internal boxes out of. It's strong, light and it fits perfectly. Measure the size if your pouches and score and fold it accordingly.
-
I've never seen how the chin cup set up works. Has anyone got any detailed pics of inside the helmet with a chin cup set up? I am guessing it somehow attaches to the 3M bolts on the inside but I'm not too sure how. Cheers SIPPY
-
All I can say is if you paid with PayPal and you are within the time frame (40 days) since ordering, lodge a PayPal dispute immediately or you could be taking a chance on eventually getting your suit or never seeing anything.
-
Thanks for the opinions guys. I chucked the pouches on today and they look HEAPS better than before. Glad I did it.
-
Thanks guys, Like I said I panicked and washed and re-dyed them (at 1:40 before a troop mind you) hahahaha. Here is the new and improved.
-
G'day guys, I've tea dyed my pouches to off white and use store bought off white webbing on the armour. Are these pouches too dark for approval? I got scared and have since washed them in hot water, stripped the original colour out and re-dyed them lighter. Was the original colour okay and would I have passed approval? Cheers StormySA
-
I've noticed though that the caps on top of the 3M glass bolts I acquired from Lonewolf are bigger than the recessed holes on the KS helmet so they don't sit flush. Has anyone had any luck or tips for "sinking" them in so the caps sit flush? I hope that makes sense? Cheers Sean.
-
All finished. I'm pretty happy with the way this turned out. It was a great save and okay for trooping, will save up and get one pre-built next time hahahahaha. Thanks for all the kind words, hope you liked the build.
-
Aaaaaand I've put my trooper bay decals somewhere "safe" and now I can't find em! When does the nightmare end? hahahaha
-
Chef, You would think it would as simple as that wouldn't you? I've worked in the hobby industry for 2 years and have been building models for at least 20+ years. You would be blown away by the amount of times I have this conversation with someone in the store: Hi I need a spray that's not glossy but not dull Oh so you would like something that's a semi gloss? Yeah that's kinda glossy isn't it, you have an example? No sorry I don't. It's kinda mid way between a high gloss and a flat coat though. Oh so how shiny is semi gloss then? IT'S HAAAAALF WAAAAAY. Makes me wanna pull my hair out. At least we know what a Semi gloss or "satin" finish is. I didn't have any semi gloss black so tonight I painted the base Matt black and hit it with a semi gloss clear (does the same thing just makes the layer a bit thicker). Really glad I was able to save this one. MJ good luck with the build. Your scout looks awesome.
-
There are a few different interpretations from people when it comes to "satin". When you say that I think a "semi gloss" whereas some people regard satin as "flat or Matt" What would you suggest Chex? A semi gloss? At least I can fix all of that up now that it's been resprayed. Thanks for the suggestion.
-
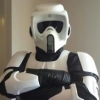
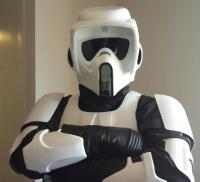
Hi all, This will be a very entertaining article for you to read as I have been through the darkest depths of hell with my KS build, only to come out the other side full of rainbows and sunshine. I have been posting regular build updates on my Garrison forums but thought you would all enjoy it as well. Sit tight and hold on, it was a bumpy ride. Okay faceplate is all done. No visor in yet but the nose sticker has been replaced by a gloss black painted base and the KS nose greeblie replaced by a more accurate one. Eyes have been drilled and and smoothed, now just have to work out how it all goes together. Okay visor is now in. The one supplied with the kit is fairly thick and impossible to bend in to shape without snapping. I had a brilliant idea. First I cut the shape of the visor out (which is already drawn on to the protective film thanks to the maker) Then I placed the visor in an oven on a flat tray for about 30sec. The material was then playable to form in to shape. I didn't have any gloves so this can be a little painful. Then I bent it slowly in to shape immediately from the oven. I formed it to the inside of the faceplate. Once it cools the plastic can lose its original bend so I worked the middle section over a toaster and used the heat to heat up the middle and then slowly folded it in or out to get a perfect fit. Then just hot glue the visor in and wholla, all done. UNTIL TRAGEDY STRIKES AND STRIKE HARD IT DID! Okay well here is the first major hiccup of the build. Thanks to EI with help regarding the helmet build. This is totally my mistake and an extremely bad one at that. I had glued the visor in the right position but once clamped and dried I had found that it had slipped up inside the clamp. The result was a visor that was high at one side and in correct position at the other. Using superglue I found a "debonder" at home and had the brilliant idea to squeeze some on to the join and pry it back apart. BAD MOVE. The debonder not only softened the glue but starting eating the ABS. In my infinite wisdom I decided to get a flat head screwdriver in there to pry apart the join. The result was a split visor and a very split one at that. I have been assured that it can be fixed but I am still nothing short of devestated! Well the time has come to fix the bucket. I put it off and put it off but after talking with Evil and Al yesterday I think this is the best approach. I will be painting the helmet and then painting my armour to match. I'm going for a glossy look instead of the weathered trooper. Wish me luck, I'm gonna need it! Info to come on this process. I just typed it all out and I timed out on my log in. CBF uploading all the info in what I did again. Both now almost ready for paint and clear coat. Will be painting armour to match. Pretty much it was cut ABS to size, insert, superglue, bog, sand, done. This was the rear of the bucket, seam gaps filled, sanded, cleaned. Stage 2 of the recovery. Was not happy with the pull on the visor so I tried heating it and straightening it. Problem.... It warped the visor. Plenty of bog can be seen here but it's now as straight as a dime. Really pleased with how this is going. There's a lot of work to go but I can see the end is near. Helmet is primed and just needs a sand with some 1200 then a 1500 wet/dry paper then she's ready for some gloss white. Hope it matches the armour or close to it. After all this work I don't really want to have to go back and paint all the armour as well. This is the repaired side and visor. Thrilled to bits how its come out. Rear of the bucket all painted, 2 coats of white, sanded, 4 coats of clear. Moving on to the face plate. Thanks heaps for the help tonight mister Evil. It's finally in its home stretch. I have it painted and the correct 3M Glass bolts installed.
-
Yep that's definitely the tell tale sign of an old and very used waterslide decal. I am very interested in these if you get a run happening for sure. I would more than likely get my helmet professionally painted white then get it back to me where I will apply the decals then maybe send it back for a coat of gloss clear over the top to protect them. Yeah this is a VERY good idea.
-
More than happy to wait until you get a reply Darth. If its more accurate I will go that way, if its too hard or doesn't happen maybe the vinyl isn't a bad option. Hope you get a reply.
-
I would definitely be interested too Darth. I've got some decal paper at home that I use for custom model kits. Have been doing my own for years now. I may just give this a crack once the helmet shows up.
-
Oh well waterside it is then. Might have to design something and print it on decal paper. I suppose if that goes wrong then they're easy enough to remove and replace with the vinyls.
-
G'day guys, Could I please grab that sound file from someone please? Cheers
-
So they were originally peel and sticks? Awesome. Reason I ask is if I decide to weather it at a later date (will troop fresh for a while) it's easier to weather water-slides than raised vinyl.
-
Yeah now that is AWESOME and must I say re-reow! Love it!
-
G'day guys, Here's a question for all you armour nuts. I have all of my gear on order and I am going for Lancer status once it's all done. I want to get it all as accurate as I can. Now the question I have refers to screen accuracy. Some vendors offer a sticker sheet to upgrade the standard decals on some helmet kits. Were the original helmets stickered up with the "peel and stick" adhesive backed decals or the good ol' model kit "waterslide" decals? Any help would be appreciated. Cheers Sean.