Scout472
-
Posts
14 -
Joined
-
Last visited
About Scout472
- Birthday 04/18/1977
-
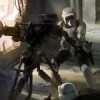
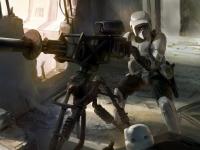
So being out of projects I needed something to pass the time and so I started looking at a new blaster. I wanted something that a Scout might carry, but was also looking for something my upcoming Mando could use. I looked through all the canon blasters and wanted something with a good rate of fire and stopping power, but a lighter weapon for high mobility and use in close quarters, like urban terrain. I considered the E-11 sniper (http://starwars.wikia.com/wiki/E-11s_sniper_rifle) but in the same article there is a scout with a DLT-19 with an optic sight. Which got me thinking about a lighter version of the DLT-19, but I could find no references. I really liked the shape of the butt and receiver group of the DLT-19 so wanted to incorporate that into the build. So here is a non-canon, but logical progression of an in-universe weapon, I give you, the DLT-19 CARBINE. So I started with this schematic and scaled to produced the butt, pistol grip and receiver on A4 and stencilled onto timber Image has been scaled down 42% (600x308). Click this bar to view original image (1024x524). Click image to open in new window. Image has been scaled down 22% (600x800). Click this bar to view original image (768x1024). Click image to open in new window. Image has been scaled down 22% (600x800). Click this bar to view original image (768x1024). Click image to open in new window. Then with some Dremel and sandpaper work I had crafted a reasonable facsimile of a MG-34 butt stock Image has been scaled down 22% (600x800). Click this bar to view original image (768x1024). Click image to open in new window. Having filled my lungs with pine dust I decided to inhale some plastic dust for variety. Having purchased a variety of PVC plumbing parts, and blatantly plagiarising Astyanax’s build thread from whitearmor.net I set about creating the flash suppressor and cooling jacket. The barrel will be 15mm poly pipe and the jacket is 32mm poly. The flash suppressor is a bundle of plumbing parts which have all had some form of modification or another made. As this is a lighter weapon than the DLT-19 the outer cone of the suppressor is also more heavily vented than the original. Image has been scaled down 42% (600x450). Click this bar to view original image (1024x768). Click image to open in new window. Then using this image, I decided to reduce the barrel by about 50%, making it about 30cm (12 inches) instead of the 20.5†in the original weapon. Image has been scaled down 42% (600x450). Click this bar to view original image (1024x768). Click image to open in new window. Image has been scaled down 42% (600x450). Click this bar to view original image (1024x768). Click image to open in new window. So at the end of the weekend I have a passable barrel group and butt. I have the basis for the pistol grip and I am yet to start properly on the receiver group. But here is the DLT-19 Carbine. Image has been scaled down 42% (600x450). Click this bar to view original image (1024x768). Click image to open in new window.
-
I think there should be a little more taken off over the nose. Advice I got and looking at the screenshots is that there is no lip over the snout. Your fourth picture looks like there is still a vertical lip over the nose. Not definitive, but have a close look at it
-
I had a reasonably productive weekend. Finally sourced some white vinyl and made a start on my boots. Only got the toes stretched and glued, but they are on their way. Another first for this build was I installed my first rivet! I reinforced the inside of the knee armour by gluing an offcut of ABS then drilled and attached the top knee strap. Test fitting was tricky but got them done and the confirmatory fit was good. Then it was time to hit the sewing machine. On advice from Chef I redid the ribbing on the front of the cummerbund, making each rib narrower, then I knocked up a couple of pouches pretty quick. Had to scale them down a bit coz of my smaller frame, but the proportions were retained so I hope this will pass when it comes to approval. I was able to source some good, cotton, off-white webbing at Spotlight so I but couldn’t find any decent off white fabric that I thought would work for the pouches. So I started making tea. Lots of test strips later I had a match. (top = original pouch fabric, middle is the cotton webbing I will use on my drop boxes, bottom is the pouch fabric after soaking in tea and drying in the sun) So with great trepidation I threw my shiny new white pouches into a pot of hot tea. So here is the end result with the off white pouches on the white cummerbund with an example of the drop box webbing. Over the course of the weekend, while waiting for glue to dry, tea to boil, pouches to dry etc, I decided to add a bit of macabre humour to the build. Maybe it is the Halloween spirit getting to me. So, I built some Battle of Endor trophy Ewok paws! I guess I was a bit ambitious with my comment last weekend that one more weekend would do it. Hit a bit of a snag with building my own flak vest as well, but got some great advice from my local 501st Garrison mambers. I won’t have a chance to do any more for a couple of weeks as I will be away with work next weekend. Thanks again to everyone who has chimed in with advice.
-
Hey Chef, I spent last night unpicking and resewing the ribbing on the cummerbund. Given my small frame the narrower ribs looks heaps better. I also finished my first pouch and with the new ribbing it's sits much better than it would have with the original stitching. I also had an idea when I was out buying fabric to make my flak vest. I have decided to make some bits that bare no relevance to getting my outfit approved but will add a macabre and humorous element. I bought some different coloured fur and faux leather and I am making some trophy Ewok paws to hang from my belt. Those pesky little critters! Photos to follow.
-
Quinexx, yeah I used the bolts that came with the kit. I first put it together with a little tiny bolt and found that the predone holes were in slightly the wrong spot. I marked up with texta and drilled a small guide hole that the tiny bolt would fit in. Now I had confirmed the correct alignment I used my Dremel to cut the holes on the face plate and visor as squares. On the helmet I made it a round hole so the bolt could rotate to raise the helmet. I will take some photos when I get home to illustrate. Hope this helps.
-
Thanks Chef. The ribbing was spaced to match the width of the codpiece. Each rib is about 1 1/4". I can unpick it and resew them narrower, especially as i am a light build that will make my pouches sit better. Thanks for the tip.
-
Thanks Southscout. I debated over the TD. I have been following the Pandatrooper build and also there are Bluray screenshots from ROTJ that show it with the notch facing down. Will this be an issue?
-
And so it begins, the brown box! So excited, but have no idea what to do next. This thread will be a fairly rambling affair, as due to my time constraints I will not be following any set sequence. There won’t really be anything new here that hasn’t been seen on this site before, but I am posting it in the hope that if I am heading off down a rabbit hole, that someone will give me a shout and steer me back on course. Great looking SC kit. Picked up the gloves which look good to me. Any issues with these? Decided that I would start with the boots. I have never worked with plastic before so I am just going to leave the armour at this point while I read lots so I don’t make a very costly mistake. So I picked these up from Big W for $30. Comfy, correct colour sole, cheap. Again, if I bugger it, it is only a cheap pair of shoes not hundreds of dollars of plastic. So decided to attempt to make the soles more screen accurate. Marked out the groove pattern and carved with a square end modelling blade. I think they have come up pretty well. Time for a break and some inspiration! So revitalised after a solid dose of ROTJ. Time to start some painting. When I ordered the boiler suit, it only mentioned a double zip, but when it arrived it had two nice shiny press studs at the top. So I masked them up and sprayed the two studs black and also did my snout and visor studs in a neutral grey. The tank topper I masked to spray the red stripe and hand painted the white dot. Not really happy with my skills at hand painting. May come back to that. Also broke out the sewing machine and hit the boiler suit. Pockets gone, legs taken in (way too baggy), neck seal attached. So finally decided to start work on the helmet. Decided to black the interior. Couple of reasons for this, but mainly I think it will provide better contrast and make it easier to see out. Also, as I am in the tropics I have invested in some micro fans to keep the air circulating. Still not sure whether these will be mounted front or rear. I will test it once I am able to put on the helmet. Today, was the day. Made my first cut into plastic! Took out the eyes from the helmet. I think I need to take a bit more off the top and deepen the bottom of each eye. Any feedback? (On advice I got from my local garrison forum I opened up the eyes a bit more.) Ok. So it has been a busy week with work but I managed to get a bit of time to keep chipping away at my TB build. It’s not much, but I did get the arms of my armour completed. I have rounded the shoulder bells (following the build thread by Pandatrooper). T-bits attached and all the Velcros and straps finished. I added some extra Velcro inside the arm pieces to hold them in position and will put the other half on the undersuit. I finished getting the thermal detonator together. Finished painting the helmet, blacking the inside and preparing the snout for attaching the greeblie. Once the inside was painted I was able to cut the ears Then I worked on installing the fans. Some knead-it to place the attachment bolts, confirmed the fit, touch up spray to complete the black lining, a bit of dodgy soldering and it was done. The cabling needs some work to neaten it up, but the overall effect is good. Still need to modify the left fan as it is a bit noisy but the right one works a treat. With the bolt holes rebored, the lens in place, foam inserts stuck on and the decals attached the helmet is complete. Well, I think it is. Any comments or advice from the crowd? Then I hit the sewing machine. I got kind of caught up and realised as I was finishing the ribbing that I hadn’t taken any photos. Anyway, about 45 minutes later and this was the result Had to try on the completed parts to see how it was looking I reckon one more weekend of solid work and it will be pretty close to complete. Any advice or changes would be greatly appreciated. As this is my first build I could really do with some help from the more experienced scouts. Cheers
-
Thanks Gaunt, I'll try it out tonight
-
How do I attach files? It will only allow me to post a total of 500k! I have reduced them as small as I can but still viewable but want to post a build thread with photos for comment and advice. Can anyone help?