gr1fter
-
Posts
55 -
Joined
-
Last visited
Everything posted by gr1fter
-
Alright after nightmares, a close heart attack, and more tornado of emotions. I think I got it or at least the best I can do for my helmet. It still looks a ton of a lot better than the default KS build. KS helmet - Before Masking down the helmet like Fort Knox Painted with Satin Black Slight heart attack when the masking tape lifted up due to heat and the paint flared through! Like a surgeon, I carefully used 800 grit sanding paper and went around the edges where it flared Put back together
-
well... just finished some painting and got some flare up around the top of the curve
-
how long would you consider long???
-
cool! yeah man I am going to bag it tonight and secure the helmet down like fort knox LOL
-
now its time to use the shot glasses! haha. Well, I still have to actually paint it! Grif, did you sand the area first before you primed and painted it or just slapped it right on the ABS?
-
Pulled it in a "tad" pull it in too much?
-
I only have one! hahah
-
hahah I have plenty of those and I needed it last night!
-
difficult is an understatement LOL. I don't know if its my helmet but it just seems like the snout is lop sided. If I try to do like how the snout "looks" like it should go, it ends up completly crooked. Thanks for the suggestion. ill pull it in a tad and post back. Thanks Griffin-X
-
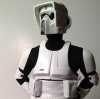
Hi guys, finally getting around to doing my upgrades on my suit since getting accepted into 501st. One of the first things I wanted to tackle was upgrading my KS bucket. I replaced the bucket bolts and now going to paint the snout and replace the snout pieces. The snout ridge on my bucket is not even so doing the tape masking has been a pain. I tried my best to eye and can you give me some feedback? Go in more, go out more? good to go? I'd like to make sure everything is in order before I start to prime / paint the actual bucket. Thanks! here it is so far:
-
I have a few armor scratches from bumping into things, armor bins, etc on my tank topper and other areas. Can this be repaired easily or should I just let it ride and be "battle damaged"?
-
yeah i cleaned it good and sanded however its kind of hard to sand right good where that spot was. The top section is really good. I was thinking of sanding the bottom section down again good as i can and brush primer it. Then if it looks good, Ill try the clear matte. Thanks for the suggestion!
-
Hi fellow scouts, I finally getting around to replacing the snout on my KS bucket. I need some help with painting. Here are the steps I performed so far: Sanded with 220 First coat with Primer Sanded with 400 Second coat of Primer Hand painted Humbrol Satin Black #85 After all that it looks really good: Comparison: However, im seeing some pretty easy chipping on the paint. Do i need to add a clear coat? would that make the snout to glossy? Thanks,
-
Thanks for the feedback guys! I am going to work on next week and make some changes. I will post back with my results!
-
Hello, Doing some test fitting on my armor. Is my Flak Vest arms too big? Should I shorten up the length? I'm not quite sure if they are supposed to be poking out the shoulder bell like that? Thanks,
-
I'm back. I started on my armor! I started with the knees, biceps and forarms. I sewed and velcro'd the straps. I glued the T-bits on. I drilled and rivoted the top strap on the knee plate. (not pictured) I created my TD I sewed together T-straps for my Chest / Back Armor and Shoulder Bells and sized up my armor. This is where I am currently at. I need to work on my belt next and have a few questions which I will ask below. Love to hear the feedback. Thanks, Current questions I have: What do I need for the cover strap that connects the Front / Back armor and the T-Straps. My SC kit did not come with this. Is it Canvas? Is it supposed to be Cream or White Color? Is the Chest Armor supposed to go over the Cummerbund? If so, do i use Velcro or something to hold it in place? Are my Flak Vest arms too long? Do they need to be shortened to before the Shoulder bells end? Last but not least, How am I looking?
-
Hi guys, I been working on my suit and yesterday I started replacing my KS Helmet Bolts with the 3M Bolts. I purchased a pre-assembled helmet from KS and I removed the rivots from the lid and pryed off the bolt covers, removed access glue. I then drilled out about a 1/2" hole to fit the square 3M cover and drilled a 1/4" hole into the face plate. After I assembled the helmet there is a tiny gap when i close the lid and I cant appear to screw the 3M bolts any tighter, to make the bolt flush against the helmet. Any suggesstions on how to make this completly flush? Was thinking to E6000 the bolt into the hole first before screwing in? Would that help or bad idea?
-
Thanks guys! I picked up a 12x12 Styrene sheet off of ebay for a couple bucks. Should be just what I need. Thanks again.
-
I see in a lot of the builds, people are using extra pieces of ABS plastic to secure things like the bank tank, some of the rivets in the knees and the gun holster. This may be a silly question but where can I buy / get the type of plastic that is being used in this armor? I don't have any extra pieces of armor or plastic that I can use. Thanks,
-
Update: Added the strap to my boots Created my flak vest Added the Calves to my boots Recieved my headband for my helmet Recieved my Armor! Completed my boots. However I think I may redo them because I need to fix the dog bone, its too wide and I need to add the sewing stiches to the dog bone which I neglected. I am going to try to take the dog bone off but I have a feeling its not gonna be pretty and when i trim a new thinner dog bone, I feel like everything is going to be noticable. We will see... Did a Test fit with my helmet, flightsuit, cummerbund and flak vest and holding up the chest plate. I decided that the flak vest is a tad too big so I am going to take it in a couple inches.
-
I found where I saw it. Straight from the Boot Tutorial on this site: "This is strictly for show and isn't necessary, but the boots they used in the movie were stitched like this and it just plain looks better." I did a squat / kneel test with the boots and the holster didnt dig in too bad. I plan on redoing the dog bone with the stitches. Thanks for your advice Marcel!
-
Thanks for the feedback guys, I overlooked teh dog bones trimming. I swear i read somewhere that it wasn't necessary (optional) for a more profressional look. I've seen the boots with and without them. But I want to get everything correct, I have ton of vinyl left so I will see about creating new dog bones. Hopefully getting it off wont be too bad! eeeek
-
Thanks! i will tackle the sole cutting at a later time. My armor has arrived and I am super stoked to get started on that.
-
Just finished my boots, please let me know if I need to make any modifications. Thanks.
-
I got the SC Armor kit. Thanks for the responses guys!