

Fool
-
Posts
58 -
Joined
-
Last visited
About Fool
-
I had that "Want to troop NOW!" feeling too. You'll get there, and it's worth the wait. You might want to bring your armor to the troop, and if you know someone with a helmet, ask if you could "look at it" for half an hour or so (of course you would happen to have your armor on when you "look" at their helmet...from the inside of course)
-
Yep raise the knees a little (maybe trim them down a little) (maybe trim a little more off the shoulder bells too) I made 4 sided boxes for my pouches, very easy to do with some very stiff cardboard or poster board, and you can still use the pouches to carry things. Looking awesome!
-
OFF TOPIC ?!?! What in the world can you use a rivit gun for besides armor! Shame on you sir for spreading lies and rumors ON TOPIC Nice build and progress! I glued my back tank on also, but then added the rivit to the top and bottom after. I just think it's more stable.
-
My det. just got ripped off at the last troop (someone just walking by....) I will start work on making these for me, Thank you!
-
Wow.... simply beautiful!
-
We had a blast! Here we are with weapons present. Next year I'm thinking full steampunk bikerscout....
-
Overwhelmed! Correct Technique? Where do I begin?
Fool replied to a topic in ROTJ Biker Scout Armor/Helmet
The advise I used (and it was very good idea) is to start with the chest, and work out from there. Look at the pictures from the movie. It was very overwelming for me too....at first. But once I started (on the chest piece) everything just started falling into place and it turn out very easy IMHO. Get those pictures up and we can help. -
I had to post the pictures here, I don't think that it will be obvious at the con what it is meant to be. My buddy's gun (that he is making) is way cooler in style. I has glowing electric wire running throughout it. Both of us tend to go a little overboard when we decide to do something We have no idea if we will enjoy the con or not, we are just going to see Abney Park. But as long as we are going, we might as well dress the part. Also, we decided to "dress" on a budget, neither of us can spend more then $50 on everything. The total cost of my gun is about $6, in parts.
-
Yes, this is the finished product.
-
Me and a friend are going to see a band (Abney Park) at a steampunk con....My first thought was to build a biker scout steampunk costume....I decided that one month was not enough time to do that, so I just made the blaster pistol. Here are the pictures. And yes...sigh, I did spell blaster wrong....
-
I agree!
-
Exactly what I did. one side of the snap is on extra abs that is then glued to the shoulder. the other side of the snap is through the elastic. I have one snap on each shoulder, and one elastic strap with a snap at both ends. If that is not clear, let me know and I'll take some pictures.
-
I used snaps. I made a hole in spare white abs plastic, then put the snap in that (I also heated up the plastic to form into the shape of the armor for a better glue area). then glued it to the shoulder. It holds together great. I did use velcro for the rest though.
-
SC Kit Purchased - anyone want to help?
Fool replied to Uplandmacenter's topic in ROTJ Biker Scout Armor/Helmet
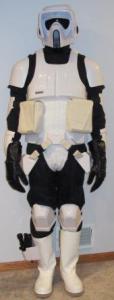
I just finished my SC armor a month ago. Trust me you have not bitten off more then you can chew. altogether it does seem daunting. Just take it one piece at a time, and you'll be fine. Ask questions here, everyone has been more then helpful to me durning my build. One of the best pieces of advice I got was to start with the chest and work outward. -
Scout blaster photos needed for Legion tracing cards
Fool replied to 5573's topic in ROTJ Biker Scout Weapons
PM sent