Leaderboard

Popular Content
Showing content with the highest reputation since 04/17/2025 in Posts
-
Well this is pretty nuts, but the granddaddy of ARTs just hit 10 years this year! Juan Jose Matamoros designed us a great 10 year logo Not sure if we will do patches or coins... stay tuned!8 points
-
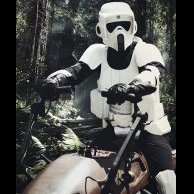
I've wanted to do this build since I saw it in Solo. I've been busy trying to finish a Shadow Scout for the past year. I've been on here a lot as you all have much better write ups about scout builds compared to SpecOps. I was recently offered a Resin cast PT helmet and that spiked my interest in this build again, so I jumped on the few items that @BikerScout007 had that I could fit in. So now that I have a helmet, boots, and gloves, it was time to start grabbing more stuff to make this happen. I bought @MrPoopie's files so I can start printing the armor on my Elegoo Neptune 3 Max, and my CR-10 S5. I'll be printing them in PETG as I don't have any enclosures. I'll also be ordering my pants from Uniform Warehouse per many recommendations. The jacket and belt were my biggest hang up. I recently was contacted by a prop maker named "Galactic Props" on Facebook and they said they could make the jacket to meet the Level 2 requirements, so I've taken a risk and ordered. As for the Belts and Belt boxes, I've gotten some recommendations and will be looking into those. So break down. Softgoods: Jacket - Galactic Props (https://www.facebook.com/galactic.props.2025) Pants - Uniform Warehouse (https://bit.ly/3GvRCGw) Gloves - Endor Finders Boots - Amazon (https://amzn.to/4lYQg7A) Belt - TBD Belt boxes - TBD Balaclava - Amazon (https://amzn.to/4jEZioI) Armor: Helmet - cast resin (not sure who they are modeled from). Armor - 3D printed PETG (MrPoopie's files).7 points
-
Hey all! This week we launched our YouTube channel in order to house the many videos we've created and will create in the future. So instead of trying to track them down in a myriad of places, they are now all in one easy to find place -- including the Virtual Armor Party videos! More stuff to be uploaded soon! Please like and subscribe at https://www.youtube.com/@501stPathfinders7 points
-
Well, I ran this by the DL and he referred me to the DCA. Last night I posted on FB that I was looked to commission a jacket. A prop vender named Galactic Props contacted me and said they could do it, and sent me some pictures and a video of their jacket. The pictures look like something that would pass basic approval, but the video seemed to show the flat stichig as well as the ribs. So I took a gamble and ordered it. They did ask for measurements and said it would take about 2-4 weeks. So, well see how it goes. If it turns out good, we might have a vendor willing to make the jackets. Link to jacket video. Patrol Trooper https://imgur.com/a/XvYsAzK Sent from my SM-S938U using Tapatalk5 points
-
To the 501st Pathfinders Command Staff, I just wanted to extend a huge thank you for the time and guidance you’ve given throughout my kit build. The resources you’ve provided, and the support you offer through the forum, have been absolutely essential—and honestly, game-changing. A special shoutout to @Chopper, @Tarok, and @Aradun—your advice, patience, and dedication made a daunting process not just doable, but actually enjoyable. You’ve helped turn a pile of plastic into something truly epic. Thanks again for everything you do—not just for me, but for every builder chasing that screen-accurate dream. Scott B. - aka Sgt. Bilko4 points
-
@Hask @Ruthar are our PT armorers and they can help guide you through the build process. @MrPoopie, besides being a PT himself, designed 3D files for it and is our 3D printer expert. He also did his own jacket, since the original source for it dried up. Feel free to post up any questions you have about the costume here.3 points
-
I’ve been reading along in the shadows for abit now, and seeing how helpful everyone is here towards each other was part of the reason I decided to actually go ahead with making the costume Sent from my iPhone using Tapatalk3 points
-
Some background, I've been with the 501st / Golden Gate Garrison since late 2014, served on Command Staff for a couple of years and helped a bit with garrison merch, but got retired due to lack of activity in 2024. A couple of reasons, one) all ABS armor eventually yellows. This was a battle with my ESB TK armor for the past 5+ years and it is now at the point of sanding and painting to rescue it. It saw quite a few troops when I was part of the Golden Gate Garrison. Two) we are in small numbers here in the Northern Nevada under Central California Garrison, thus event requests are far and few between. So with that said, I am planning to return back to active status this year with Central California Garrison (relocated to the Outer Sierra Mountain Ranges in 2023). We are looking to change this in 2025, so if you know anyone who is looking to join the Empire here in the Reno/Sparks area. We are here to help! This is my First Offical WIP entry. Not that there is anything that probably haven't already been done with other builds, but I did do a few tricks when fitting my TK armor to fit as good as I was able to accomplish. Something I am looking forward to doing here as well. My loadout: Armor: Studio Creations full kit. Ordered April 12th, received May 3rd. (Which BTW, at the time of this entry, they were offering a $504.00 price for their kit. Unheard of IMO and don't know how long this sale will be good for! Plus Kurt took care of me when I asked if he could accomodate my request. That was customer service!) Soft Parts: ChrisX909X: Full soft kit including boots. Hoping my experience will be better than some others had, especially regarding the boots. I wanted to give my business to someone in the USA. Ordered on April 27th, with an estimate of completion around June if I jumped in line but his original ETA was end of July, but as we say, "Time will tell" Gloves: Wampa Wear - Size Med Received April 30th. Base Layers: Basic black compression gear and balaclava used with my TK. I am hoping that I won't need to use the insulated ones during colder months with all the TB layers.😄 Voice Amps: Anker and Throat mic. Optional: TrooperTalk used with my TK. Ground Transportation: Honda CBR650F with Imperial Graphics Okay, since photo space is limited on the forum, here are pics from my Google Photo account. I'll be adding to it and sharing anything specific about my build from another image hosting site. Obligatory Big Brown Box and initial unboxing. Hasbro Black Series TB Helmet and LEGO key chain for inspiration. My next post will probably be helmet related as that doesn't need to have my soft parts for proper fitting. Until then Toybiz out...🫡3 points
-
Nes, just a note for when you’re trooping. Don’t wear the balaclava over your mouth and nose. You’ll fog up the inside of your lenses super fast that way.3 points
-
GLOVES: Wampa Wear is the obvious go-to, but I was intrigued by Endor Finders trying to more closely mimic the Esprit gloves what with the included zippers. Ordering was very easy but I did notice that a few sizes were out of stock, I'm not sure how often these are getting produced. I was between a size Small and Medium according to the size chart; I endored ended up getting a size Small and they fit pretty well (even a little on large side). Shipping was very quick and the gloves appear to be very well made. So far, I would recommend these if you don't mind the increased price and a little extra work to remove the zippers. More pockets!!! So about that zipper... To remove the zipper, I used the same method Aradun recommended in his thread here: This was a great resource and I probably wouldn't have gotten these gloves if it weren't for this topic. I considered cutting the zipper like some other posters, but ultimately went with the flathead + knife approach. Personally, I prefer the look with the nylon zipper attachment intact and way it affects the form of the gloves, but I may cut them out later if they are a problem for approval or durability (I would like to go for Lancer status eventually). I'll probably cut the zipper pulls on the wrist at some point as well. All in all, very happy with these gloves. At some point, I may look into modifying a pair of Esprits since they don't seem too uncommon on Ebay. Apologies if that's a photo overload!3 points
-
Agreed! It constantly gave me headaches. Here is my setup. I used to have a pad on the top, but it lifted the helmet up too high3 points
-
Look online for First Order TK belts. The material is the same.3 points
-
The ribbed material is ribbed rubber floor matting / grooved anti slip matting https://www.ebay.co.uk/itm/402300779926?mkcid=16&mkevt=1&mkrid=711-127632-2357-0&ssspo=JXXRYntqTvu&sssrc=4429486&ssuid=sDN08318Qna&var=&widget_ver=artemis&media=COPY A guide on how to construct the pouches can be found here https://forum.501stpathfinders.com/topic/20477-ruthars-patrol-trooper-build/page/2/#comment-187463 It's been a few years since making mine but I think I used 2 of the medium sized pouches as the smaller one was to small IMHO . I used the belt material on the back of the pouches, cut to size and super glued back on to the belt, using the ridges as a way of having a large contact area and also making the pouches sit flush and close to the belt,it's held up for 3 years and I've had no problems. Sent from my 21091116UC using Tapatalk3 points
-
I believe the Lucas museum in downtown LA opens in early 2027? Likely not a coincidence…3 points
-
Finally getting some time to work on this again. Got all the pieces glued together. I realized after gluing the barrel pieces together that they weren't properly aligned. I'm pretty sure that big gap between the cooling fins should be on the bottom of the barrel, not the top. Oops! It's glued in too tight, so will continue working on it for now to get some practice in. I got the gappy pieces Bondo'd together and sanded down and prepped for spraying. First layer of filler-primer done, will add 1 or 2 more layers before sanding down again, then will start painting. The misaligned barrel shouldn't be too obvious when completed and definitely some lessons learned for the next one I'm working on.3 points
-
I’ve been following the 501st since I was a kid, and I’ve finally resolved to try and do a 501st approved costume of my favorite modern Star Wars trooper. I’ll be getting a 3D printer within the month, but I’m still a bit overwhelmed by the entire process if I’m abit honest. Going to try and post the process over the next year or so here so I can track my own progress and help others avoid the mistakes that I’m sure I’m going to make.2 points
-
Ok, took me a while but I wanted to share some first pictures of my new Scout Helmet by iron Motion in germany. He offers three different options on his website: 1) Kit 2) Pre-assembled kit 3) Finished kit I chose the pre-assembled version because of too many projects you know... 😉 It only needs some finishing touch like minor trimming, final sanding, assembling, installing all parts of the helmet and painting. When I'm finished I'll make some new pictures with a tape measure and side by side comparison with my SC bucket.2 points
-
Was able to use your recommendation for the sandpaper around pen trick (not sure why I didn’t think of that), and it worked out really nice and was able to get them more symmetrical for both side. Tip of the cap to you Chopper! Sent from my iPhone using Tapatalk2 points
-
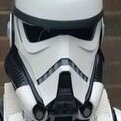
I dislike the “hard hat” insert from RS prop masters for the helmet. Any padding suggestions? Anyone willing to share a few photos of the inside of their bucket?2 points
-
I've used both of these styles in different helmets: https://www.amazon.com/Aoutacc-Universal-Airsoft-Replacement-Accessories/dp/B07PGF4CTH/ref=dp_prsubs_d_sccl_1/144-1238176-3458826?pd_rd_w=PS5H0&content-id=amzn1.sym.efe5d038-dc89-42e0-b82c-81ca9bb5c760&pf_rd_p=efe5d038-dc89-42e0-b82c-81ca9bb5c760&pf_rd_r=3GRSFS4DDVY7G3EGHMT5&pd_rd_wg=Rlb1t&pd_rd_r=763a4310-e4fb-4bc4-802e-09640706bcee&pd_rd_i=B07PGF4CTH&th=1 https://www.amazon.com/dp/B08Y5JZFGB?ref_=ppx_hzsearch_conn_dt_b_fed_asin_title_10&th=12 points
-
The neck seal is optional and the dip in the front is not a problem.2 points
-
I will have to check. Probably? I won't be home for a few more days but I will look2 points
-
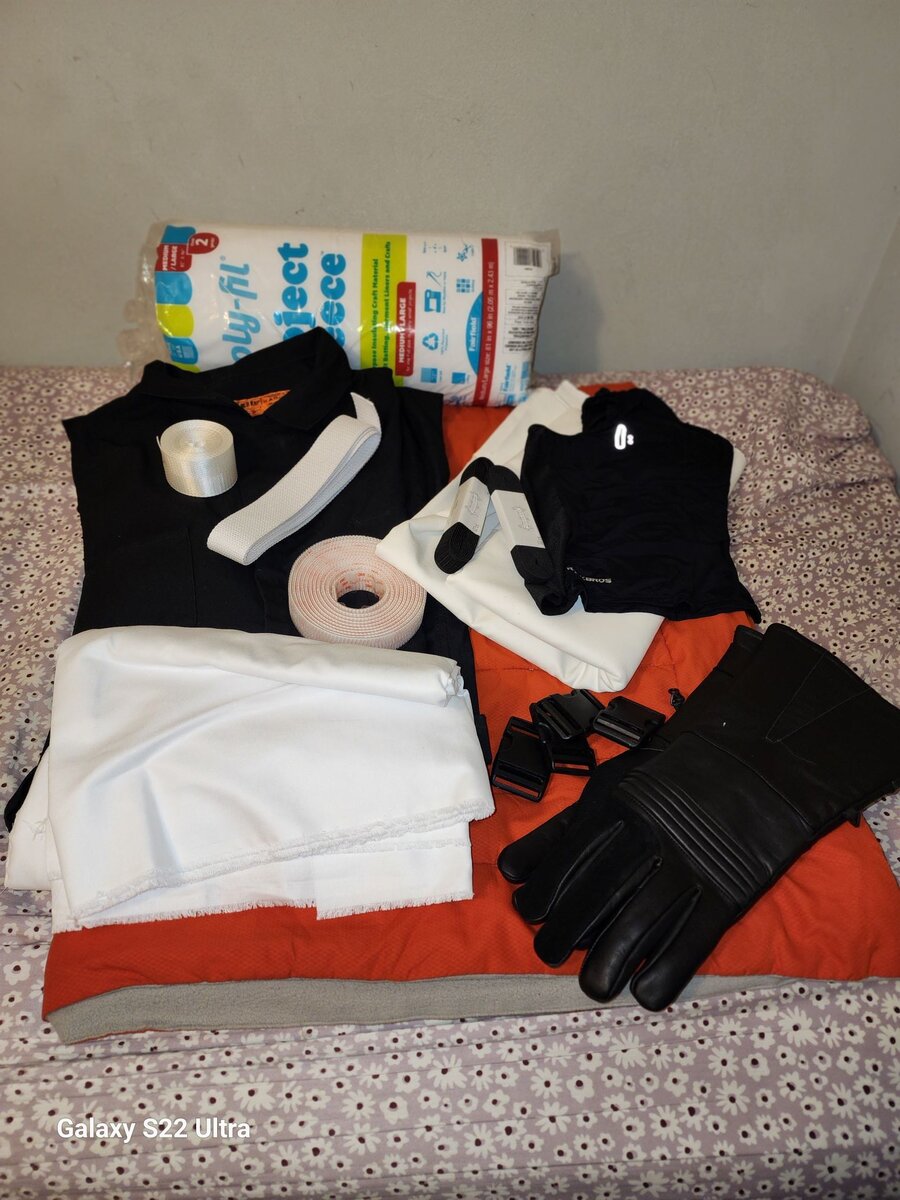
Gloves ✅ Black Coveralls ✅ Black Balaclava ✅ Strong Velcro ✅ 3yds White cotton fabric ✅ 1 roll batting ✅ 2yds white duck ✅ 1/2-, 1-, & 2-inch black elastic ✅ 3yds white cotton webbing ✅ 1 roll white nylon webbing ✅ 4, 1 1/2-inch black buckles ✅ WampaWear Gloves ✅
 2 points
 -
Hi Nes, Yes, those thigh patches, and thigh straps, are too low. they should end above your knee and the strap should be at the middle of your thigh.2 points
-
Sent from my iPhone using Tapatalk2 points
-
I bought a Jet Trooper file set from them. They're not well detailed and really not designed to turn into a costume. It could be done but with sooooo much work.2 points
-
I have a printed set of Galactic Armory Scout Trooper and I wouldn't use it for Approval. Maybe pieces of it. I have a Studio Creations kit I am building alongside two Galactic Armory prints and I am not even approved and I can already see problems with some of the pieces just from my casual reading of the CRL, particularly for Level 2 approval.2 points
-
Your second image looks good. In the first image the top end should be rounded a bit more. For both, take a bit of 400 grit sandpaper and wrap it around a pen tube and run it around the edges to smooth it out.1 point
-
The two different shades in your photo should not be an issue.1 point
-
I think I do. Let me look when I get home from work later.1 point
-
The bag would need to pass CRL requirements like any other( from what I have seen it's not bad). As for Grogu it's not part of the CRL so your GML would have the right to refuse.1 point
-
Ah I see... well again @Hask would be the expert here (especially on Hot Toys!), but if it's lacking a screen reference that's not something we would add to a CRL.1 point
-
Definitely keep us updated on this. Hopefully, it's a good product and good quality.1 point
-
So I'm down to some small pieces of soft goods. What is everyone using for the belt and belt boxes? All the CRL says is: The belt is ribbed and made from rubber or rubber-like material with no visible buckle or fastening mechanism. The belt contains 3 leather or leather-like pouches with hard plate and press stud on each flap. So, I'm not sure where to start. Any guidance would be appreciated. Sent from my SM-S938U using Tapatalk1 point
-
. Sent from my 21091116UC using Tapatalk1 point
-
Any chance this maker might be willing to make more?1 point
-
Uh... sounds like a good opportunity to visit the west coast of the states. I guess there will be a lot of you guys around! 😁1 point
-
Not Anaheim? Interesting...1 point
-
Sent from my iPhone using Tapatalk1 point
-
I was able to buy the DLT-19x files from surfinbird132 on Cults before he mysteriously took them all down a few days ago. Posting my build progress here. So far I've got all the pieces printed out and did some 120, 220, and 320g sanding. Next step will be to glue all the pieces together with the dowel and pipe then bondo.1 point
-
Looks great so far. I'm planning to start my build this summer. So far I've sourced the ammo pouches and the shoes. I've got a helmet already but it'll probably need to be repainted. I'm learning a lot reading through your thread. Thanks for posting! Sent from my SM-S928U1 using Tapatalk1 point
-
Dry fit. Bag on the wrong side and my boxes need adjusting. Not too bad. Sent from my iPhone using Tapatalk1 point
-
The side armor and ammo boxes are all painted, not in picture. Left with the largest armor to work with. The AB armor look kinda tricky. Not sure if I need extension by the sides or by extending the back plate. Will figure it out. Sent from my iPhone using Tapatalk1 point
-
1 point
-
If you used standard hardware store spray paints, then that weathering is not coming off. Acetone and other chemical based paint removers will take it off, but will also melt the armor. Don't do it. You can try wiping it with 90% iso alcohol, but that will depend on how heavy the weathering is. if your weathering is on the heavier side, your only other option is to wet sand the armor with 600+ grit sandpaper, prime and repaint the armor in white, and then once dried, start applying the mando scout weathering techniques.1 point
-
Hi everyone, this is a thread I've been wanting to post for a while now. There are plenty of great build threads on the Pathfinders Forums, but I thought it might be helpful to share some tips for keeping your scout costume together while trooping. Usually these are the sorts of things you discover after you've been walking around in your armor for a number of hours! I'm not a huge person, so, when I first started trooping I found that a lot of my armor parts would shift around throughout the day (particularly my belt, knees, biceps, and forearms). After my first few troops I started modifying my scout costume to try and make it as stable as possible. Anyhow, below are a few of the modifications I made to prevent parts from shifting awkwardly and falling off. All of the mods are non-visible once everything is attached and I was approved as a Lancer with everything I've shown below. Remember, this is by no means the only way to keep everything together, but hopefully it'll provide some good ideas for all you new scouts trooping away out there. Tank -- I wanted to make it look like I was using the 1/2" elastic strapping to keep the tank on, just as was done on screen, but I wanted to make it a bit more stable. My 1/2" elastic strapping attached to velcro on the inside. Also, for stability, I anchored 2" velcro strapping on the inside of the tank, and attached it to the back armor. Undersuit -- I sewed 2" hook velcro onto on the knee, bicep, and forearm positions of my undersuit and and placed loop velcro inside the armor parts. In order to find the proper positions to sew the velcro, I put my armor parts on and then marked where they were in chalk. This meant I wouldn't have any velcro sticking out awkwardly when the parts were anchored on. I know that some folks add stirrups to the bottom of their pant legs. I tried it, didn't like it, and ended up sewing boot blousers to the bottoms of the legs instead. Flak Vest -- I sewed 2" hook velcro on the front of the vest and loop velcro on the back of the cod. My vest is a little bit longer than most, but you could easily do this mod on your undersuit as well. The end of the 2" elastic coming off of the cod attaches to the back of the vest. The front of the cod has a large strip of hook velcro for anchoring the front of the belt. As I mentioned, my belt was constantly slipping down, so this keeps it in place. The corresponding loop veclro is mounted on the triangle portions on the inside front of the belt. Also note that my 2" webbing on the belt extends much further beyond the single rivet on the inside. I velcroed the webbing to the inside of my belt in order to take the load off of the rivet, which is a known stress point. The vest also has hook velcro to attach the bund just underneath the armpit level as well as two small pieces of velcro on the upper chest to hold the front armor in place. The velcro tab on the back of the bund attaches to the back of my belt and helps keep it from slipping down in the back. Pouches -- I added some velcro behind the pouch and on the bund to keep them from flopping around. Belt and Detonator -- I used velcro to affix the det to the back of the belt. Of all the mods I added, this is the one I'd probably do differently. The velcro makes it difficult to slide the det on the back of the belt and, although it's not going anywhere, it's also a pain to get on. Boot Holster -- Probably one of the most common issues is keeping your boot up when you've got a pistol in the holster. Try this -- before you rivet the holster onto your boot, sew an elastic boot blouser to the vinyl. This will help anchor it in position to your leg and prevent the dreaded boot droop! And that's it! Hopefully this will be helpful and useful for all you scouts out there. I realize some of this may be overkill, but you can take what you need, and leave the rest. Thanks and keep trooping! Chopper1 point
-
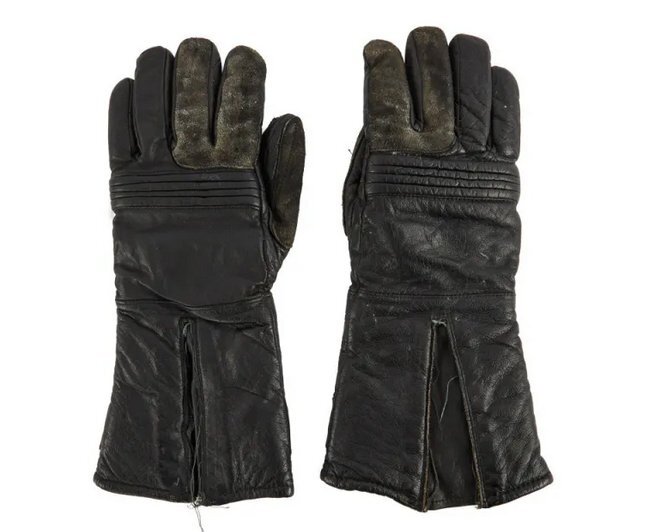
Here are some original screen used details of Retun of the Jedi Biker Scout Gloves. I found those Pictures at Julien`s Auctions.
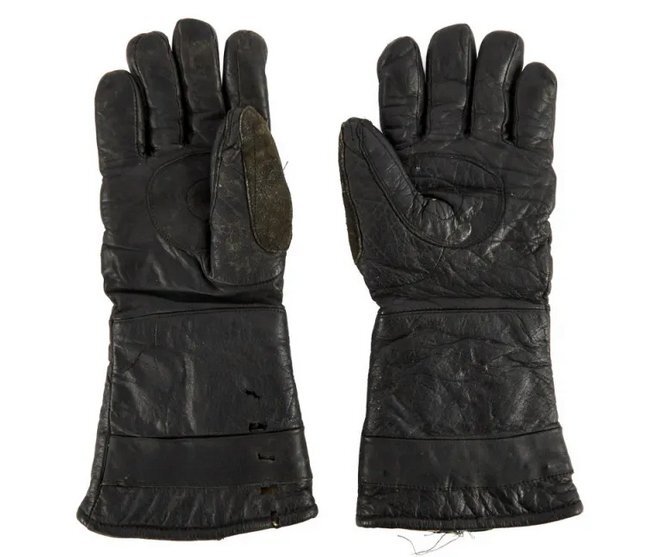 1 point
 -
You can tape a piece of paper inside the face plate, then trace the lens hole in pencil. Once it's flat, trace a second line that's 10mm wider. That'll give you a tracing pattern if you're cutting the lens shape out of a welding shield, or something similar. You can further trim the shape from there, as needed.1 point
-
Velcro is a life saver! Well done1 point