
-
Who's Online 6 Members, 0 Anonymous, 10 Guests (See full list)
-
Topics
-
-
Posts
-
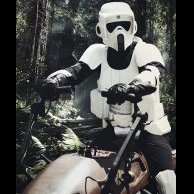
 This next section is purely OPTIONAL. I ridden motorcycles for many years and the inside of the helmets are usually medium/dark gray or black. Because of this I painted the inside of my ESB TK helmet BLACK as well. I know it's more work but I like the end results. To me it makes the helmets look more "military". With that said, the time to paint the inside is BEFORE it's all assembled. So the first step was to combine the top and rear helmet sections. I chose to use E-6000 because that was my go-to when building my TK. Strong, flexible and forgiving if you have to take anything apart. Rare earth magnets and some ratchet clamps held things together overnight. What next? Here's that part of the journey of masking, masking, and guess what? More masking. Followed by cleaning and double checking the masking - then painting. Remember when painting, best results are from prepping prepping and prepping. 👆🏿 I got myself some 1/8" wide masking tape to outline the shape of the snout. As one of the features our fans see first, having a smooth blacked out snout is important. I taped and removed the thin masking tape about 4 times before I was satisfied. This isn't an RS helmet so there are some imperfections along the snout "ridge", so just do your best that you can. Better to change your mind with masking than to remove paint later. I used Krylon Fusion Satin Black for Plastics spray paint. It's not as glossy in person as it does in pictures, so it should be good. 👆🏿 Got some old newspaper and wrapped the rest of the exposed areas to prevent any overspray. You will get some no matter what. I used some plastic polish and any overspray, pencil marks, scuffs, etc - all came right off with a little bit of elbox grease. Took some masking tape and visually found the center of the forehead and without peeling all three decals separately, I just peeled them back about halfway and lightly tapped them into place, stood back and checked for center/level. Removed them, recentered them (three times) and when I was happy, I simply rolled back the paper while pressing out any air bubbles and all three decals stuck in a straight line just like they were on the cut sheet. 👉 My next post will be assembly. I KNOW all fan made helmets are slightly wonky. They are not symetrical and nor were the ones used in the films. I have a Hasbro Black Series if I want to look at an idealized version of the Biker helmet. So take a breather and just find some peace to do your best, just get as close to the reference images as you can and you should be good to go. You have literally over 100 years of combined experience here on Pathfinders to give you a hand so don't worry. I am waiting for the E-6000 to dry on the face plate and visor at the time of this post and will share my assembly on the next post. Until then Toybiz out...🫡
 -
Hope we all were able to take a moment out of our day to Honor those who paid the ultimate sacrifice for our freedoms that we get to enjoy. Okay, with the extra time off, I wanted to post some progress on the bucket. Previously I asked about the Studio Creations "red line" for the lens opening and Chopper advised I can go higher. So I did. I also widened the opening ever so slightly so the shape of the lens opening was more of a goggle than being like an upside down Sonic the Hedgehog.🙃 (now that you know, can you "unsee it"?) 👇 Here's the "rough cut" up to the red line. 👇 Here the lens cuts has been sanded and smoothed out. Studio Creations face plate is fairly thick without any thin spots from stretching. So, I used a 180 grit sanding sponge with good results. I know it's difficult to see from this angle but the droop of the lens opening was kind of pointed, so was rounded a bit more as well. 👇 Now onto the "ears", I free handed the shape and compared it to the reference pics and went for it. The ABS in this area is paper thin, so it doesn't take much to cut through it. I just drilled a couple of starting holes and used a Lexan scissor to get the basic shape. Cleaned up some of the cuts with a small X-acto knife. I would highly advise limiting the use of power tools with the ears. Here are the initial "rough cuts" - followed by the sand and smooth by wrapping a plastic pen with 800 grit sandpaper to get the round shape on the corners. To keep things, separate, I'll post my next steps in the following post.
-
 thanks for the advice! I'll check out Mr. Paul Mark
 -
By BikerScout007 · Posted
If I remember correctly there should be a file for just one link that you would print as many times as needed and feed over a web strap to give them structure. Honestly I'd just buy some real straps from Mr. Paul -
Hi! I'm currently printing greaves for my shoretrooper, using Sean Field 3D files. I can't find the flexible, wide top strap anywhere in the file package. I've searched the forum and haven't found anyone reference this issue. Anyone have a link to a file for this part, or ideas on how to model one up from scratch? (I use solidworks, so this could be straightforward if I had the dimensions). thanks! Mark
-
-
Today's Birthdays


