


TKZombie
-
Posts
137 -
Joined
-
Last visited
-
Days Won
9
1 Follower
About TKZombie
Recent Profile Visitors
120 profile views


-
That's a really great design!!! Well done!
-
 Thanks Once dried nothing comes off. You can scratch it and it would but otherwise the only way to remove it is with 90% isopropyl alcohol. I’ve never sealed any of my weathering. It’s usually a month to fully cure.
 -
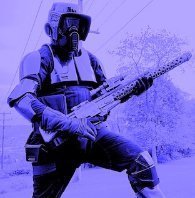
Finally got two actually troop in my Scout Trooper and I had a photo shoot done at Toronto Comic-Con 2022.
-
The approval: My trio of Pathfinder Costumes: Christina Costumes: ANH Stunt Stormtrooper, ANH Centurion Hero Stormtrooper, ANH Sandtrooper, ANH Tusken Raider (RL/501ST Approved), ESB Snowtrooper, ROTJ Pagetti Rook, ROTJ Scout Trooper, Mandalorian Scout Trooper, Shoretrooper Grunt Rogue One, ANH Luke Skywalker X-Wing Pilot, ESB Luke Skywalker Snowspeeder Pilot, ESB Hoth Luke Skywalker. WIP: Din Djarin Beskar Version Season 1 & 2, , ESB Bespin Luke Skywalker.
-
And happy to share the costume is approved. Now to see if Vanguard is achievable, the blaster is the thing in question. Hopefully only minor alterations are needed.
-
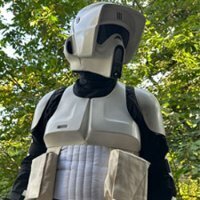
@BikerScout007 @Minimo @KOtrooper Here is the E-22. Let me know what you think would be needed to make this acceptable for Vanguard. I know the screws need to be replaced with hex head bolts, thats relatively easy. The scope os being replaced for the right version.
-
Thanks, no nothing needs to be sealed, they just need time to dry fully which can be 2-3 weeks or longer depending on humidity and temperatures.
-
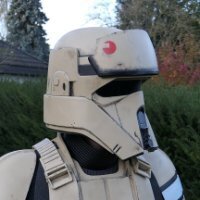
The red stripe is a plastic reflective film, Did the stunts not have anything there? That could be removed. The screws are all Robertson head and need to be replaced with hex head ones. The M plates I'm not sure of what you mean, I don't know what part that is. I think it's the plates on either side one under the flashlight part and the other on the opposite side, if that is mine doesn't match the reference photos, it has 3 extra blocks on the left side. The scope I know is wrong and I have replacement that is the correct scope and I'm currently painting it. I didn't print it, it was printed by and friend and he assembled and based painted it black it when he did it, so unfortunately there is too many print lines visible, which I guess won't be approvable. Trying to sand out those on an assembled piece is not something I want to attempt. I can post photos to see what you think but I don't think its close enough from the reference I reviewed.
-
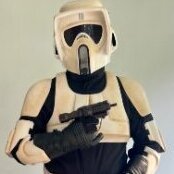
Thank you, that was the plan and I’d love to submit for Vanguard but my E22 doesn’t meet the standards. So unfortunately I won’t be submitting. Doubtful I’ll replace the E22 I have to meet the standards.
-
Yeah those shins are really the big weak spot in that kit. It wouldn't be that much to update for my accurate if he wanted to. I tried multiple times to make them work but its impossible to get the straps to line up at the back and front to be screen accurate.
-
Awwww thank you that’s really kind of you to say!
-
Sorry, I've been too busy to update here, so here is a bulk update... Trial fitting of the painted armour (pre-weathering) from the waist up. Onto the weathering, the fun part! All masking (liquid latex) was applied on the base brown paint then painted with the final colours. Masking was them removed and some additional wear added with sandpaper, files, and a Dremel. Here's an example of artists oil paint weathering. Raw Umber is applied all over with a cheap chip brush. (PRO-TIP: The Montana gold paint can sometimes go on with a bit of a dusty finish, or semi rough texture once its dried, usually from spraying too far from the surface. In thiose cases I wet sanded the dried paint with 1000 grit to get rid of that texture, if you don't the oil paint weathering method will not work as it will collect in the rough texture. I learned that from experience) Then the bulk of the oil paint is wiped off with paper towel (Wear latex gloves though this whole process) Leaving more wear dirt naturally collects which is in creases and also make note of gravity dirt/grime collects along bottom edges not on the top. You have a long working time with oil paint to perfect it. Then I drybrush/stipple in weathering to build up some layers. From there I let is dry for 2-3 days and add some additional layers of Brunt Umber and Black oil paints to create further depth and variety. Different colours need somewhat different applications. The red being a different type of paint took the oil paint differently. Before and After, you can see I'm always referencing screen photos as a work, from building the armour to weathering. The shins, the nemesis of this costume, The Imperial Surplus ABS shins simply don't cut it, they are by far the weakest link in that kit. I'd personally would have preferred ABS but their inaccuracies were just too far off for me. So I bought MPSB files and printed the shins, the shins are PLA and the cover parts and knee plates are all resin printed. I did have photos assembling them and painting these but seem to have deleted them. But here are the finished shins pre weathering. Weathering, I found juice cartons worked perfectly for supporting the shins, filled with water they created a stable base to work on for painting and weathering. (sorry for the lighting, I have amber tinted lights in my dining room so they aren't great to photograph at night.) Once they were done they had to dry which is about a 2 week process. I'll suit up with everything for the first time once they are done but till then here is everything. The pants and shirt were both weathered with oil paints as well, just very light layers of dry brushing building layers gradually. And flash forward 2 weeks... Here is the finished Shoretrooper Grunt. Son of a !!!!! I just saw the back of the armour skirt had popped out and was hanging below the belt. Suiting up alone and taking photos is hard!!! Oh well... I'm very happy how this all turned out but it was by far the hardest build I've done and nearly broke me a few times. There's no quick assembly here, to do things right takes time, a lot of time! It's a lot to assemble then there is multiple layers of paint, chipping, distressing, and weathering to deal with. I'd say if this is your first costume build it's not going to be easy. This is my 15th costume so I have a lot of experience and I struggled. Its not very comfortable and I was surprised how limited mobility is in it. And now the fun photos with the submission ones out of the way.
-
Actually I didn't do any weathering on it, it came like that. But if your's is too new looking a tea dye would help and some light drybrushing to weather the edges, as well as some sanding on the edges.
-
I use artists oil paints not acrylics. Once dried, which takes several weeks it’s basically on there for good, it can be scratched as any paint can. But if Ty want to clean it off 99% isopropyl alcohol will take it off. On the fabric I use oil paints as well but very, very lightly dry brushing.
-
Mikerscout Scout(Mandalorian) Lancer approved
TKZombie replied to MikerScout's topic in Scout Trooper: "The Mandalorian" WIP
Great solution, I use 99% isopropyl alcohol and it wipes it away clean no matter how long it’s been on.

